background image

Before Using

9

8

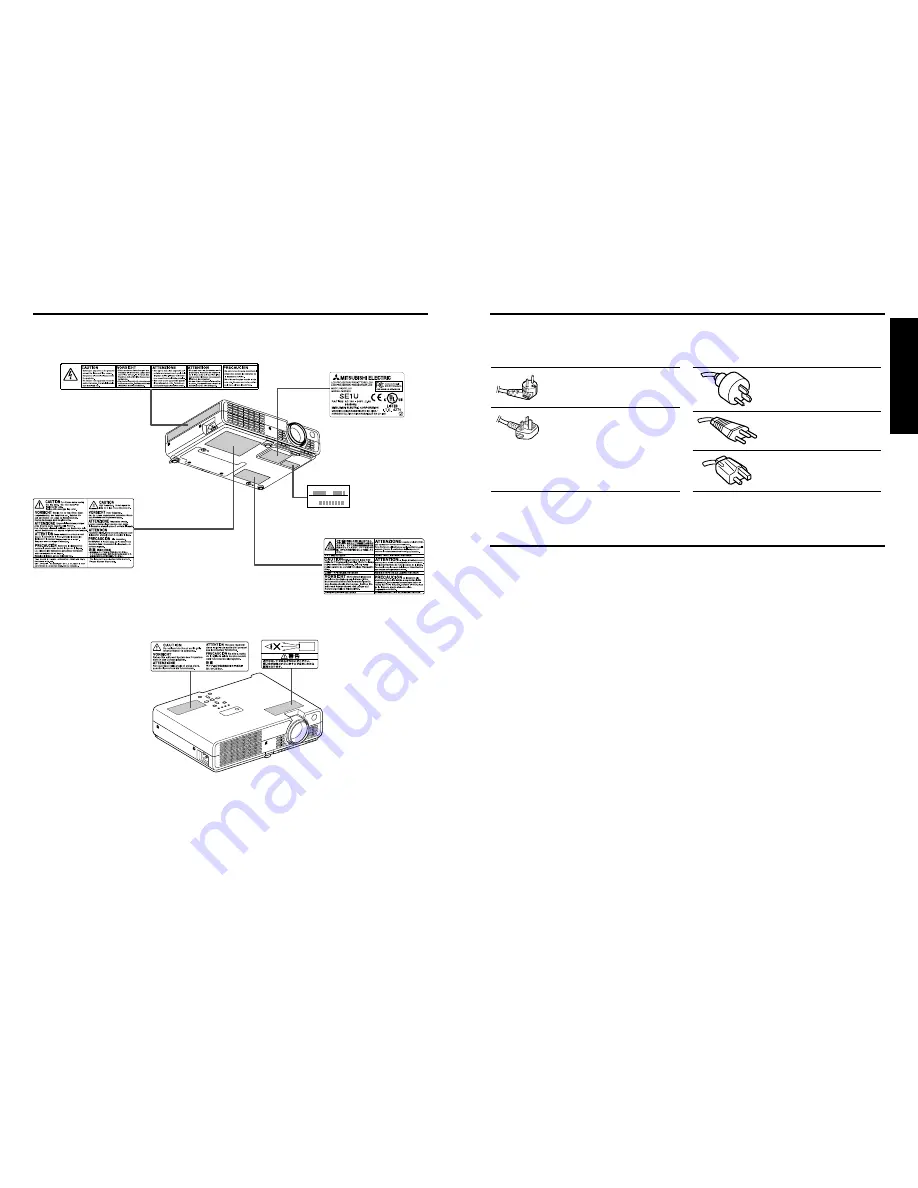
If your line voltage is 220 to 240V, use one of the following types of cable.

Plug
configuration Plug type

Australian
240V
10A

North American
240V
15A

Switzerland
240V
6A

Line voltage

EURO

UK

220 – 240V

220 – 240V

200 – 240V

200 – 240V

200 – 240V

Plug
configuration

Plug type

Line voltage

Use a 5A fuse which is approved by ASTA 
or BSI to BSI362.
Always replace the fuse cover after 
changing the fuse.

IMPORTANT PRECAUTIONS

Moisture Condensation

Never operate this unit immediately after moving it from a cold location to a warm location.
When the unit is exposed to such a change in temperature, moisture may condense on
the crucial internal parts. To prevent the unit from possible damage, do not use the unit for
at least 2 hours when there is an extreme or sudden change in temperature.

Place and Manner of Installation

Do not place in hot locations, such as near heating equipment.  Doing so could cause
malfunction, and shorten the life of the LCD panel.

Avoid locations with oil or cigarette smoke.  Doing so will dirty the LCD panel and other
optical parts, shortening their lives, and darkening the screen.

Using this instrument near a TV or radio may cause intereference to the images or audio
sound. If this happens, move it away from the TV or radio.

Moving the projector from a low-temperature room to a high-temperature room may
cause condensation on the lens or internal parts in the instrument. If you continue to use
it in that situation, the malfunction may result. Ensure to wait until the condensation
naturally disappears.

In a high altitude location where air is thin, cooling efficiency of the scanner is reduced so
use it with the ambient temperature being lowered.

POWER SUPPLY CORD SELECTION

LABEL LOCATIONS

MANUFACTURED;

SERIAL NO.

WARNING Label

CAUTION Label

MODEL NO. /

RATING Label

SERIAL NO. Label

CAUTION Label

CAUTION Label

CAUTION Label

E166452

Summary of Contents for SE1

Page 1: ...Others Maintenance Operations Preparations Before Using LCD PROJECTOR MODEL SE1U User Manual SE1 ...

Page 2: ...T OPEN CAUTION TO REDUCE THE RISK OF ELECTRIC SHOCK DO NOT REMOVE COVER OR BACK NO USER SERVICEABLE PARTS INSIDE REFER SERVICING TO QUALIFIED SERVICE PERSONNEL CAUTION The lightning flash with arrowhead symbol within an equilateral triangle is intended to alert the user to the presence of uninsulated dangerous voltage within the product s enclosure that may be of sufficient magnitude to constitute...

Page 3: ... in a safe operating condition WARNING Unplug immediately if there is something wrong with your projector Do not operate if smoke strange noise or odor comes out of your projector It may cause fire or electric shock In this case unplug immediately and contact your dealer Never remove the cabinet This projector contains high voltage circuitry An inadvertent contact may result in an electric shock E...

Page 4: ... Do not use rechargeable batteries If the solution of batteries comes in contact with your skin or clothes rinse with water If the solution comes in contact with your eyes rinse them with water and then consult your doctor IMPORTANT SAFEGUARDS Continued Place of installation For safety s sake do not use the projector at any place subjected to high temperature and high humidity Please maintain an o...

Page 5: ...not place in hot locations such as near heating equipment Doing so could cause malfunction and shorten the life of the LCD panel Avoid locations with oil or cigarette smoke Doing so will dirty the LCD panel and other optical parts shortening their lives and darkening the screen Using this instrument near a TV or radio may cause intereference to the images or audio sound If this happens move it awa...

Page 6: ...tosh is a registered trademark of Apple Computer Inc Windows is a registered trademark of Microsoft Corporation in the U S and other countries Adobe is a registered trademark and Acrobat Reader is a trademark of Adobe Systems Incorporated Notational Conventions Used in This Manual References to pages with related information are annotated as follows For example if making a reference to page 24 p 2...

Page 7: ...ons Checking the package contents 14 Names of each part on the main unit 15 Names of each part on the control panel and remote control 16 Preparing and using the remote control 17 Placement 18 Connection 19 Operations Turning the power on and off 20 Basic operations 22 Using handy features 24 Using auto positioning Auto Positioning 24 Correcting the keystone distortion Keystone 25 Zooming out the ...

Page 8: ...for operating the projector p 40 Note The shape and number of supplied power cords vary depending on the product destination The Supplied CD ROM The supplied CD ROM contains a user manual including information omitted in the User Manual Getting started and Acrobat Reader to view the manual Installing Acrobat Reader Windows Run the CD ROM select the Reader English folder and run ar500enu exe Follow...

Page 9: ...onditions could impede the operation of the remote control If this happens point the remote control at the main unit again and repeat the operation Preparing and using the remote control Names of each part on the control panel and remote control Control panel FAN TEMP LAMP POWER VOL VOL 1 2 3 4 5 6 7 8 9 10 ON STANDBY SOURCE MENU ENTER AUTO POSITION KEYSTONE ZOOM ZOOM 1 2 3 4 5 6 12 13 14 1 1 15 R...

Page 10: ...etting menu p 30 in accordance with your needs Placement Floor mounted front projection AC IN Floor mounted rear projection 90 Screen Size Width Projection Distance a Screen Size Height H Projection Distance and Screen Size Use the figures and table below to determine the screen size and projection distance Screen sizes are approximate values for full size picture with no keystone adjustment a is ...

Page 11: ...re that the lamp is off Keeping the lamp off is also very effective at saving electricity If the air filter becomes dirty and clogged the projector s internal temperature will rise shortening the lifetime of the LCD panel and causing malfunctions Clean the air filter from time to time p 32 and replace it periodically Contact the store where you purchased your projector or your local Service Statio...

Page 12: ...mages to be shown improperly If this happens turn off the computer s LCD display For information on how to turn off the LCD display see the owner s manual of your computer If a signal not supported by the projector is input the icon will appear If a no signal is being input from the connected device the icon will appear If an unavailable operation button is pressed the icon will appear 1 3 2 1 Tur...

Page 13: ...1 Press the AUTO POSITION button The Auto positioning menu appears 2 Press the AUTO POSITION button again The menu item is automatically adjusted positioned For computer input the icon will appear during processing Note Auto adjustment positioning may not be performed correctly for source signals other than those supported by the projector p 38 p 39 Manual adjustment and positioning The menu items...

Page 14: ...otected by the copyright laws Remote Control 1 2 4 3 Using handy features Continued Cutting off the picture and sound temporarily Mute When you want to project the images of another projector overhead projector etc temporarily this projector s images and sound can be turned off Press the remote control s MUTE button The picture and sound are cut off The Mute function is released when pressing the ...

Page 15: ...the CALL button on the remote control once When the button is pressed once the Setting display menu appears Pressing it again displays information p 29 The table below shows what kind of information is displayed Press the button or press the CALL or EXPAND OFF button on the remote control to serve the same purpose again to dismiss the display Yes displayed No not displayed Item Description Compute...

Page 16: ...this menu to adjust image related items Items that can be adjusted are marked with Yes and those that cannot are marked with No Item Description Computer Y PB PR Video S video Contrast Lower Higher Yes Yes Yes Yes Brightness Darker Brighter Yes Yes Yes Yes Color Lighter Deeper No Yes Yes Yes Tint Note 1 Reddish Greenish No No Yes Yes Sharpness Softer Sharper No Yes Yes Yes R level Less red More re...

Page 17: ...get inside the projector Air filter cleaning Maintenance WARNING Request cleaning and maintenance of a ceiling mounted unit from your projector dealership Lens cleaning Clean the lens with a commercially available blower and or lens cleaner The lens is easily scratched so do not rub it with hard objects or strike it Main unit cleaning Clean the main unit after unplugging the AC power cord Wipe dir...

Page 18: ...e lifetime of the lamp has ended or the projector is malfunctioning Unplug the AC power cord and wait for a short while then turn the power back on If a lamp burns out replace it with a new one After approx one minute of abnormal display the projector returns to the standby state waiting for internal cool down Power went out during use Internal overheating or the outside temperature is too high Pl...

Page 19: ...ustments off p 30 Is the screen dirty Is the lamp nearing the end of its service life p 28 Are the remote control s batteries drained Are the batteries inserted into the remote control correctly p 17 Is the remote control being used within the effective range p 17 Are there any obstructions between the remote control and projector Are there any fluorescent or other bright lights shining at the pro...

Page 20: ... 720 x 400 640 x 480 800 x 600 832 x 624 1024 x 768 1152 x 864 1280 x 960 1280 x 1024 1400 x 1050 1600 x 1200 1792 x 1344 1856 x 1392 1920 x 1440 Note Signals whose resolution exceeds the LCD panel s number of pixels p 37 will be compressed For this reason some information may be lost or image quality may be affected List of supported signals Y PB PR signals Signal format fh kHz fv Hz 480i 525i 60...

Page 21: ...ation 3 Data format For input commands only ASCII compliant all uppercase alphanumeric characters supported 4 Replies Acknowledge ACK 06h CR 0Dh Data Normally ended ACK 06h ESC 1Bh Aborted No acknowledge NAK 15h If commands are to be sent consecutively wait for the response from the projector before sending the next command Main Commands Note Contact your dealer for control cable and other command...

Page 22: ......

Reviews: