background image

MODELS: WT-46809 / WS-55809 / WS-55819 / WS-65809 / WS-65819

Page 3

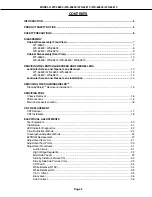
INTRODUCTION ................................................................................................................................ 5

PRODUCT SAFETY NOTICE ............................................................................................................. 5

SAFETY PRECAUTIONS ................................................................................................................... 6

DISASSEMBLY

Cabinet Disassembly (Front View) ..............................................................................................

7

WT-46809 .............................................................................................................................. 7
WS-55809 / WS-65809 .......................................................................................................... 8
WS-55819 / WS-65819 .......................................................................................................... 9

Cabinet Disassembly (Rear View) .............................................................................................

10

WT-46809 ............................................................................................................................ 10
WS-55809 / WS-55819 / WS-65809 / WS-65819 ................................................................. 11

SERVICING THE LENTICULAR SCREEN AND FRESNEL LENS

Lenticular Screen and Fresnel Lens Remova

l ......................................................................... 12

WT-46809 / WS-55809 / WS-65809 ..................................................................................... 12
WS-55819 / WS-65819 ........................................................................................................ 13

Lenticular Screen and Fresnel Lens Installation ....................................................................

14

SERVICING THE DIAMONDSHIELDS

TM 

r

DiamondShield 

TM

 Removal & Installation ...................................................................................... 15

SERVICING PCBs

Chassis Removal .......................................................................................................................... 16
PCB Locations .............................................................................................................................. 16
Main Components Location ........................................................................................................... 16

CRT REPLACEMENT

CRT Removal ................................................................................................................................ 17
CRT Installation ............................................................................................................................ 18

ELECTRICAL ADJUSTMENTS

Test Equipment ............................................................................................................................. 20
Initial Setup ................................................................................................................................... 21
LED Indicator Diagnostics ............................................................................................................. 22
Circuit Adjustment Mode ............................................................................................................... 22
Convergence Adjustment Mode ..................................................................................................... 24
E2PROM Replacement ................................................................................................................. 27
Adjustment Items List ................................................................................................................... 27
Adjustment Test Points ................................................................................................................. 30
Adjustment Procedures ................................................................................................................ 31

Audio Circuit ........................................................................................................................ 31
High Voltage Regulation ....................................................................................................... 32
Main/Sub Y Level ................................................................................................................. 32
Side by Side Sub Picture Tint .............................................................................................. 33
Side by Side Sub Picture Color ............................................................................................ 33
CRT Cutoff ........................................................................................................................... 34
White Balance (NTSC) ......................................................................................................... 34
White Balance (HD) ............................................................................................................. 35
Cb, Cr Offset ........................................................................................................................ 35
Black Level .......................................................................................................................... 36
Sub Contrast ....................................................................................................................... 36

CONTENTS

Summary of Contents for WS-55809

Page 1: ...s input CRT Size 7 inches High Voltage 32 0kV at 0A Speaker WT 46809 WS 55809 WS 65809 5 round type full range 2 pcs 8Ω 10W WS 55819 WS 65819 WS 73907 6 round type full range 2 pcs 8Ω 10W Weight WT 46809 170 lbs WS 55809 250 lbs WS 55819 244 5 lbs WS 65809 323 lbs WS 65819 323 lbs Cabinet Model H x W x D Dimensions WT 46809 38 4 x42 8 x27 1 WS 55809 50 x50 6 x26 3 WS 55819 50 4 x50 6 x26 4 WS 6580...

Page 2: ......

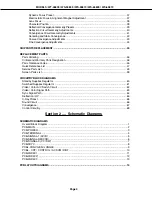
Page 3: ...n 14 SERVICING THE DIAMONDSHIELDSTM r DiamondShield TM Removal Installation 15 SERVICING PCBs Chassis Removal 16 PCB Locations 16 Main Components Location 16 CRT REPLACEMENT CRTRemoval 17 CRT Installation 18 ELECTRICAL ADJUSTMENTS Test Equipment 20 Initial Setup 21 LED Indicator Diagnostics 22 Circuit Adjustment Mode 22 Convergence Adjustment Mode 24 E2PROM Replacement 27 Adjustment Items List 27 ...

Page 4: ...Warranty Parts Designation 46 Parts Tolerance Codes 46 Quick Reference List 47 Service Parts List 48 Screen Parts List 58 CIRCUITRY BLOCK DIAGRAMS Standby Supplies Regulator 60 Switched Supplies Regulator 61 Video Color A V Switch Circuit 62 Video Color Signal Path 63 Sync Signal Path 64 Deflection HV 65 X Ray Protect 65 Sound Circuit 66 Convergence 67 Control Circuitry 68 Section 2 Schematic Diag...

Page 5: ...1 Cabinet and screen parts 2 Electrical parts Schematic and block diagrams of the above listed models are included in this service manual for better under standing of the circuitry PCB drawings are also included for easy location of parts and test points PRODUCT SAFETY NOTICE Many electrical and mechanical parts in television receivers have special safety related characteristics These characterist...

Page 6: ...regard to X Radiation High voltage must be set as prescribed under the section titled Electrical Adjustments Leakage current check Before returning the receiver to the customer it is recommended that leakage current be measured according to the following methods 1 Cold Check With the alternating current AC plug removed from the AC source place a jumper across the two AC plug prongs Connect one lea...

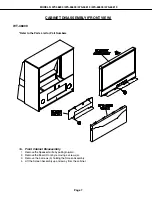
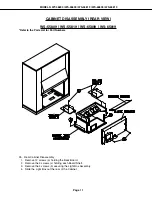
Page 7: ...VIEW WT 46809 Refer to the Parts List for Part Numbers 1a Front Cabinet Disassembly 1 Remove the Speaker Grille by pulling forward 2 Remove the Board Front by removing 4 screws a 3 Remove the 4 screws b holding the Screen Assembly 4 Lift the Screen Assembly up and away from the cabinet ...

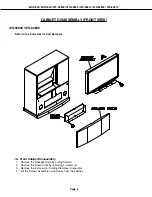
Page 8: ...IEW WS 55809 WS 65809 Refer to the Parts List for Part Numbers 1b Front Cabinet Disassembly 1 Remove the Speaker Grille by pulling forward 2 Remove the Board Front by removing 4 screws a 3 Remove the 5 screws b holding the Screen Assembly 4 Lift the Screen Assembly up and away from the cabinet ...

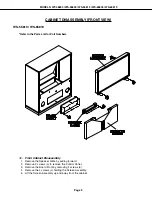
Page 9: ... to the Parts List for Part Numbers 1c Front Cabinet Disassembly 1 Remove the Speaker Grille by pulling forward 2 Remove 2 screws a to remove the Control Panel 3 Remove the Board Front by removing 4 screws b 4 Remove the 4 screws c holding the Screen Assembly 5 Lift the Screen Assembly up and away from the cabinet ...

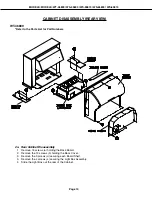
Page 10: ...r to the Parts List for Part Numbers 2a Rear Cabinet Disassembly 1 Remove 15 screws a holding the Back Board 2 Remove the 13 screws b holding the Back Cover 3 Remove the 3 screws d securing each Board Shelf 3 Remove the 4 screws c securing the Light Box Assembly 4 Slide the Light Box out the rear of the Cabinet ...

Page 11: ...09 WS 55819 WS 65809 WS 65819 Refer to the Parts List for Part Numbers 2b Rear Cabinet Disassembly 1 Remove 12 screws a holding the Back Board 2 Remove the 4 screws c holding each Board Shelf 3 Remove the 4 screws b securing the Light Box Assembly 4 Slide the Light Box out the rear of the Cabinet ...

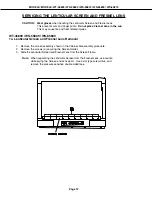
Page 12: ...and heat related injuries WT 46809 WS 55809 WS 65809 1a Lenticular Screen and Fresnel Lens Removal 1 Remove the screen assembly shown in the Cabinet Disassembly procedure 2 Remove the screws a securing the Screen Holder 3 Slide the Lenticular Screen and Fresnel Lens from the Screen Frame Note When separating the Lenticular Screen from the Fresnel Lens use caution while prying the Screen and Lens a...

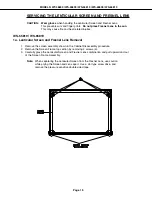
Page 13: ...819 WS 65819 1a Lenticular Screen and Fresnel Lens Removal 1 Remove the screen assembly shown in the Cabinet Disassembly procedure 2 Remove the Screen Frame top section by removing 4 screws a 3 Carefully grasp the Lenticular Screen and Fresnel Lens combination and pull upward and out of the Screen Frame Assembly Note When separating the Lenticular Screen from the Fresnel Lens use caution while pry...

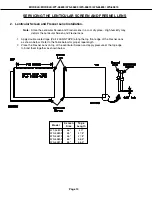
Page 14: ...dity may deform the Lenticular Screen and Fresnel Lens 1 Apply double coated tape Part LENS TAPE along the top front edge of the Fresnel Lens as shown below Refer to the Table below for proper tape length 2 Place the Fresnel Lens on top of the Lenticular Screen and apply pressure at the top edge to bond them together as shown below Model Screen Size Tape Length WT 46809 46 40 WS 55809 55 47 8 WS 5...

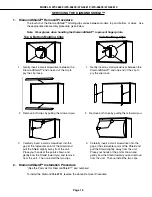
Page 15: ... pull the Shield slightly away from the unit Place your hands at the points shown and gently bow the Shield toward you and remove from the unit Then re install the two clips Top Bottom Molding Clips Side Molding Clips 1 Gently insert a small screwdriver between the DiamondShield and one end of the clip to pry the clip loose 2 Remove both clips by pulling them toward you 3 Carefully insert a small ...

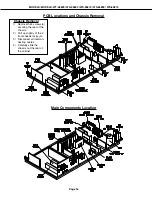
Page 16: ...cations and Chassis Removal Main Components Location Chassis Removal 1 Remove the 3 screws a securing the rear of the chassis 2 Pull up slightly of the 2 front chassis locks b 3 Disconnect all intercon necting cables 4 Carefully slide the chassis out the rear of the cabinet ...

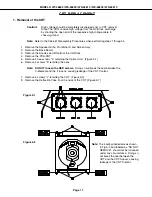
Page 17: ...ck Board 3 Remove the Anode Lead Wire from the CR Block 4 Remove the PCB CRT 5 Remove 4 hex screws a retaining the Optical Unit Figure 5 1 6 Remove 4 screws b retaining the Lens Note DO NOT loosen the RED screws Doing so will break the seal between the C Element and the 6 Lens causing leakage of the CRT Coolant 7 Remove 4 screws c retaining the CRT Figure 5 2 8 Remove the Deflection Yoke from the ...

Page 18: ...en them filled with ethylene glycol Care should be taken during handling and installation to prevent shock from disrupting the seal or alignment between the CRT and Inner Lens Figure 5 3 Note The CRT fixing screws should not be loosened nor should they be removed Figure 5 4 1 Carefully position the replacement CRT and fasten in place using 4 screws d Figure 5 6 Figure 5 6 Figure 5 5 Figure 5 4 Fig...

Page 19: ...the Label faces the direction shown in Figure 5 8 b Install the mounting screws Figure 5 1 4 Connect the PCB CRT 5 Insert the Optical Unit into the Light Box Assembly 6 Insert the Anode Lead Wire into the Flyback Transformer 7 Re clamp the Lead Wire in its original position Adjustment procedures after replacing the CRT s CRT Cut Off White Balance Adjustment Static Convergence Adjustment Dynamic Co...

Page 20: ...cope Unless otherwise specified use 10 1 probes Signal Generator both SD and HD capable Frequency Counter Direct Current Voltmeter Direct Current Power Supply Multiplex Audio Signal Generator Direct Current Ampere Meter 2 Test Signal A Monoscope Signal Note If you do not have a monoscope signal source connect the unit to a VCR and play a Monoscope alignment tape Part Number 859C568060 B Color Bar ...

Page 21: ...glish Channel 3 Video Mute On Memory Deleted Black Level Expansion On Clock Setting Auto Name N A Time Zone Eastern SQV N A Volume 30 Daylight Savings Applies Bass 50 Clock Time N A Timer Off Treble 50 Set Day N A Set Time 12 00PM Balance 50 Set Day Everyday Surround Off AV Network OFF Input ANT A Listen to Stereo External Audio System NO Channel 3 Level Sound Off AV Receiver at Input 1 None Audio...

Page 22: ...e Error Code Mode The LED flashes denoting a two digit Error Code or indicating no problem has occurred since the last Initialization Note The front panel buttons must used NOT those on the Remote Control The number of flashes indicates the value of the MSD tens digit of the Error Code The flashing then pauses for approximately 1 2 second The LED then flashes indicating the value of the LSD ones d...

Page 23: ...tton on a remote hand unit to select an adjustment function Each time the button is pressed the Function changes in the following sequence 2 Press the VIDEO button to select a specific Adjustment Item The Item number increases each time the VIDEO button is pressed C Changing Data After selecting an adjustment Item use the ADJUST UP DOWN button to change data Press ADJUST DOWN to decrease the data ...

Page 24: ...de is activated If the signal source is HD the HD mode is activated 3 Activating the HD mode when no HD signal is available Activate the Factory Option Menu MENU 0 1 7 0 Use the Adjust keys to select DTV Port and use the Enter key to change the setting from AUTO to 1080i Exit the Option Menu Press MENU twice Select the DTV Inputs as the signal source INPUT button Activate the Convergence Mode the ...

Page 25: ...alues controlling the Dynamic Beam Focus circuit drive signal 1 Use AUDIO button to select a Sub Function 2 Use the VIDEO button to select an Adjustment Item 3 Use the ADJUST buttons to change data F FINE CONV Press 4 Sub Functions This mode is used to perform Fine Raster Correction and Fine Red and Blue Convergence Adjustments There are three Sub Adjustment Functions selected with the AUDIO butto...

Page 26: ...Cursor is at coordi nates outside the screen area the Cursor will not be visible Use the ADJUST buttons to move the Cursor to an intersection on the screen Display The on screen display changes in the Fine mode as shown at the right The display shows the vertical and horizontal data for the current Cursor Position and the horizontal and vertical coordinates for that position G Saving Data and Exit...

Page 27: ... 15 15 15 White Balance 12 RDRL R Drive low 0 63 50 50 50 13 BDRL B Drive low 0 63 25 25 25 14 CTRL R Cutoff low 0 63 23 23 23 15 CTGL G Cutoff low 0 63 50 50 50 16 CTBL B Cutoff low 0 63 10 10 10 17 GMMA Gamma control 0 15 8 4 5 Preset 18 BRT Brightness control 0 63 31 31 31 User 19 COL Color Gain control 0 63 31 31 31 User 21 CONT Picture Gain control 0 63 42 42 42 Preset 52 VM VM level 0 3 2 2 ...

Page 28: ...DC Control 0 15 7 Preset 5 UPDS Sub U Pedestal DC Control 0 15 7 AUDIO Function IC3A01 Function Display Adjustment Data Initial Notes Item Abbrev Description Range Data 1 INP Input Level Alignment 0 15 8 Input Level 3 WDE Wideband Separator Align 0 31 3 Separation 4 SPC Spectral Separator Align 0 31 3 IRIS Function Function Display Adjustment Data Initial Notes Item Abbrev Description Range Data 1...

Page 29: ... X axis rotation 0 0 0 0 0 0 Geo Conv HSTA and VSTA must not exceed 200 CONV RED Items MENU 0 1 5 9 5 Item Abbrev Description Notes Number Name SD HD SD HD SD HD 0 HSTA Horizontal Position 40 40 40 40 0 0 Static Conv 1 HLIN Horiz Linearity 250 230 220 220 230 200 Coarse Conv 2 SKEW Skew Y axis rotation 0 0 0 0 0 0 Coarse Conv 3 HWID Width 80 80 10 30 20 20 Coarse Conv 4 HSBW Horiz Side Bow Correct...

Page 30: ... Adjustments Test Point Locations Test Points DT pins 3 6 HV Regulation Adjustment DT pins 7 8 Sub Contrast JA pins 6 8 Audio Adjustments EA pin 1 15 Main Sub Y Level EB pin 5 Side by Side Sub Color TP6R Red CRT Cutoff TP6G Green CRT Cutoff TP6B Blue CRT Cutoff ...

Page 31: ...firm that the left audio level at pin 6 of the JA connector is 1 56 Vp p 0 06V Note Adjustment 2 Stereo Separation must be performed after this adjustment Audio Circuit 1 MCS Input Level Oscilloscope Conector JA pin 8 10mV Div RF Stereo RF Input Audio Circuit 2 Separation Check stereo separation Poor stereo separation Note This adjustment must follow Adjustment 1 Input Level 1 Supply a RF Stereo S...

Page 32: ...E2RESET or Convergence E2RESET are activated HV Circuit 3 HV Regulation Oscilloscope EA connector pins 15 1 Color Bars Video Input Video Circuit 4 Main Sub Y Level To set picture luminance Excess or insufficient brightness 1 Supply a color bar signal to a Video Input not an RF input 2 Select the color bar signal for both the main and sub pictures 3 Connect the oscilloscope to connector EA pin 15 4...

Page 33: ...4 VPDS and 5 UPDS 5 Side by Side Sub Picture Tint To set the sub picture color level Main and sub pictures color levels differs Video Circuit 6 Side by Side Sub Color Oscilloscope EB connector pin 5 200mV div 20usec div Color Bars Video Input Note Let the set run for at least one minute before making this adjustment 1 Supply a color bar signal 2 Select the color bar signal as the source for both t...

Page 34: ...7 GDR 50 8 BDRH 42 9 CTRH 15 10 CTGH 50 11 CTBH 15 18 BRT 31 19 COL 0 DC Voltmeter NTSC White Raster RF or Video CRT Circuit 8 White Balance NTSC To set the CRTs white level in the NTSC mode Monochrome has a color tint Note Use the Expand mode full screen 1 Supply a full White Raster Signal 2 Activate the Service Mode Video Chroma function 3 Set the data for Item 19 COL to 0 4 Adjust Items 6 RDRH ...

Page 35: ... 8 Set the data for Item 19 COL back to 31 White Raster HD NTSC Video DTV Inputs CRT Circuit 10 Cb Cr Offset To set Cb and Cr color signal level Incorrect colors NTSC Mode 1 Supply an NTSC White Raster 25 luminance signal to a Video Input 2 Activate the Adjust Mode Video Chroma Function 3 Set Item 19 COL data to 63 4 Adjust Items 56 CRO1 and 57 CBO1 for optimum white 5 Set Item 19 COL data to 31 6...

Page 36: ... 60 70 80 90 GRADATION SCALE DC ma meter DT connector pins 7 8 Grayscale RF Input To set overall beam current to its optimum level Excess or insufficient contrast Note Activate the Expand mode full screen 1 Supply a Grayscale signal to a RF Input 2 Activate the Adjust Mode Video Chroma Function 3 Select Item 1 SCT signal level automatically reduces 4 Connect a 3ma DC meter between DT connector pin...

Page 37: ...t Adjustment WS 55819 and WS 65819 Only This adjustment must be performed before Static Focus Adjustment 1 Supply a Crosshatch with Center Dot signal to a Video Input 2 Select a Green raster using the table below 3 Roughly adjust Green Focus VR 4 Rotate Green Focus VR CCW so the center dot is about 10mm diameter 5 Adjust the Green 4 Pole Magnet for the roundest center dot 6 Set the Green Focus VR ...

Page 38: ... focus at the center of the Monoscope pattern Note Attach a white paper to the screen center During adjustment observe the picture on the screen from inside for easier adjustment 4 Repeat Steps 2 and 3 for the Red and Blue monochrome pictures Video Circuit 15 Lens Focus To set the Lens position for optimum focus Video Signal Video Input On Screen Display 16 Character Position To position the chara...

Page 39: ...U 0 1 7 0 2 Set DTV Port to 1080i 3 MENU twice 4 INPUT select DTV Inputs 5 MENU 0 1 5 9 After adjusting set the DTV Port to AUTO DEFL JUNGLE MENU 8 2 5 7 Item Abbrev NTSC HD 1 HWID 29 33 2 HKEY 31 40 3 EWPT 31 31 5 EWPB 39 40 7 VHGT 38 24 8 VLIN 9 9 9 VSCN 0 0 20 VPOS 0 31 Data CONV GREEN MENU 0 1 5 9 Item Abbrev SD HD SD HD SD HD 0 HSTA 0 0 0 0 0 0 1 SPCC 0 0 0 0 0 0 2 HWID 0 0 0 0 0 0 3 SKEW 0 0...

Page 40: ...e signal source Input button 3 Activate the Adjustment Mode Defl Jungle Function 4 Select and adjust each of the following items 7 VHGT so the vertical marker sum 4 1 HWD so the horizontal marker sum 7 5 Save data and Exit the Service Mode HD Mode 1 Supply an HD Monoscope signal to the DTV HD Inputs 2 Select the DTV Inputs as the signal source Input button 3 Activate the Service Mode Defl Jungle F...

Page 41: ...a Cursor is displayed on the crosshatch 5 Use the Cursor to adjust for straight crosshatch lines 6 Exit the Convergence Mode HD mode 1 Supply horizontal and vertical HD sync to the DTV Inputs Note If an HD signal is not available use the Conv HD With No Signal procedure 2 Select the DTV Inputs as the signal source Input button 3 Enter the Convergence Mode Coarse Green 4 Repeat NTSC Steps 3 through...

Page 42: ... use the Red Centering Magnet to converge red on the green at the center of screen Correct any red tilt with the Red Deflection Yoke 7 In the Coarse Blue mode repeat Step 6 using the Blue Centering magnet and the Blue Deflection Yoke 8 Exit the Convergence mode SD mode 1 Supply an NTSC Monoscope signal to a Video Input 2 Select the Monoscope as the signal source Input button 3 Enter the Convergenc...

Page 43: ... the green Note If center convergence shifts use red and blue Items 0 HSTA and 5 VSTA to correct the shift 6 Exit the Convergence Mode HD mode 1 Supply an HD signal sync only to the DTV inputs and use the Input button to select the DTV inputs as the source If no HD signal is available use the Conv HD with No Signal procedure 2 Repeat SD Steps 2 through 5 in the HD mode 3 Exit the Convergence mode ...

Page 44: ...verge blue on the green 6 Exit the Convergence mode HD Fine Adjustment 1 Supply an HD signal sync only to the DTV inputs and select DTV with the Audio button If no HD signal is available use the Conv HD No Signal Procedure 2 Repeat SD Steps 2 through 7 in the HD mode Convergence Circuit 23 Fine Convergence NTSC None HD HD sync Video DTV Inputs CONV HD WITH NO SIGNAL 1 MENU 0 1 7 0 2 Set DTV Port t...

Page 45: ... 3 three seconds to new chip parts 5 Avoid using a rubbing stroke when soldering 6 Take care not to scratch or damage the chip parts when soldering 7 Supplementary cementing is not required Chip Parts Removal Resistors Capacitors etc 1 Grasp the part with tweezers Melt the solder at both sides alternately and remove one side of the part with a twisting motion 2 Melt the solder at the other side an...

Page 46: ...t Critical and Warranty Parts Designation Critical Electrical Components are indicated by Bold Type in the Parts List and in the schematic diagrams by shading Warranty Return Parts are indicated in the Parts List with an Parts Tolerance Codes Refer to the following chart for tolerance characteristics of electrical components MARK B C D F G J K Tolerance 0 1 0 25 0 5 1 2 5 10 MARK M N V X Z P Q Tol...

Page 47: ...S 55819 WS 65819 330P276020 DEFL YOKE WT 46809 WS 55809 WS 55819 330P276010 DEFL YOKE WS 65809 WS 65819 453B035010 CAP ANODE RED 453B035020 CAP ANODE B G MODEL ASSY CRT RED ASSY CRT GREEN ASSY CRT BLUE WT 46809 251C212070 251C212080 251C212090 WS 55809 251C212010 251C212020 251C212030 WS 55819 251C212010 251C212020 251C212030 WS 65809 251C212040 251C212050 251C212060 WS 65819 251C212040 251C212050...

Page 48: ...C08 270P706020 IC MAX823REUK IC7C09 270P575020 IC NJM78M05DLA TEI IC7C10 275P419010 IC C MOS SN74AHCT1G126DBV IC7D00 275P451010 IC C MOS TC74HC4066AFN ELP IC7D01 275P560010 IC ADS931E A2D CONVERTER IC7D02 275P560010 IC ADS931E A2D CONVERTER IC7D03 275P560010 IC ADS931E A2D CONVERTER IC7D10 275P535010 IC C MOS TC74AC157FN ELP IC7D11 275P535010 IC C MOS TC74AC157FN ELP IC7E00 275P451010 IC C MOS TC7...

Page 49: ... TR PHP21N06T Q9A50 260P416030 TR 2SC2274 F K F Q9A51 260P559030 TR 2SC1740S S Q9A53 260P559030 TR 2SC1740S S Q9A54 260P559030 TR 2SC1740S S DIODES D2J08 264P484040 DIODE RD5 6FB3 D2J09 264P484040 DIODE RD5 6FB3 D2V44 264P828010 D CHIP DAN202U MA142WK D2W01 264P828010 D CHIP DAN202U MA142WK D2W02 264P828010 D CHIP DAN202U MA142WK D2W03 264P501040 DIODE HZ3ALL D4B01 264D056020 DIODE S5500D EM1Z ERB...

Page 50: ...B272S L2W05 409P923060 EMI F CHIP BLM21B272S L2W76 409P923060 EMI F CHIP BLM21B272S L2W79 409P923060 EMI F CHIP BLM21B272S L2X01 409P923060 EMI F CHIP BLM21B272S L2X04 409P923060 EMI F CHIP BLM21B272S L2Y01 409P923060 EMI F CHIP BLM21B272S L2Y03 409P923060 EMI F CHIP BLM21B272S L2Y04 409P923060 EMI F CHIP BLM21B272S L2Y06 409P923060 EMI F CHIP BLM21B272S L2Y07 409P923060 EMI F CHIP BLM21B272S L4A0...

Page 51: ...351P203010 LINE FILTER SS35V 45022 L9D01 351P203010 LINE FILTER SS35V 45022 LC7D02 409P875090 EMI F CHIP ELKE103FA LC7D05 409P875090 EMI F CHIP ELKE103FA LC7D10 409P876020 EMI F CHIP CNF20C470S CKD510JB1H470S LC7D11 409P876020 EMI F CHIP CNF20C470S CKD510JB1H470S LC7D12 409P876020 EMI F CHIP CNF20C470S CKD510JB1H470S LC7D13 409P876020 EMI F CHIP CNF20C470S CKD510JB1H470S LC7D14 409P876020 EMI F CH...

Page 52: ...0 1 16W270K J 103P505040 1 16W 1 6K F 103P493000 1 16W330K J 103P505050 1 10W 1 8K J 103P402080 1 16W390K J 103P505060 1 16W 1 8K J 103P502080 1 16W470K J 103P505070 1 16W 2K F 103P493020 1 16W560K J 103P505080 1 10W 2 2K J 103P402090 1 16W680K J 103P505090 1 16W 2 2K F 103P493030 1 16W820K J 103P506000 1 16W 2 2K J 103P502090 1 16W3 3M J 103P506070 Common Resistors By Ref Ref Part No Description ...

Page 53: ... R METAL 1W470 J R5H48 103P712060 R CARBON 1 4W 1 2K J R5H49 103P714070 R CARBON 1 4W 68K J R5H50 103P714070 R CARBON 1 4W 68K J R5H51 103P712060 R CARBON 1 4W 1 2K J R5H53 103P713080 R CARBON 1 4W 12K J R5H59 103C191070 R METAL 3W220 J R5H60 103C178080 R METAL 1W 4 7 J R5H84 103P713050 R CARBON 1 4W 6 8K J R5K09 103P762020 R FUSE 1 2W 560 J R5K10 103P711010 R CARBON 1 4W 68 J R5K12 103P760060 R F...

Page 54: ...2W22 J R9A69 103C180050 R METAL 2W22 J R9A75 103P714090 R CARBON 1 4W 100K J R9A77 103P714090 R CARBON 1 4W 100K J R9A78 103P711030 R CARBON 1 4W 100 J R9A79 103P711030 R CARBON 1 4W 100 J R9A80 103C193060 R METAL 3W 8 2K J R9A83 103P463090 R METAL 1 4W 3 9K F R9C01 103C177020 R METAL IW 0 22 J R9C10 103C170020 R METAL 1W12 J R9D00 109D036020 R COMPOSITION 1 2W 4 7M K CAPACITORSANDTRIMMERS CHIP Ty...

Page 55: ... PP 200V0 01M K C5H20 181P352040 C ELEC 16V100M M C5H22 155P112090 C CER 500V 56P J C5H24 181P192060 C ELEC 200V22M M C5K03 181P352040 C ELEC 16V100M M C5K12 181P352040 C ELEC 16V100M M C5K14 181P352030 C ELEC 16V47M M C6B02 181P195040 C ELEC 350V4 7M M Q C6B04 181P352030 C ELEC 16V47M M C6B23 181P352030 C ELEC 16V47M M C6G02 181P195040 C ELEC 350V4 7M M Q C6G04 181P352030 C ELEC 16V47M M C6G23 18...

Page 56: ...Y COOLANT PS 94V 0 622C065010 CLIP MIRROR 5 622C076010 BRACKET SVM 642C340010 BOARD MIRROR 3 4 642C352010 CLIP MIRROR 1 2 669D514070 SCREW MIRRORBOARD 3 4 750A356010 COVER BACK 46 5 762B345020 BACK BOARD 5 762B354010 BACKBOARD 3 4 762B354020 BACKBOARD 1 2 767D048090 MIRROR 65 3 4 767D055040 MIRROR 55 1 2 767D055070 MIRROR 46 5 920P016010 HV BLOCK MSC102 AG5K00 224D019040 AIR GAP 2 0 0 5KV S LEAD C...

Page 57: ...WB FRONT 935D600001 ASSY PWB JUNGLE 935D601001 ASSY PWB CONV GENE 935D602001 ASSY PWB 3DYC MD COSMETICPARTS 702A391020 PANEL CONTROL 1 702A392010 PANEL TERMINAL 702A393020 PANEL CONTROL 3 702A397010 PANEL CONTROL 5 702A398010 PANEL CONTROL 2 4 703B031020 DOOR FRONT A V IN COVER 1 3 703B032010 DOOR 5 761A159040 GRILLE SP 55 1 761A171010 GRILLE SP 65 3 761A172020 GRILLE SP 2 761A173020 GRILLE SP 4 7...

Page 58: ...IDE 8 702A388030 CAP CORNER LEFT 9 702A388040 CAP CORNER RIGHT 10 760D627060 DIAMOND SHIELD WS 55819 Figure 2 1 491P125010 SCREEN LENTICULAR 2 491P126010 LENS FRESNEL Figure1 ScreenAssemblyParts WT 46809 WS 55809 WS 65809 9 622C071010 CLIP SCREEN TOP BOT 4 701B429010 SCREEN FRAME TOP BOTTOM 5 701B430010 SCREEN FRAME SIDE 7 702A396010 CAP CORNER 8 760D627060 DIAMOND SHIELD WS 65809 Figure 1 1 491P1...

Page 59: ...PAGE 59 MODELS WT 46809 WS 55809 WS 55819 WS 65809 WS 65819 Figure2 ScreenAssemblyParts WS 55819 WS 65819 Model Legend 1 WS 55809 2 WS 55819 3 WS 65809 4 WS 65819 5 WT 46809 ...

Page 60: ...MODELS WT 46809 WS 55809 WS 55819 WS 65809 WS 65819 Page 60 STANDBY SUPPLIES REGULATOR ...

Page 61: ...MODELS WT 46809 WS 55809 WS 55819 WS 65809 WS 65819 Page 61 SWITCHED SUPPLIES REGULATOR ...

Page 62: ...MODELS WT 46809 WS 55809 WS 55819 WS 65809 WS 65819 Page 62 VIDEO COLOR A V SWITCH CIRCUIT ...

Page 63: ...MODELS WT 46809 WS 55809 WS 55819 WS 65809 WS 65819 Page 63 PCB SIGNAL Y C PATH ...

Page 64: ...MODELS WT 46809 WS 55809 WS 55819 WS 65809 WS 65819 Page 64 SYNC PATH ...

Page 65: ...MODELS WT 46809 WS 55809 WS 55819 WS 65809 WS 65819 Page 65 DEFLECTION CIRCUIT X RAY PROTECT ...

Page 66: ...MODELS WT 46809 WS 55809 WS 55819 WS 65809 WS 65819 Page 66 SOUND CIRCUIT ...

Page 67: ...MODELS WT 46809 WS 55809 WS 55819 WS 65809 WS 65819 Page 67 CONVERGENCE CIRCUIT ...

Page 68: ...MODELS WT 46809 WS 55809 WS 55819 WS 65809 WS 65819 Page 68 CONTROL CIRCUIT ...

Page 69: ...EMA SCHEMA SCHEMA SCHEMATIC DIA TIC DIA TIC DIA TIC DIA TIC DIAGRAMS GRAMS GRAMS GRAMS GRAMS Refer to PART 1 for Specifications Safety Precautions Disassembly CRT Replacement Electrical Adjustments Parts List Block Diagrams CONTENTS Page Overall PCB Block Diagram 1 PCB MAIN 2 PCB POWER 3 PCB TERMINAL 4 PCB SIGNAL 1 AV I O 5 PCB SIGNAL 2 MICRO 6 PCB SIGNAL 3 VC SW 7 PCB 3DYC 8 PCBs CONV GEN JUNGLE ...

Page 70: ......

Page 71: ......

Page 72: ......

Page 73: ......

Page 74: ......

Page 75: ......

Page 76: ......

Page 77: ......

Page 78: ......

Page 79: ......

Page 80: ......

Page 81: ......

Page 82: ......

Page 83: ......

Page 84: ......

Page 85: ......

Page 86: ......

Page 87: ......

Page 88: ......

Page 89: ......

Page 90: ......

Reviews: