–
122
–
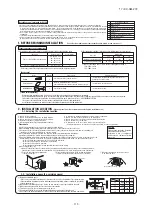
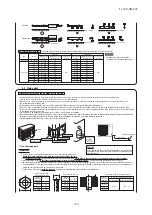
4−4. Additional refrigerant charge
Refrigerant pipe size
Additional charge volume (kg)
φ
9.52
0.054
φ
6.35
0.022
112, 140, 155
3.38
5.0
0.054 (Liquid piping
φ
9.52)
30
0
Cap tightening torque
(N・m)
Cap nut tightening torque
of check joint
(N・m)
φ
9.52
(
3/8"
)
6
-
8 20
-
30 13
φ
15.88(5/8"
)
14
-
16 30
-
35 13
<
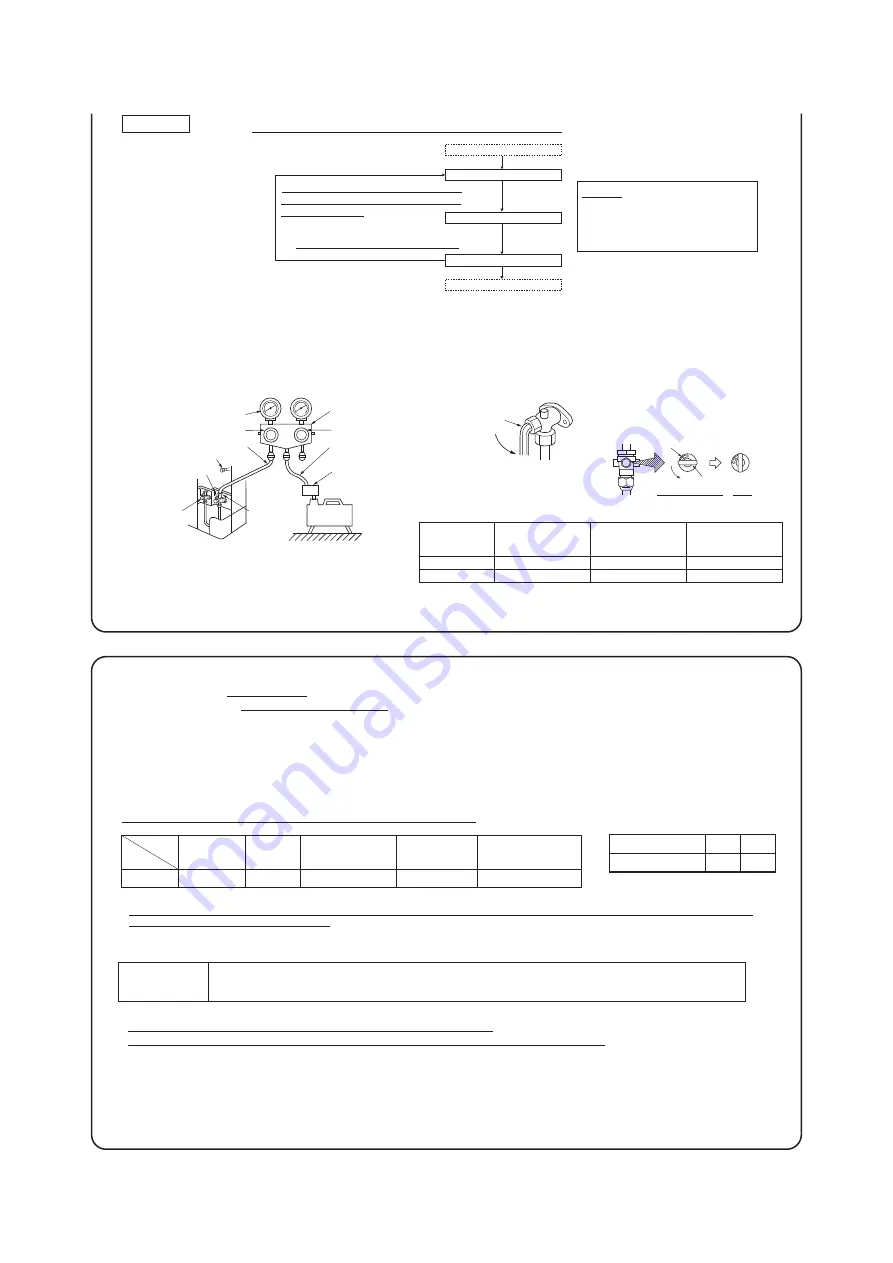
Work flow
>
Fill refrigerant
Please run the vacuum pump for at least one hour
after the vacuum gauge shows -101kPa or lower.
(-755mmHg or lower)
Confirm that the vacuum gauge indicator does not
rise
after leaving the system for an hour or more
.
When the system has remaining
moisture inside or a leaky point,
the vacuum gauge indicator will
rise.
Check the system for a leaky
point and then draw air to create
a vacuum again.
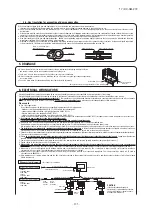
CAUTION
Insufficient vacuuming may result in poor
performance falling short of the design
capacity, pipe clogging due to residue
moisture and/or a compressor failure.
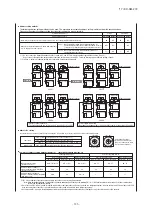
Vacuuming
Please pull air
from the check joints of the service valves on both liquid and gas sides
.
Airtighteness test completed
Vacuuming begins
Vacuuming completed
Vacuum gauge check
Pay attention to the following points in addition to the above for the R410A and compatible machines.
○
To prevent a different oil from entering, please assign dedicated tools, etc. to each refrigerant type. Under no circumstances must a gauge manifold and a
charge hose in particular be shared with other refrigerant types (R22, R407C, etc.).
○
Use a counterflow prevention adapter to prevent vacuum pump oil from entering the refrigerant system.
Hexagonal wrench
(M4)
Liquid/gas operation
Open
When a vacuum air purge is completed, remove the valve rod cap nuts and open the service valves
(both liquid and gas sides) as illustrated below. After you have made sure that the valves are in the
full-open position, tighten the cap nuts (for the valve rods and charge ports).
●
Open the valve rod until it touches the stopper.
You need not apply force to push it further.
Liquid service valve
(with a charge port)
Charge port
Gas service valve
Compound pressure gauge
Pressure gauge
Gauge manifold
(for R410A only)
Handle Hi
Handle Lo
Charge hose (for R410A only)
Charge hose
(for R410A only)
Check valve
Vacuum adapter
(for R410A only)
Vacuum
pump
−101KPa(−755mmHg)
In-unit check joint
●
You can purge air with either liquid service valve or gas service valve.
Remove the hexagon cap nut, set it as illustrated
in the drawing below.
Factory setting (close)
Open
Pin type
▲
Hexagonal wrench type
▲
Stopper
Pin
For tightening torque, refer to the table below.
Tightening torque
(N·m)
Service valve size
(mm)
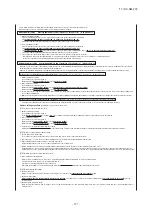
Additional refrigerant charge
Charge additional refrigerant
in the liquid state
.
Be sure to measure the quantity
with a scale in adding refrigerant
.
If you cannot charge all refrigerant with the outdoor unit lying idle, charge it with the unit running in the test run mode. (For the test run method, please refer to Section 8.)
If operated for a long time with insufficient refrigerant the compressor will be damaged. (In particular, when adding refrigerant during operation, complete the job within 30min.)
Fill this unit only with the standard amount of refrigerant (piping length 0m fill quantity).
Determine the amount of refrigerant to be charged additionally using the following formula and put down the amount of refrigerant added on the refrigerant charge volume
recording plate provided on the back of the side panel.
●
Adding additional refrigerant
Charge additional refrigerant according to the size and length of the liquid piping
.
Determine additional charge volume by rounding to the nearest 0.1 kg.
Pipe length for
baseline charge
volume (m)
Item
Capacity
Standard refrigerant
charge volume (kg)
Additional charge volume (kg)
per meter of refrigerant piping
(liquid pipe)
Refrigerant volume
charged for shipment
at the factory (kg)
Installation’s pipe length (m)
covered without additional
refrigerant charge
●
A standard refrigerant charge volume means a refrigerant charge volume for an installation with 0m long refrigerant piping.
●
This unit contains factory charged refrigerant covering 30m of refrigerant piping and additional refrigerant charge on the installation site is not required for
an installation with up to 30m refrigerant piping.
When refrigerant piping exceeds 30m, additionally charge an amount calculated from the pipe length and the above table for the portion in excess of 30m.
Total refrigerant (necessary) charge volume (kg) = Standard refrigerant charge 3.38kg +
φ
9.52 Total length of liquid pipes (m) x 0.054(kg/m) +
φ
6.35 Total length of liquid pipes (m) x 0.022
Additional charge volume (kg) = Total refrigerant (necessary) charge volume (kg) - Factory charged volume 5 (kg)
Formula to calculate the volume of additional refrigerant required
Model 112,140,155
*When an additional charge volume calculation result is negative, it is not necessary to charge refrigerant additionally.
●
If the pipe length is shorter than 5 m, you should charge a reduced refrigerant volume.
Recover the refrigerant from the system and charge the standard refrigerant the amount for liquid pipe.
Pay attention to the following points in addition to the above for the R410A and compatible machines.
●
To prevent a different oil from entering, please assign dedicated tools, etc. to each refrigerant type. Under no circumstances must a gauge manifold and a charge hose
in particular be shared with other refrigerant types (R22, R407C, etc.).
●
Refrigerant types are indicated by color at the top of the cylinder. (Pink for R410A). Always confirm this.
●
Do not use a charge cylinder under any circumstances. There is a danger that the composition of the refrigerant will change when R410A is transferred to a cylinder.
●
When charging refrigerant, use liquid refrigerant from a cylinder.
●
Use a adverse current prevention adapter so that vacuum pump oil does not mix in a system.
・
When an operation is completed, replace the cap nut and tighten it as before.
・
Shaft operation, cap and cap nut is performed by excessive torque, it will become failure
and a cause of a leak, please follow a table.
'17 • KX-SM-272
Summary of Contents for 140KXZEN1
Page 153: ... 17 KX SM 272 151 ...
Page 154: ... 17 KX SM 272 152 ...
Page 155: ... 17 KX SM 272 153 ...
Page 156: ... 17 KX SM 272 154 ...
Page 165: ... 163 MEMO 17 KX SM 272 ...

