background image

– 9 –

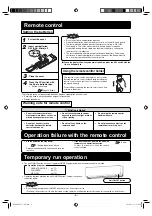
Remote control

Setting the batteries

The following cases show exhausted batteries. Replace old batteries with new ones.

  Receiving beep is not emitted when a signal is transmitted.

  Display fades away.

NOTE

  Do not use old and new batteries together.

  Remove the batteries when the remote control is not used for a long period.

  The recommended effective period of a battery conforming to JIS or IEC 

should be 6 to 12 months with normal use. If used longer, or when an 
unspecified battery is used, liquid may leak from the battery, causing the 
remote control to malfunction.

  The recommendable effective period is printed on the battery. This may be 

shorter due to manufacturing time to the unit. However, the battery may still 
be in working order after expiry of its nominal life.

Pull out the cover.

Insert new batteries. 
R03 (AAA, Micro) x2

Close the cover.

  When the display shows any abnormal condition, press the ACL switch with the 

tip of a ballpoint pen.

1
2

3

Pay attention to 
the

   and 


marks

4

The remote control can be attached to a wall or pillar 
by using the remote control holder. Before installing the 
remote control, check that the air-conditioner receives 
the signals properly. 

For installing or removing the remote control, move it up 
or down in the holder.

Using the remote control holder

Warning note for remote control


Are the batteries running down? 


   “Setting the batteries” above.


Replace the batteries with new ones and retry the 
operation. 

Operation failure with the remote control


If the operation fails, operate the unit with 
temporary run operation function. 


Contact your dealer to have the remote 
control checked.

   Below


Strictly prohibited

  Do not drop the remote control. 

Handle with care. 

  Do not take remote control near 

high temperature places, such as an 
electric heating carpet or a stove.

  Do not place heavy objects on the 

remote control, or step on it.

  Do not put any obstructing 

obstacles between the remote 
control and the unit.

  Do not spill any liquid on the 

remote control.

  Do not leave the remote control 

exposed to direct sunlight or other 
strong lighting.

Temporary run operation

  The unit ON/OFF button on the unit operates ON/OFF temporarily when the remote control is not used.

 Operation 

program

• OPERATION 

MODE :  AUTO

• FAN 

SPEED 

:  AUTO

• AIR 

FLOW 

:  AUTO

  Operation starts by pressing the unit ON/OFF button; it stops if you press 

the button again.

  Do not keep pressing the unit ON/OFF button down for 5 seconds or more.


(Pressing it 5 seconds or more sets the forced cooling operation used during servicing or when relocating the air-conditioner.)

NOTE

Unit ON/OFF button

Press the ACL switch with 
the tip of a ballpoint pen.

  Set the current time.

 Page 13 Step 2

RLD012A015C̲EN.indd   9

RLD012A015C̲EN.indd   9

2017/02/17   15:46:04

2017/02/17   15:46:04

Summary of Contents for DXK21ZRA-W

Page 1: ...apan http www mhi mth co jp en MITSUBISHI HEAVY INDUSTRIES AIR CONDITIONERS AUSTRALIA PTY LTD 9C Commercial Road Kingsgrove NSW 2208 PO BOX 318 Kingsgrove NSW 1480 Tel 61 2 8571 7977 Fax 61 2 8571 7992 https www mhiaa com au USER S MANUAL AIR CONDITIONER 201706 RLD012A015G Cover indd 1 RLD012A015G Cover indd 1 2017 06 14 13 10 41 2017 06 14 13 10 41 ...

Page 2: ...RLD012A015G Cover indd 2 RLD012A015G Cover indd 2 2017 06 14 13 10 42 2017 06 14 13 10 42 ...

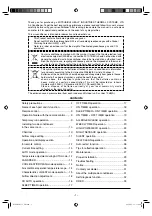
Page 3: ...r local community waste collection or the recycling center Safety precautions 2 Name of each part and its function 7 Remote control 9 Operation failure with the remote control 9 Temporary run operation 9 Installing two air conditioners in the same room 10 Child lock 10 Airflow range setting 11 Operation and display section for remote control 12 Current time setting 13 AUTO mode operation 13 Temper...

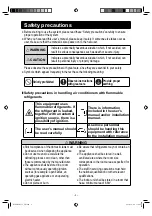
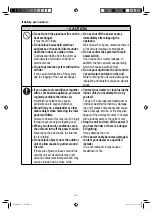
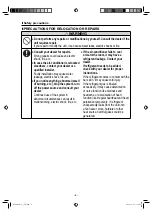
Page 4: ...aked together with an external ignition source there is a possibility of ignition There is information included in the user s manual and or installation manual The user s manual should be read carefully A service personnel should be handing this equipment with reference to the installation manual WARNING Strict compliance of the domestic laws must be observed when disposing the appliance Do not us...

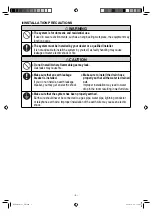
Page 5: ...Gas leaks may cause fire Make sure that an earth leakage breaker is installed If you do not install an earth leakage breaker you may get an electric shock Make sure to install the drain hose properly so that all the water is drained out Improper installation may lead to water drop in the room resulting in wet furniture Make sure that the system has been properly earthed Earth wire should never be ...

Page 6: ... down you may get injured Do not place a flammable insecticide or paint spray near the air conditioner nor spray it directly on the system This may result in a fire Do not expose any combustion appliance directly to the air stream of the air conditioner The combustion appliance may malfunction Do not wash the air conditioner with water This could cause an electric shock Using a high pressure washe...

Page 7: ...n may cause accidents due to oxygen deficiency Stand firmly on a stepladder or other stable object when removing the inlet panel and filters Failure to observe this may result in injury through insecure objects toppling over When you clean air conditioner stop the unit and turn off the power source Never open the panel while the internal fan is rotating Do not place objects near the outdoor unit o...

Page 8: ... dealer Continued use of the system in abnormal circumstances can result in malfunctioning electric shock fire etc If the air conditioner fails to cool or warm the room it may have a refrigerant leakage Contact your dealer If refrigerant needs to be added check with your dealer for proper instructions If the refrigerant comes in contact with the bare skin it may cause cold injury If the refrigeran...

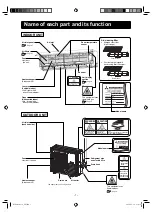
Page 9: ... back and side Fan Inside of the unit Model name Refrigerant pipe and electric wire Drain hose Drain hole The appearance varies by models IT MIGHT CAUSE INJURY DO NOT STEP ON TOP OF THIS UNIT WARNING DO NOT INSERT ANYTHING INTO THE AIR OUTLET IT MIGHT CAUSE INJURY DO NOT TOUCH THE ALUMINUM FINS IT MIGHT CAUSE INJURY SHARP EDGE OF FINS MOVING FAN BLADES CAUTION Don t touch the terminal Don t touch ...

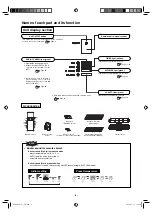
Page 10: ...l holder mounting Accessories Illuminates during operation Blinks slowly when SELF CLEAN operation 3 seconds ON 1 second OFF Blinks when airflow is stopped to prevent blowing out of cold air in heating operation 1 5 seconds ON 0 5 seconds OFF Page 26 Page 30 RUN lights blink quickly during invalid operation mode Page 31 3D AUTO light green Illuminates during 3D AUTO operation Page 16 TIMER light y...

Page 11: ...control holder Warning note for remote control Are the batteries running down Setting the batteries above Replace the batteries with new ones and retry the operation Operation failure with the remote control If the operation fails operate the unit with temporary run operation function Contact your dealer to have the remote control checked Below Strictly prohibited Do not drop the remote control Ha...

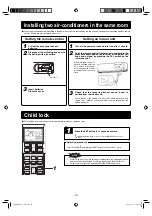
Page 12: ...oor unit At completion of the setting the indoor unit emits a buzzer sound peep If no reception sound is emitted start the setting from the beginning again Setting an indoor unit 1 2 3 Since the signal is sent in about 6 seconds after the ACL switch is pressed point the remote control at the indoor unit for some time Child lock This function locks the remote control operation to prevent an operati...

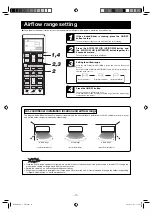
Page 13: ...n 60 seconds of setting the airflow range while the airflow range setting display illuminates The diagram below indicates the airflow ranges corresponding to the air conditioner s installation location Consider your room s layout and set the airflow range to maximize air conditioning Air conditioner installation location and airflow range Airflow range Airflow range Airflow range Left End Installa...

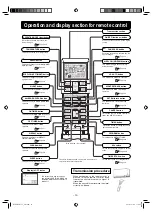
Page 14: ...ton changes the airflow left right direction SILENT button This button sets the SILENT operation OFF TIMER button This button selects OFF TIMER operation WEEKLY button This button switches the WEEKLY TIMER to ON OFF FAN SPEED button Each time the button is pressed the fan speed changes 3D AUTO button This button sets 3D AUTO operation NIGHT SETBACK button This button sets NIGHT SETBACK operation S...

Page 15: ...s replaced or the ACL switch is pressed the remote control will be set to the initial state Since the WEEKLY TIMER program is not set in the initial state set the program according to the setting procedure Example Set to Sat 10 30 Press the TIME SET UP switch Press with the tip of a ballpoint pen etc The day of the week display blinks enabling the setting of a day of the week Press the or TIMER bu...

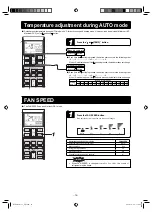
Page 16: ...gy saving operation Lo Standard operation Me Powerful operation with high capacity Hi AUTO Hi Me Lo ULo 1 Press the or TEMP button Each time the button is pressed the switch over occurs in the following order 6 5 1 0 1 6 When 6 is indicated even if the button is pressed the indicator does not change Each time the button is pressed the switch over occurs in the following order 6 5 1 0 1 6 When 6 is...

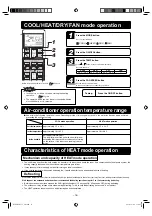
Page 17: ...ating capacity reduces when the outside air temperature gets colder It may take some time to supply hot air after turning on the air conditioner If the outside temperature becomes extremely low it would be better to use an additional source of heating Defrosting If the outside temperature becomes low and humidity is high the heat exchanger in the outdoor unit may frost over which prevents efficien...

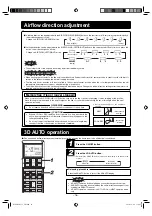
Page 18: ...operation starts the flap and louver direction is fixed at the horizontal center position in order to avoid cold draft It returns to the set position when the warm air supply is started The flap and louver direction will be controlled to the horizontal center position when the room temperature reaches the set temperature and compressor stops or when defrosting is in operation The airflow direction...

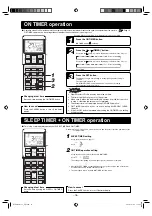
Page 19: ...ner turned off start the operation from Step 1 With the air conditioner running start from Step 2 Example You prefer it to stop 22 30 Press the ON OFF button Press the OFF TIMER button OFF TIMER display is blinking Press the or TIMER button Every time the button is pressed the display is switched in the order of 0 00 0 10 0 20 Units of ten minutes 1 00 1 10 Every time the button is pressed the dis...

Page 20: ...0 0 10 0 20 Units of ten minutes 1 00 1 10 Every time the button is pressed the display is switched in the order of 0 00 23 50 23 40 Units of ten minutes 23 00 22 50 Set at 8 00 Press the SET button The display changes from blinking to steady lighting and the setting is complete The timer light yellow is on If ON TIMER setting is performed when air conditioner is running air conditioner operation ...

Page 21: ... operation Stop Operation starts Check the room temp 1 hour before Set time When SLEEP TIMER is selected the set temperature is automatically adjusted after a while ensuring that the room is not too cold during cooling or too warm during heating Operation Set temperature How to cancel Press the CANCEL or ON OFF button to turn off the timer display Changing of set time Set a new time by using the O...

Page 22: ...ing to the contents that are set The remote control display is also switched to the operation contents that are set The setting can be changed from the remote control after ON TIMER operation of the WEEKLY TIMER The following contents can be set by the ON TIMER Operation mode fan speed temperature airflow direction ECO 3D AUTO NIGHT SETBACK SILENT Comfort start up is not performed for WEEKLY TIMER...

Page 23: ...he button is pressed the display is switched in the order of 3 Press the SET button The day of the week is determined and the program number blinks Press the PROGRAM button and current day of the week blink Press the or TIMER button Select a day of the week to be reserved Every time the button is pressed the display is switched in the order of Mon Tue Wed Sun Display of all of the days of the week...

Page 24: ... TIMER is selected go to Step 8 When OFF TIMER is selected go to Step 9 Setting mode Collective setting Set the same operation contents to the same program number of all the days of the week In Step 2 above select all of the days of the week When the contents that were individually set exist in the same program number the contents are overwritten If no operation is performed for 60 seconds in sett...

Page 25: ...play of all of the days of the week Press the or TIMER button Select a day of the week and a program number to be confirmed Display starts from the current day of the week For the program without setting is displayed When the PROGRAM button is pressed in Confirm mode a setting mode is set Press the or TIMER button Select a day of the week to be canceled 4 Press the or TIMER button Select a program...

Page 26: ... When the HI ECO button is pressed again The operation mode will be changed to the ECO operation 2 When the operation mode is changed 3 When it has been 15 minutes since HIGH POWER operation has started 4 When the 3D AUTO button is pressed 5 When the SILENT button is pressed 6 When the NIGHT SETBACK button is pressed Not operable while the air conditioner is OFF ECO operation Pressing the HI ECO b...

Page 27: ...apacities deteriorate SILENT operation will not function during DRY and FAN operation In case of following operations the air conditioner will resume SILENT operation whenever it turns ON again 1 When the air conditioner is stopped by ON OFF button during SILENT operation 2 When the air conditioner is stopped in SLEEP or OFF TIMER operation during SILENT operation 3 When the operation is retrieved...

Page 28: ...conditioner immediately press the ON OFF button SELF CLEAN operation is not operated after HEAT FAN OFF TIMER SLEEP and ALLERGEN CLEAR operations have finished The indoor unit fan runs for about two hours in SELF CLEAN operation The RUN light illuminates during SELF CLEAN operation Pressing the SLEEP button ALLERGEN CLEAR button or NIGHT SETBACK button during SELF CLEAN operation cancels the SELF ...

Page 29: ...mage Cleaning the air inlet panel The panel can be washed with water After washing with water wipe any moisture off the panel and dry out of direct sunlight Pull up the air inlet panel forward Lightly hold the knobs both sides and lift a little to remove the panel forward If the filter is very dirty clean it with warm water approx 30 C and dry it thoroughly Standard interval is once every two week...

Page 30: ... be replaced after about 1 year of used However the actual replacement period may vary depending on the conditions in which the filter is used Remove the photocatalytic washable deodorizing filter orange from the filter holder and inspect the filter Periodically remove any dust or dirt from the photocatalytic washable deodorizing filter If the photocatalytic washable deodorizing filter is particul...

Page 31: ...rpose tools are required Suitable installation position Troubleshooting Please carry out the following checks before making a service call If the air conditioner does not operate properly after you have checked the left points or if any doubt still exists after you have consulted page 30 or if things happen as shown on page 31 switch off the power and contact your dealer Do not put any obstruction...

Page 32: ...er you have stopped it RUN light is on Restart is blocked for 3 minutes after you have stopped the operation to protect the unit The 3 minutes protection timer in the microcomputer automatically starts it up again Some steam releases during COOL operation This may occur if the room s temperature and humidity are very high It disappears as soon as the temperature and humidity decrease There is a sl...

Page 33: ...hanged in response to the temperatures of the individual rooms this will result in the operation of the outdoor unit being stopped In such a case COOL or HEAT mode should be used instead of AUTO mode This is only relevant when more than one air conditioner unit is being used If the all of the indoor units are not operated at the same time for an extended period the cooling or heating performance m...

Page 34: ...s insufficient leaking Closed service valve Outdoor temperature sensor error Outdoor heat exchanger sensor error Discharge pipe sensor error Suction pipe sensor error Broken outdoor sensor wire poor connector connection Broken heat exchanger sensor wire poor connector connection Broken discharge pipe sensor wire poor connector connection Broken suction pipe sensor wire poor connector connection Cu...

Page 35: ...ipped with a terminal block for DRED input and supports ELV Extra Low Voltage complying with AS NZS60335 1 Under DRED mode RUN light and TIMER light blink alternately as shown When the Defrost function becomes effective during DRED operation the TIMER light blinks quickly RUN light ON OFF 2 seconds 2 seconds 2 seconds 2 seconds ON OFF TIMER light Display in DRED mode Display in DRED mode during De...

Page 36: ... 34 RLD012A015C EN indd 34 RLD012A015C EN indd 34 2016 12 08 15 44 58 2016 12 08 15 44 58 ...

Page 37: ... 35 RLD012A015C EN indd 35 RLD012A015C EN indd 35 2016 12 08 15 44 58 2016 12 08 15 44 58 ...

Page 38: ... 36 RLD012A015C EN indd 36 RLD012A015C EN indd 36 2016 12 08 15 44 58 2016 12 08 15 44 58 ...

Page 39: ...RLD012A015G Cover indd 2 RLD012A015G Cover indd 2 2017 06 14 13 10 42 2017 06 14 13 10 42 ...

Page 40: ...apan http www mhi mth co jp en MITSUBISHI HEAVY INDUSTRIES AIR CONDITIONERS AUSTRALIA PTY LTD 9C Commercial Road Kingsgrove NSW 2208 PO BOX 318 Kingsgrove NSW 1480 Tel 61 2 8571 7977 Fax 61 2 8571 7992 https www mhiaa com au USER S MANUAL AIR CONDITIONER 201706 RLD012A015G Cover indd 1 RLD012A015G Cover indd 1 2017 06 14 13 10 41 2017 06 14 13 10 41 ...

Reviews: