-
274
-
'12 • PAC-T-173
C
AUTION
●
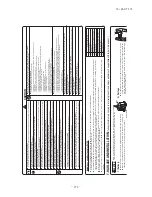
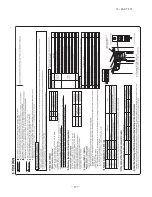
When the 40V model is connected as an indoor unit,
al
ways use a
φ
9.52 liquid pipe for the branch (branching pipe – indoor unit) and a different diameter joint supplied with the branching pipe
set for connection with the indoor unit (
φ
6.35
on the liquid pipe side
).
If a
φ
6.35 pipe is used for connection with a branching pipe,
a refrigerant distribution disorder may occur
, causing one of the indoo
r units to fall short of the ra
ted ca
pacity
.
●
A riser pipe must be a part of the
main.
A branching pipe set should
be installed horizontally a
t a point as c
lose to an indoor unit as possible.
A branching part must be dressed with a hea
t-insula
tion ma
terial supplied as an accessor
y.
●
For the details of installa
tion work required a
t and near a branching area,
see the installa
tion manual supplied with your bran
ching pipe set.
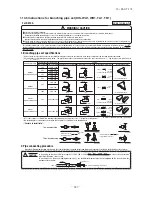
3) Refrigerant pipe wall thickness and material
●
Select refrigerant pipes of the table sho
wn on the right wall thickness and
ma
terial as specified for each pipe size.
Pipe diameter [mm]
Minimum pipe wall thickness [mm]
Pipe ma
terial*
6.35
0.8
O-type pipe
9.52
0.8
O-type pipe
12.7
0.8
O-type pipe
15.88
1.0
O-type pipe
NO
TE
*Phosphorus deoxidized seamless copper pipe C1220T
, JIS H3300
L (riser)
Outdoor unit
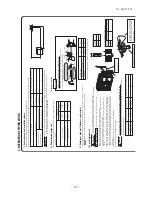
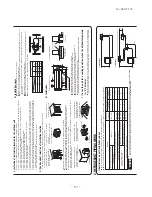
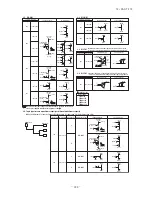
2) Determination of pipe size
●
Determine refrigerant pipe size pursuant to the follo
wing guidelines based on the indoor unit specifica
tions.
Outdoor unit connected
Refrigerant piping (branch pipeL)
Indoor unit connected
Ca
pacity of indoor unit
Branching pipe set
Refrigerant piping (branch pipe L1,L2)
Indoor unit connected
Ca
pacity of indoor unit
In the case of a single type
φ
15.88
Flare
φ
15.88
φ
15.88
φ
12.7
φ
12.7
φ
9.52
Flare
φ
9.52
φ
9.52
φ
9.52
φ
6.35
Model 71V
Model 71V
DIS-W
A1
Model 40V
×
2
Liquid pipe
Gas pipe
In the case of a twin type
●
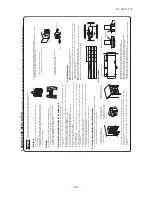
Take care so tha
t installed pipes may not touch
components within a unit.
If touching with an internal component
, it will genera
te abnormal sounds and/or vibra
tions.
●
Carr
y out the on site piping work with the opera
tion valve fully c
losed.
●
Give sufficient protection to a pipe end (compressed and blazed,
or with an adhesive ta
pe) so tha
t wa
ter
or foreign ma
tters may not enter the piping.
●
Bend a pipe to a radius as large as practical.(R100
〜
R150) Do not bend a pipe repea
tedly to correct
its form.
●
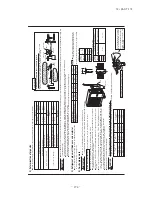
Flare connection is used between the unit and refrigerant pipe.
Flare a pipe after enga
ging a flare nut
onto it.
Flare dimensions for R410A are different from those for conventional R407C.
Although we
recommend the use of flaring tools designed specifically for R410A,
conventional flaring tools can also
be used by adjusting the measurement of protrusion B with a protrusion control gauge.
●
The pipe should be anchored ever
y 1.5m or less to isola
te the vibra
tion.
●
Tighten a flare joint securely with a double spanner
.
4) On-site piping work
IMPOR
TANT
A
B
Flared pipe end:
A (mm)
Screw
Side cover
φ
6.35
φ
9.52
φ
12.7
φ
15.88
Copper
pipe outer
diameter
0
ー
0.4
A
9.1
13.2
16.6
19.7
Copper pipe protrusion for flaring:
B (mm)
φ
6.35
φ
9.52
φ
12.7
φ
15.88
Copper
pipe outer
diameter
In the case of a rigid (c
lutch) type
With an R410A tool
With a conventional tool
0
〜
0.5
0.7
〜
1.3
Plug the end of the pipe with ta
pe,
or other
ma
terial,
and fill the pipe with nitrogen gas.
Only use nitrogen
gas (N
2
)
Ta
ping
<
N
2
>
Nitrogen
Brazing
Sta
tion valve
Primar
y side
Secondar
y side
0.5MP
a
Hand
Relief valve
Nitrogen
gas
Brazing must be performed under a nitrogen gas flow
.
Without nitrogen gas,
a large quantity of foreign ma
tters (oxidized film) are crea
ted,
causing a critical failure from ca
pillar
y tube or expansion valve c
logging.
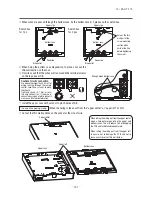
About brazing
How to remo
ve the side co
ver
Please remove the screw of a side cover and remove to the front.
C
AUTION
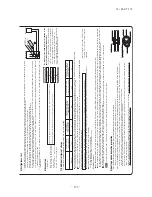
Do not apply force beyond proper f
astening tor
que in tightening the fl
are nut.
Fix both liquid and gas ser
vice valves a
t the valve main bodies as illustra
ted on the right,
and then fasten them,
a
pplying a
p
p
ropria
te fastening torque.
Tightening angle
(
°
)
Tightening torque
(N-m)
φ
6.35 (1/4")
φ
9.52 (3/8")
φ
12.7 (1/2")
φ
15.88(5/8")
14
〜
18
34
〜
42
49
〜
61
68
〜
82
45
〜
60
30
〜
45
30
〜
45
15
〜
20
150
200
250
300
Use a torque wrench.
If a torque
wrench is not a
vailable,
fasten the
flare nut manually first and then
tighten
it
further
, using
the
left
table as a guide.
Recommended length
of a tool handle
(mm)
Opera
tion valve size
(mm)
Do not hold the valve ca
p area with a spanner
.
●
Select pipes ha
ving a wall thickness larger
than the specified minimum pipe thickness.
Summary of Contents for FDC Series
Page 95: ... 94 12 PAC T 173 Models FDT100VF 125VF 140VF H H H H H C B A F G D G PJF000Z285 ...
Page 98: ... 97 12 PAC T 173 Models FDEN60VF 71VF C 2 C 1 A B A B D C 1 C 2 C 1 C 2 E G F B PFA003Z817 ...
Page 113: ... 112 12 PAC T 173 b Wireless remote controller RCN E1R 60 17 150 Unit mm ...
Page 278: ... 277 12 PAC T 173 ー K ...
Page 346: ... 345 12 PAC T 173 Power PCB 1BSU OVNCFS 4GRNCEG VJG 2 ...
Page 518: ... 517 12 PAC T 173 3 5 SUPER LINK E BOARD SC ADNA E F SL2NA E and SL3N AE BE to control ...
Page 519: ... 518 12 PAC T 173 ...


