-
323
-
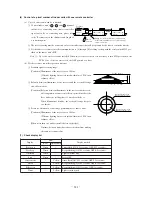
CAUTION
* When the battery is once removed, the setting returns to the initial setting
condition (setting at factory shipping). Therefore, when the battery has
been removed, perform the above mentioned wireless remote controller
setting change work again.
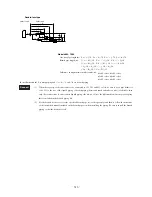
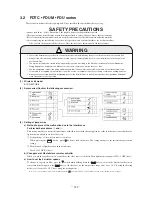
Wireless remote
controller
Light detection adaptor substrate
Prevention of malfunction
from mixed signals
Receiver master/slave switching
O N : Normal
OFF : Remote
O N : Master
OFF : Slave
SW1-1
SW1-2
All switches are turned
ON when the product is
shipped from the factory.
Ensure to explain the
handling method to the
customer.
(The handling method
is also mentioned in the
operation manual.)
(4)
Installation
work
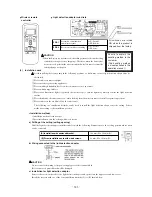
Avoid installing the receiver amp in the following positions, as faults may occur or light detection adaptor may be
obstructed.
1
Places subject to direct sunlight.
2
Places near heat generating appliances.
3
Places with high humidity levels or where water may come in contact.
4
Places with bumpy surfaces.
5
Places near fl uorescent lights (especially the inverter type) or where light may directly contact the light detection
surface.
6
Places hidden by the indoor unit, etc., when looking from the wireless remote controller operation positions.
7
Places subject to the air blow off by the indoor unit.
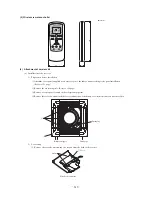
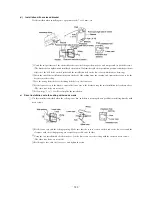
The following two installation methods can be used to install the light detection adaptor onto the ceiling. Select a
method according to the installation position.
<Installation method>
• Installation with enclosed bracket.
• Direct installation onto the ceiling with wood screws.
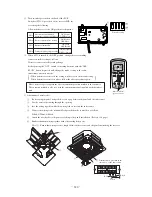
a) Drilling of the ceiling (ceiling opening)
Drill the light detection adaptor installation holes with the following dimensions at a the ceiling position where wires
can be connected.
(A) Installation with enclosed bracket.
(B) Direct installation onto with wood screws.
108 mm (H) 108 mm (W)
88 mm (H) 101 mm (W)
×
×
b) Wiring connected to the light detection adaptor
CAUTION
Do not connect the wiring to the power supply part of the terminal block.
If it is connected, printed board will be damaged.
c) Installation for light detection adaptor
Remove the screw on the side of the light detection adaptor, and sprit it into the upper case and lower case.
Install the receiver with one of the four installation methods (A) or (B) shown below.
Summary of Contents for FDCVA1002HESAR
Page 107: ... 106 60 17 150 b Wireless remote controller Unit mm ...
Page 119: ... 118 Model FDCVA1002HESAR Polar white ...
Page 133: ......


