–
–
'17 • KX-T-259
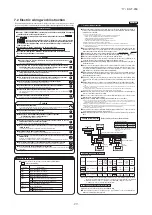
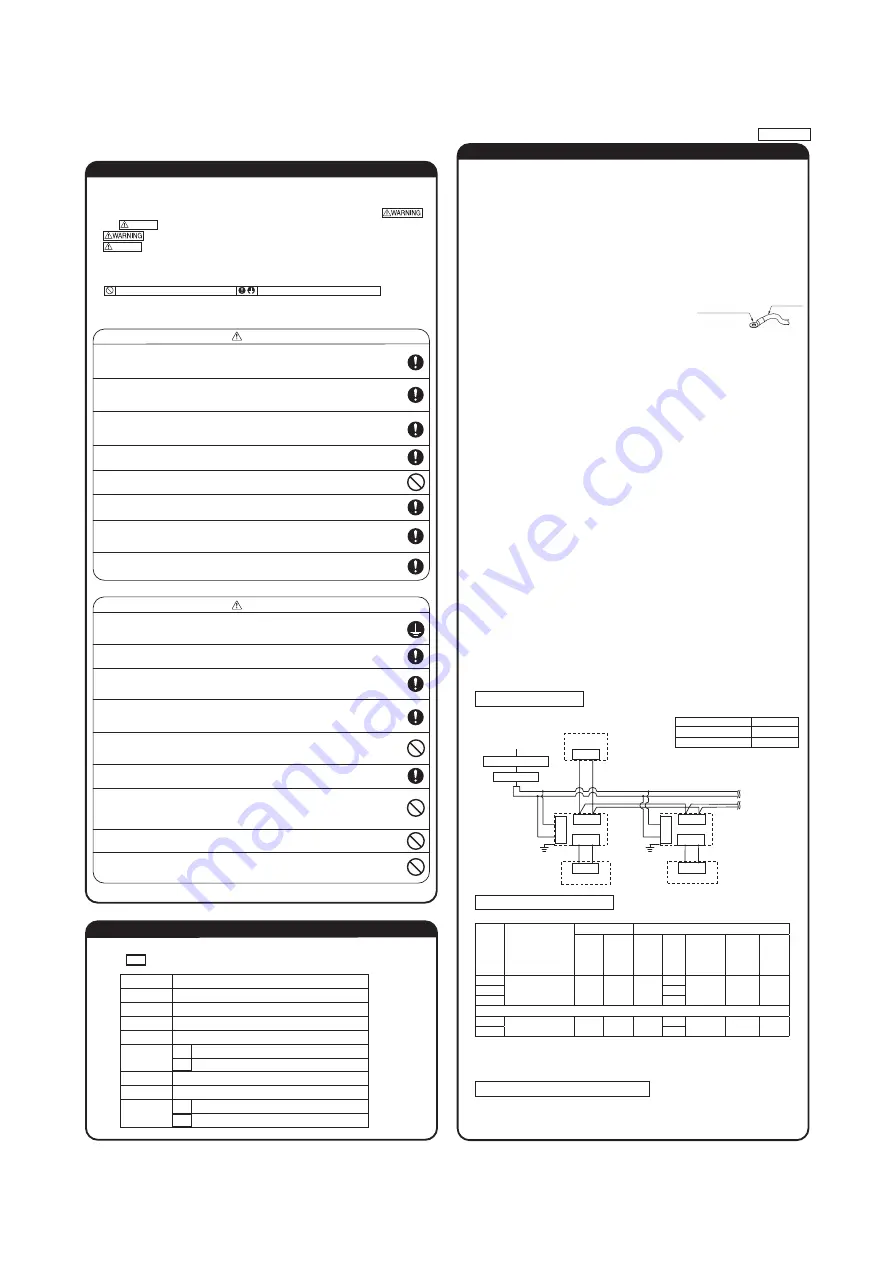
7.2 Electric wiring work instruction
Round crimp terminal
Electric cable
●
Electrical wiring work must be performed by an electrician an qualified by a local power
provider. These wiring specifications are determined on the assumption that the following
instructions are observed:
①
Do not use cords other than copper ones.
Do not use any supply line lighter than one specified in parentheses for each type below.
-braided cord (code designation 60245 IEC 51), if allowed in the relevant part 2;
-ordinary tough rubber sheathed cord (code designation 60245 IEC 53);
-flat twin tinsel cord (code designation 60227 IEC 41);
-ordinary polyvinyl chloride sheathed cord (code designation 60227 IEC 53);
②
Provide a separate power outlet for each outdoor or indoor unit.
③
All indoor units grouped in one system must have power source that can be turned on or off simultaneously.
④
Pay extra attention so as not to confuse signal line and power source line connection, because an error in their connection
can be burn all the boards at once.
●
Connect ground wires before connecting wires between the indoor and outdoor units and
between indoor units. The ground wires need to be longer than the wires between the
indoor and outdoor units, and protected from undue stress.
●
Do not turn on the power source before completing the work.
●
The ground wires must be connected by the Class D grounding connection.
●
Use the round crimp terminals for connections to the terminal block.
●
Use dedicated branch circuits, avoiding combination with other devices. Otherwise, it
could trip the power source breaker, resulting in secondary accidents.
●
Install the overcurrent and earth leakage breakers (sensitivity current: 30 mA) specified to
respective models.
●
Do not connect indoor and outdoor signal cables to extension cables on the way. If the
joint is wetted with intruding water, it could cause a ground insulation failure or poor
connection, resulting in communication errors. (If it is inevitable to connect cables on the
way, make sure to prevent the water intrusion completely.)
●
When running wires (wires for power source, remote control, connecting between indoor
and outdoor units, or other) behind the ceiling, protect them using copper or other pipes
against assault by rat, or other.
●
It is up to 3.5 mm
2
the size of power source cables connected to indoor units. When using
cables of 5.5 mm
2
or larger, provide a dedicated pull box for branching connection to indoor
units.
●
If signal and power source cables are connected mistakenly, it could burn down all PCBs.
①
Even if the power source of 220/240/380/415 V is connected mistakenly to A-B signal cable, it is protected at initial occasion
only.
②
If the remote controller fails to detect the unit No. (address) at 15 minutes after turning the power on, check and repair all
signal cables for misconnection.
③
Cut the jumper wire J10SL1 of burnt PCB, and reconnect connectors CnK (yellow) and CnK1 (white) to CnK2 (black).
④
If any anomaly is found on wires between the A-B terminal block and the PCB, replace them.
●
At the outside of indoor and outdoor units, take care to avoid direct contacts between
remote control and power source cables.
●
In no event connect the power source of 220/240/380/415 V to the remote control
terminal block. It could cause failures.
●
Connections of wiring between units, ground wire and remote control cable
①
When connecting wires between units, ground wire or remote control wire, connect them according to the number of
terminals on the power source terminal block or signal terminal block in the control box. Connect the ground wire to the
ground terminal on the power source terminal block.
②
Make sure to install an earth leakage breaker for the power source. Select a breaker for inverter circuit.
③
When the earth leakage breaker is exclusive for the earth leakage protection, it is necessary to connect also an isolating
switch ( Class B fuse) or wiring circuit breaker in series to the earth leakage breaker.
④
Install the isolating switch close to the unit.
●
Connect wires securing by tightening screws firmly. Confirm also no connector or wire
(from terminal) is disconnected in the control box.
●
When installing an auxiliary electric heater, consult the electric heater manual or technical
data.
Cabling system diagram
(Outdoor/indoor unit connection procedure)
Ⓐ Ⓑ
○
B
Ⓐ Ⓑ
Ⓧ Ⓨ
○
Y
Ⓛ
Ⓝ
Ⓧ Ⓨ
Ⓐ Ⓑ
Ⓧ Ⓨ
Ⓛ
Ⓝ
Ⓧ Ⓨ
Outdoor unit
Power source
Indoor unit1
Indoor unit2
Signal line (between indoor and outdoor units)
Use shielded cord for a signal line and connect “earth
(signal line)” at all the indoor units and
outdoor units.
Earth
Signal line
(between indoor unit)
Earth
Remote control
Remote
control line
Remote
control line
Power source line specification
Note (1) The cord distances are calculated with a voltage drop of 2%. If the distance should exceed the
above data, review the cord thickness to use in accordance with your extension cord regulations.
(2) When total extension of remote control line is more than 100m, change the size of cord
according to "
③
Remote control, Wiring and functions".
In case of heat recovery 3-pipe systems
Branching control of heat recovery 3-pipe systems wiring
●
When this unit is used as a "Heat Recovery 3-pipe Systems", refer to the installation
manual of a branching control (option).
Remote control
●
Be sure to have the electrical wiring work done by qualified electrical installer,
and use exclusive circuit.
Power source with insufficient capacity and improper work can cause electric shock and fire.
●
Use specified wire for electrical wiring, fasten the wiring to the terminal securely,
and hold the cable securely in order not to apply unexpected stress on the terminal.
Loose connections or hold could result in abnormal heat generation or fire.
●
Arrange the electrical wires in the control box properly to prevent them from
rising. Fit the lid of the services panel property.
Improper fitting may cause abnormal heat and fire.
●
Use the genuine option parts. And installation should be performed by a specialist.
If you install the unit by yourself, it could cause water leakage, electric shock and fire.
●
Do not repair by yourself. And consult with the dealer about repair.
Improper repair may cause water leakage, electric shock or fire.
●
Consult the dealer or a specialist about removal of the air-conditioner.
Improper installation may cause water leakage, electric shock or fire.
●
Turn off the power source during servicing or inspection work.
If the power is supplied during servicing or inspection work, it could cause electric shock and injury by
the operating fan.
●
Shut off the power before electrical wiring work.
It could cause electric shock, unit failure and improper running.
●
Perform earth wiring surely.
Do not connect the earth wiring to the gas pipe, water pipe, lightning rod and telephone earth wiring.
Improper earth could cause unit failure and electric shock due to a short circuit.
●
Earth leakage breaker must be installed.
If the earth leakage breaker is not installed, it can cause electric shocks.
●
Make sure to install earth leakage breaker on power source line.
(countermeasure thing to high harmonics.)
Absence of breaker could cause electric shock.
●
Use the circuit breaker of correct capacity. Circuit breaker should be the one
that disconnect all poles under over current.
Using the incorrect one could cause the system failure and fire.
●
Do not use any materials other than a fuse of correct capacity where a fuse
should be used.
Connecting the circuit by wire or copper wire could cause unit failure and fire.
●
Use power source line of correct capacity.
Using incorrect capacity one could cause electric leak, abnormal heat generation and fire.
●
Do not mingle solid cord and stranded cord on power source and signal side
terminal block.
In addition, do not mingle difference capacity solid or stranded cord.
Inappropriate cord setting could cause loosing screw on terminal block, bad electrical contact, smoke and fire.
●
Do not turn off the power source immediately after stopping the operation.
Be sure to wait for more than 5 minutes. Otherwise it could cause water leakage or breakdown.
●
Do not control the operation with the circuit breaker.
It could cause fire or water leakage. In addition, the fan may start operation unexpectedly and it may
cause injury.
Security instructions
WARNING
CAUTION
Electrical wiring work must be performed by an electrician qualified by a local power provider according to
the electrical installation technical standards and interior wiring regulations applicable to the installation site.
Earth leakage breaker
Circuit breaker
Wiring specification
①
Electrical Wiring Connection
●
●
●
●
Read the “SAFETY PRECAUTIONS” carefully first of all and then strictly follow it during the
installation work in order to protect yourself.
The precautionary items mentioned below are distinguished into two levels,
and .
: Wrong installation would cause serious consequences such as injuries or death.
: Wrong installation might cause serious consequences depending on circumstances.
Both mentions the important items to protect your health and safety so strictly follow
them by any means.
The meanings of “Marks” used here are as shown on the right:
Accord with following items. Otherwise, there will be the risks of electric shock and
fire caused by overheating or short circuit.
Never do it under any circumstances.
CAUTION
CAUTION
Always do it according to the instruction.
PSC012D087
Unit type Earth leakage breaker
Circuit breaker
Wiring size
Switch
breaker
Over-
current
protector
rated
capacity
Power
source
line
Wire
length
Signal line
Remote
control
line
Earth
line
22-36
15A
30mA 0.1sec
30A
15A
2.0mm
2
×2
304m
0.75-
1.25mm
2
×2
0.3mm
2
×2cores
2.0mm
2
m
6
1
2
0
9
-
5
4
m
9
2
1
0
6
1
-
2
1
1
In case of duct connected -High static pressure- type
71-140
15A
30mA 0.1sec
30A
15A
2.0mm
2
×2
87m
0.75-
1.25mm
2
×2
0.3mm
2
×2cores
2.0mm
2
m
8
4
0
8
2
,
4
2
2
Specification of each line
Power source line
Signal line (Shielded cord)
Remote control line
2.0-3.5mm
2
0.75-1.25mm
2
0.3-2.0mm
2
Control mode switching
●
The control content of indoor units can be switched in following way.
( is the default setting)
Switch No. Control content
SW1
Indoor unit address (tens place)
SW2
Indoor unit address (ones place)
SW3
Outdoor unit address (tens place)
SW4
Outdoor unit address (ones place)
SW5
-
1 ON Fixed previous version of Super Link protocol
OFF Automatic adjustment of Super Link protocol
SW5
-
2 Indoor unit address (hundreds place)
SW6
-
1 ~ 4 Model capacity setting
SW7
-
1 ON Operation check, Drain motor test run
OFF Normal operation

