-
-
'14 • SRF-T-163
Press or button.
Make sure which do you want to set, " FUNCTION "
(remote control function) or "I/U FUNCTION " (indoor unit
function).
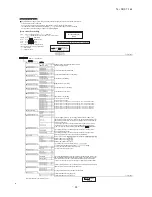
Note 1: The initial setting marked “ ” is decided by connected indoor and outdoor unit, and is automatically defined as following table.
Function No.
Remote controller
function02
Remote controller
function06
Remote controller
function07
Remote controller
function13
Remote controller
function15
Default
Model
Indoor unit with only one of air flow setting
Heat pump unit
Exclusive cooling unit
"Auto-RUN" mode selectable indoor unit.
Indoor unit without "Auto-RUN" mode
Indoor unit with two or three step of air flow setting
Indoor unit with only one of air flow setting
Indoor unit with automatically swing louver
Indoor unit without automatically swing louver
Indoor unit with three step of air flow setting
Indoor unit with two step of air flow setting
Item
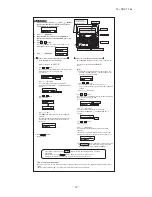
[Flow of function setting]
Note 3: As for plural indoor unit, set indoor functions to each master and slave indoor unit.
But only master indoor unit is received the setting change of indoor unit function “05 EXTERNAL INPUT” and “06 PERMISSION /
PROHIBISHION”.
Indoor unit No. are indicated only when
plural indoor units are connected.
01
02
Validate setting of ESP:External Static Pressure
Invalidate setting of ESP
Automatical operation is impossible
Temperature setting button is not working
02
03
03
04
04
05
05
06
06
07
07
08
09
08
10
09
11
10
12
11
13
12
13
14
14
15
16
15
17
18
19
Consult the technical data etc. for each control details
Finalize : Press “
” (SET) button.
Reset
: Press “
” (RESET) button.
Select : Press button.
End
: Press ON/OFF button.
It is possible to finish above setting on the way,
and unfinished change of setting is unavailable.
“
” : Initial settings
“
” : Automatic criterion
How to set function
2.
1.
3.
4.
5.
It is possible to finish by pressing ON/OFF button on the way, but unfinished change of setting is
unavailable.
During setting, if you press (RESET) button, you return to the previous screen.
Setting is memorized in the control and it is saved independently of power failure.
Permission/prohibition control of operation will be valid.
Record and keep the
setting
The functional setting
Stop air-conditioner and press
(SET) + (MODE) buttons
at the same time for over three seconds.
Function
setting
Function
setting
Mode button is not working
On/Off button is not working
Fan speed button is not working
Louver button is not working
Timer button is not working
Remote thermistor is not working.
Remote thermistor is working.
Remote thermistor is working, and to be set for pro3.0˚C increase in temperature.
Remote thermistor is working, and to be set for pro2.0˚C increase in temperature.
Remote thermistor is working, and to be set for pro1.0˚C increase in temperature.
Remote thermistor is working, and to be set for producing -1.0˚C increase in temperature.
Remote thermistor is working, and to be set for producing -2.0˚C increase in temperature.
Remote thermistor is working, and to be set for producing -3.0˚C increase in temperature.
If you change the range of set temperature, the indication of set temperature
will vary following the control.
If you change the range of set temperature, the indication of set temperature
will not vary following the control, and keep the set temperature.
If you change the remote controller function "14 ",
you must change the indoor function "04 " accordingly.
You can select the louver stop position in the four.
The louver can stop at any position.
In normal working indication, indoor unit temperature is indicated instead of airflow.
(Only the master remote controller can be indicated.)
Heating preparation indication should not be indicated.
Temperature indication is by degree C
Temperature indication is by degree F
To set other indoor unit, press
AIRCON
NO. button, which
allows you to go back to the indoor
unit selection screen
(for example: I/U 000 ).
ON/OFF button
(finished)
The filter sign is indicated after running for 180 hours.
The filter sign is indicated after running for 600 hours.
The filter sign is indicated after running for 1000 hours.
The filter sign is indicated after running for 1000 hours, then the indoor unit will be stopped by
compulsion after 24 hours.
If you change the indoor function "04 ",
you must change the remote controller function "14 " accordingly.
You can select the louver stop position in the four.
The louver can stop at any position.
With the VRF series, it is used to stop all indoor units connected with the same outdoor unit immediately.
When stop signal is inputed from remote on-off terminal "CNT-6", all indoor units are stopped immediately.
To be reset for pro3.0˚C increase in temperature during heating.
To be reset for pro2.0˚C increase in temperature during heating.
To be reset for pro1.0˚C increase in temperature during heating.
To be reset pro2.0˚C increase in return air temperature of indoor unit.
To be reset pro1.5˚C increase in return air temperature of indoor unit.
To be reset pro1.0˚C increase in return air temperature of indoor unit.
To be reset producing -1.0˚C increase in return air temperature of indoor unit.
To be reset producing -1.5˚C increase in return air temperature of indoor unit.
To be reset producing -2.0˚C increase in return air temperature of indoor unit.
When heating thermostat is OFF, fan speed is low speed.
When heating thermostat is OFF, fan speed is set speed.
When heating thermostat is OFF, fan speed is operated intermittently.
When heating thermostat is OFF, the fan is stopped.
When the remote thermistor is working, "FAN OFF" is set automatically.
Do not set "FAN OFF" when the indoor unit's thermistor is working.
Drain pump is run during cooling and dry.
Drain pump is run during cooling, dry and heating.
Drain pump is run during cooling, dry, heating and fan.
Drain pump is run during cooling, dry and fan.
After cooling is stopped or cooling thermostat is OFF, the fan does not perform extra operation.
After cooling is stopped or cooling thermostat is OFF, the fan perform extra operation for half an hour.
After cooling is stopped or cooling thermostat is OFF, the fan perform extra operation for an hour.
After cooling is stopped or cooling thermostat is OFF, the fan perform extra operation for six hours.
After heating is stopped or heating thermostat is OFF, the fan does not perform extra operation.
After heating is stopped or heating thermostat is OFF,the fan perform extra operation for half an hour.
After heating is stopped or heating thermostat is OFF,the fan perform extra operation for two hours.
After heating is stopped or heating thermostat is OFF, the fan perform extra operation for six hours.
During heating is stopped or heating thermostat is OFF, the fan perform intermittent operation for five minutes
with low fan speed after twenty minutes' OFF.
During heating is stopped or heating thermostat is OFF, the fan perform intermittent operation for five minutes
with low fan speed after five minutes' OFF.
Connected “OA Processing” type indoor unit, and is automatically defined.
Working only with the Single split series.
To control frost prevention, the indoor fan tap is raised.
Change of indoor heat exchanger temperature to start frost prevention control.
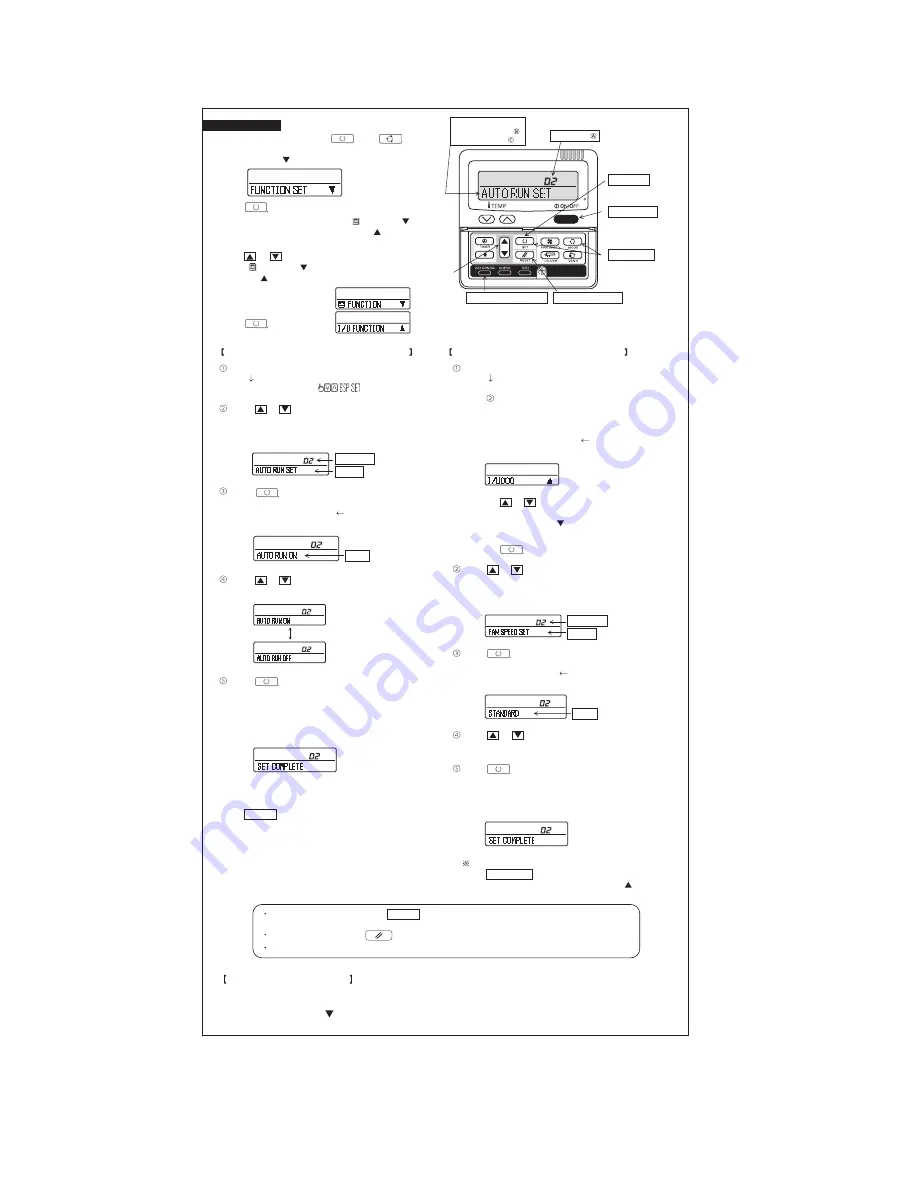
How to check the current setting
When you select from "No. and funcion" and press set button by the previous operation, the "Setting" displayed first is the current
setting.
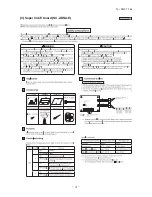
(But, if you select "ALL UNIT ", the setting of the lowest number indoor unit is displayed.)
Stop air-conditioner and press (SET) (MODE)
buttons at the same time for over three seconds, and the
"FUNCTION SET " will be displayed.
Press (SET) button.
Selecct " FUNCTION " (remote control function) or "I/U
FUNCTION " (indoor unit function).
Operation message
Function description: ,
setting description:
Function No.
Fixing button
Finishing button
7
2
1
Starting button
Previous screen button
Indoor unit selection button
Start
: Stop air-conditioner and press “
” (SET) and
“
” (MODE) buttons at the same time for over three seconds.
(Remote controller function)
(Indoor unit function)
In case of Single split series, by connecting ventilation device to CNT of the
indoor printed circuit board (in case of VRF series, by connecting it to CND of the
indoor printed circuit board), the operation of ventilation device is linked with the
operation of indoor unit.
In case of Single split series, by connecting ventilation device to CNT of the indoor printed
circuit board (in case of VRF series, by connecting it to CND of the indoor printed circuit
board), you can operate /stop the ventilation device independently by
(VENT) button.
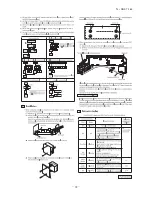
Press (SET) button.
6.
"DATA LOADING" (Indication with blinking)
Display is changed to "01 ".
7.
"DATA LOADING" (Blinking for 2 to 23 seconds to read the data)
(1)
(2)
(3)
Press (SET) button.
On the occasion of remote control function selection
On the occasion of indoor unit function selection
Press or button.
"No. and function"are indicated by turns on the remote control
function table, then you can select from them.
(For example)
Press or button.
Select the setting.
Press or button.
Select the setting.
The current setting of selected function is indicated.
(for example) "AUTO RUN ON" If "02 AUTO RUN SET" is
selected
Press (SET) button.
Press (SET) button.
Press or button.
Press or button.
Select the number of the indoor unit you are to set
If you select "ALL UNIT ", you can set the same setting with
all unites.
Press (SET)
"SET COMPLETE" will be indicated, and the setting will be
completed.
Then after "No. and function" indication returns, Set as the
same procedure if you want to set continuously ,and if to
finish, go to 7.
Press ON/OFF button.
Setting is finished.
Indication is changed to "02 FAN SPEED SET".
Go to .
[Note]
If plural indoor units are connected to a remote control, the
indication is "I/U 000" (blinking) The lowest number of the
indoor unit connected is indicated.
"No. and function" are indicated by turns on the indoor unit function
table, then you can select from them.
(For example)
The current setting of selected function is indicated.
(For example) "STANDARD" If "02 FAN SPEED SET" is
selected.
Press (SET) button.
"SET COMPLETE" will be indicated, and the setting will be
completed.
Then after "No. and function" indication returns, set as the same
procedure if you want to set continuously , and if to finish, go to 7.
Setting
Function No.
Function
When plural indoor units are connected to a remote control, press
the AIRCON NO. button, which allows you to go back to the
indoor unit selection screen. (example "I/U 000 ")
The initial function setting for typical using is performed automatically by the indoor unit connected, when remote
controller and indoor unit are connected.
As long as they are used in a typical manner, there wiil be no need to change the initial settings.
If you would like to change the initial setting marked “
”, set your desired setting as for the selected item.
The procedure of functional setting is shown as the following diagram.
Function No.
Function
Setting
If you input signal into CNT of the indoor printed circuit board from external, the
indoor unit will be operated independently according to the input from external.
If you input into CNT of the indoor printed circuit board from external, all units which
connect to the same remote controller are operated according to the input from external.
16
17
Airflow of fan becomes the three speed of - - or - - - .
Airflow of fan becomes the two speed of - .
Airflow of fan becomes the two speed of - .
Airflow of fan is fixed at one speed.
Note2: Fan setting of "HIGH SPEED"
Initial function setting of some indoor unit is "HIGH SPEED".
UH - Hi
UH - Me
UH - Hi - Me
STANDARD
HIGH
SPEED1, 2
FAN
SPEED
SET
Hi - Lo
Hi - Me
-
-
-
-
-
-
-
Hi - Me - Lo
UH - UH - Hi - Me
UH - Hi - Me - Lo
Indoor unit air flow setting
Fan tap
PJA012D730
Summary of Contents for SRF25ZMXA-S
Page 2: ......
Page 3: ... 14 SRF T 163 TECHNICAL MANUAL ...
Page 12: ... 10 14 SRF T 163 3 Remote control Unit mm 60 26 167 a Wireless remote control ...
Page 93: ... 91 14 SRF T 163 WARING CAUTION 3 Super link E board SC ADNA E F ...
Page 94: ... 92 14 SRF T 163 ...
Page 100: ... 98 14 SRF T 163 CRCE0010 12 13 14 3 2 1 4 4 5 10 10 4 7 8 9 6 15 16 11 CONTROL PARTS SET ...
Page 106: ... 104 14 SRF T 163 CRCE0010 12 13 14 3 2 1 4 4 5 10 10 4 7 8 9 6 15 16 11 CONTROL PARTS SET ...
Page 112: ... 110 14 SRF T 163 CRCE0010 12 13 14 3 2 1 4 4 5 10 10 4 7 8 9 6 15 16 11 CONTROL PARTS SET ...
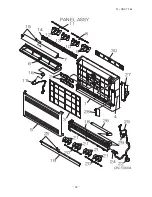
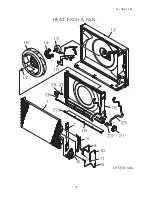
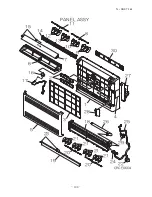
Page 114: ... 112 14 SRF T 163 CRBE0276 6 13 11 12 15 16 3 17 14 2 4 9 8 7 5 1 8 8 10 PANEL FAN ASSY ...
Page 118: ... 116 14 SRF T 163 CRBE0276 6 13 11 12 15 16 3 17 14 2 4 9 8 7 5 1 8 8 10 PANEL FAN ASSY ...
Page 122: ... 120 14 SRF T 163 CRBE0315 9 13 15 16 14 17 7 6 4 1 8 3 11 5 18 10 10 10 2 12 PANEL FAN ASSY ...


