-
-
'14•SRK-T-153
– 29 –
1 2
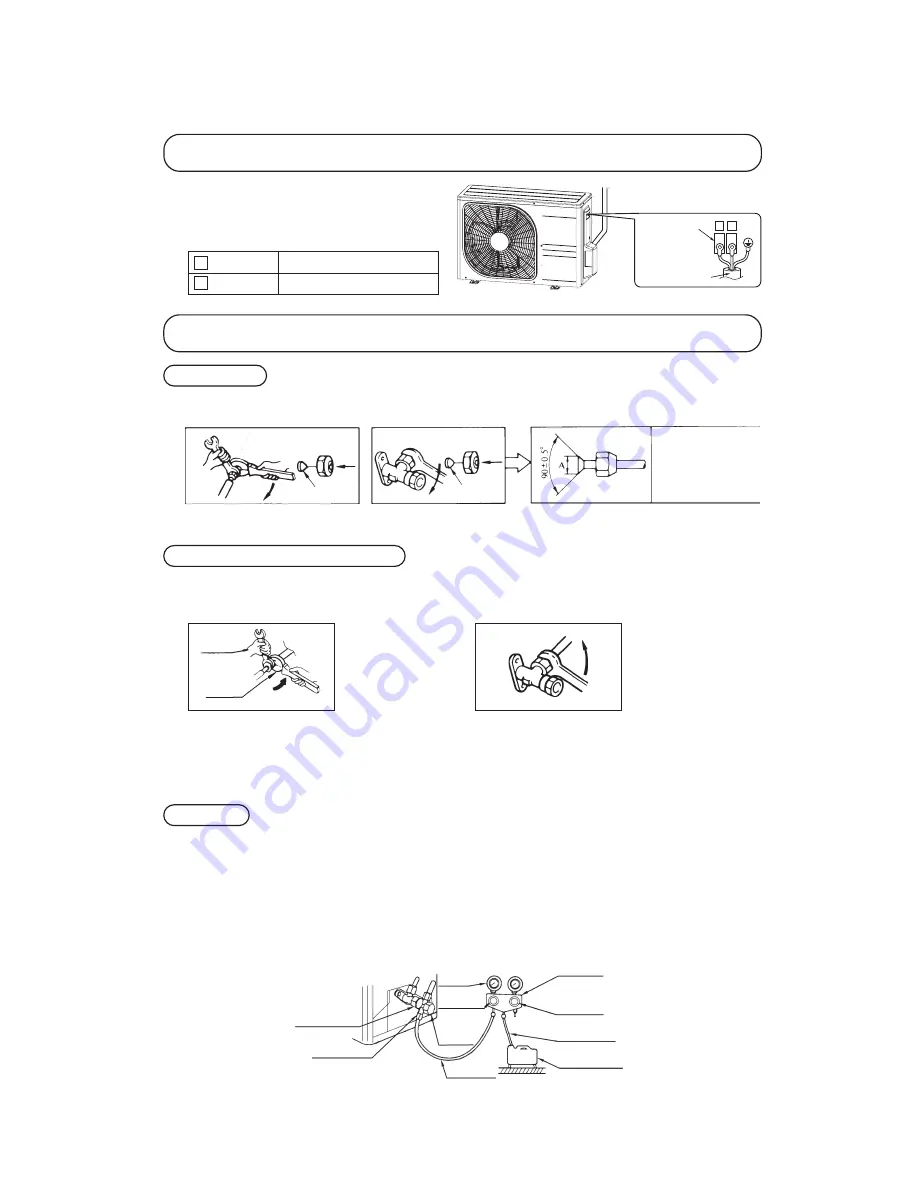
Installation of outdoor unit
For power supply, indoor outdoor
For power supply, indoor outdoor
1
Brown
2
Blue
①
Make sure that the unit is stable in installation. Fix the unit
to stable base.
②
Perfrom wiring, making wire terminal numbers conform to
terminal numbers of indoor unit terminal block.
Terminal block
Interconnecting wire
Connection of refrigerant pipings
Preparation
Connection of refrigerant piping
Air purge
Keep the openings of the pipes covered with tapes etc. to prevent dust, sand, etc. from entering them.
•
Specified torquing value:
Liquid side (ø6.35)
: 14~18N·m (1.4~1.8kgf·m)
Gas side (ø9.52)
: 34~42N·m (3.4~4.2kgf·m)
Gas side (ø12.7)
: 49~61N·m (4.9~6.1kgf·m)
•
Use one more spanner to fix the valve.
①
Tighten all flare nuts in the pipings both indoor and outside wall so as not to cause leak.
②
Connect service valve, charge hose, manifold valve and vacuum pump as is illustrated below.
③
Open manifold valve handle Lo to its full width, and perform vacuum or evacuation.
Continue the vacuum or evacuation operation for 15 minutes or more and check to see that the vacuum gauge reads – 0.1 MPa
(– 76 cmHg).
④
After completing vacuum operation, fully open service valve (Both gas and liquid sides) with hexagon headed wrench.
⑤
Detach the charge hoses.
⑥
Check for possible leakage of gas in the connection parts of both indoor and outdoor.
•
Remove the flared nuts.
(on both liquid and gas sides)
•
Remove the flared nuts.
(on both liquid and gas sides)
•
Install the removed flared nuts to the pipes to be con-
nected, then flare the pipes.
Dimension A
Liquid side
(ø6.35): 9.0 dia
Gas side
(ø9.52): 13.0 dia
(ø12.7): 16.2 dia
Press
Remove
Remove
(Do not
turn)
Spanner
for fixing
the piping)
Torque
wrench
•
Specified torquing value:
Liquid side (ø6.35)
: 14~18N·m (1.4~1.8kgf·m)
Gas side (ø9.52)
: 34~42N·m (3.4~4.2kgf·m)
Gas side (ø12.7)
: 49~61N·m (4.9~6.1kgf·m)
①
Indoor unit side
②
Outdoor unit side
①
Indoor unit side
②
Outdoor unit side
•
Connect firmly gas and liquid side
pipings by Torque wrench.
•
Connect firmly gas and liquid side
pipings by Torque wrench.
•
Always use a Torque wrench and back up spanner to tighten the flare nut.
Manifold
Valve
-76 cm Hg
Handle Lo
(pressure)
Charge hose
Stop valve
(Two-way valve)
Service port
Stop value
(Three-way
value)
Compound
(Gauge)
Pressure
gauge
Handle Hi
(pressure)
Charge hose
Vacuum pump
Summary of Contents for SRK10CNS
Page 46: ... 45 14 SRK T 153 3 Wireless remote control Unit mm 60 17 3 150 Unit mm 60 17 3 150 ...
Page 71: ... 70 14 SRK T 153 4 Troubleshooting procedure If the air conditioner runs NO YES 71 ...
Page 79: ... 78 14 SRK T 153 ...
Page 83: ... 82 14 SRK T 153 4 6 10641 ...
Page 87: ... 86 14 SRK T 153 4 6 10641 ...
Page 91: ... 90 14 SRK T 153 4 6 10641 ...
Page 95: ... 94 14 SRK T 153 4 6 10641 ...
Page 99: ... 98 14 SRK T 153 4 6 10641 ...
Page 103: ... 102 14 SRK T 153 4 6 10641 ...
Page 108: ... 107 14 SRK T 153 MEMO ...
Page 114: ... 113 14 SRK T 153 MEMO ...
Page 117: ... 116 14 SRK T 153 CRBE0290 6 11 9 10 13 14 3 15 12 2 4 8 7 5 1 7 7 PANEL FAN ASSY ...
Page 121: ... 120 14 SRK T 153 CRBE0290 6 11 9 10 13 14 3 15 12 2 4 8 7 5 1 7 7 PANEL FAN ASSY ...
Page 125: ... 124 14 SRK T 153 CRBE0290 6 11 9 10 13 14 3 15 12 2 4 8 7 5 1 7 7 PANEL FAN ASSY ...
Page 129: ... 128 14 SRK T 153 CRBE0290 6 11 9 10 13 14 3 15 12 2 4 8 7 5 1 7 7 PANEL FAN ASSY ...
Page 133: ... 132 14 SRK T 153 CRBE0290 6 11 9 10 13 14 3 15 12 2 4 8 7 5 1 7 7 PANEL FAN ASSY ...
Page 137: ... 136 14 SRK T 153 CRBE0290 6 11 9 10 13 14 3 15 12 2 4 8 7 5 1 7 7 PANEL FAN ASSY ...
Page 141: ... 140 14 SRK T 153 CRBE0221 12 16 17 1 2 3 5 6 7 8 9 10 13 16 14 15 4 11 PANEL FAN ASSY ...


