-
574
-
'13 • PAC-T-197
⑦
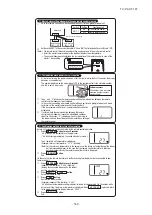
Interlocking with the indoor unit fan
⑥
Installation of panel
⑤
Installation of indoor unit
Work procedure
Tighten the panels to the brackets 3 and 4 with bolts.
For further details, refer to the installation manual of panel.
(Caution) Connect the connector of lover motor within the control box.
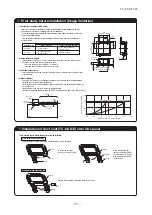
140mm
Suspension bolt
97mm
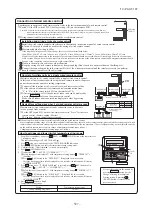
1. This units is designed for 2 x 2 grid ceiling.
If necessary, please detach the T bar temporarily before you install it.
If it is installed on a ceiling other than 2 x 2 grid ceiling, provide an inspection port on the control box side.
2. Arrange the suspension bolt at the right position (530mm530mm).
3. Make sure to use four suspension bolts and fix them so as to be able to hold 500N load.
4. Ensure that the lower end of the suspension bolt should be 97mm above the ceiling plane. Temporarily put the four lower nuts 140mm above the ceiling plane and the
upper nuts on distant place from the lower nuts in order not to obstruct hanging the indoor unit or adjust the indoor unit position, and then hang the indoor unit.
5. Adjust the indoor unit position after hanging it by inserting the level gauge (Packed together with the indoor unit.) attached on the package into the air supply port and
checking if the gap between the ceiling plane and the indoor unit is appropriate. (*) In order to adjust the indoor unit position, adjust the lower nuts while the upper
nuts are put on distant place. Conrm there is no backlash between the hanger plate for suspension bolt and the lower nut and washer.
* Use the level gauge only when OA spacer has been installed before hanging (
④
1-1 only).
Unit
Correct
Unit
Wrong
Nut (upper)
Flat washer
Spring washer
Ceiling surface
Nut (lower)
Touch the nut (lower) and
washer without any play
Play is left between the fixture and the
nut (lower) and washer.
◎
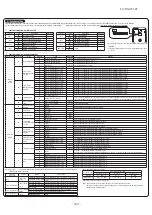
Connect the Single split series and the VRF series to CNT on the indoor PCB and to CND on the indoor PCB respectively. If a ventilation device is connected been geared
with the motion of indoor device (ON: DC12V output, OFF: 0V output), the ventilation device is operated/stopped.
◎
Set it at “VENT LINK” by selecting “No. 11 VENT LINK SET” from the Functional setting by Remote Controller. For details, refer to the “ELECTRIC WIRNG WORK
INSTRUCTION” of indoor unit.
Although the indoor unit fan stops during the defrosting or oil return operation, the booster fan is operating.
Use a total heat exchanger, if necessary.
CNT (6P)
OR
CND (2P)
MC
Connector
Control Bord
Power source
1
2
3
4
5
6
MC
:
Relay
M
:
Booster fan motor
M
MC
(Example of circuit)
Insulate #3 to #6
because these are used.
(Caution)
CNT Conector (the single split series)
Connector: Made by MOLEX 5264-06
Terminal: Made by MOLEX 5263T
1
2
CND Conector (the VRF series)
Connector: Made by MOLEX 5264-02
Terminal: Made by MOLEX 5263T
4
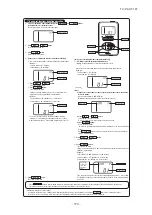
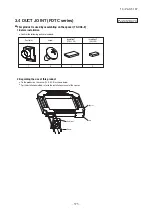
Installation of OA spacer on the indoor unit
1
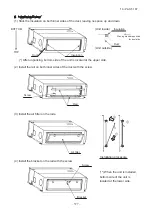
Placing OA spacer on the indoor unit, fix the brackets 1 and 2 (2 pieces
each) with bolts.
Install OA spacer in the appropriate position that the duct joint side of OA
spacer becomes opposite to the control box of indoor unit (FDTC).
Applying the insulation attached to duct joint set (TC-OAD-E)
1
Applying the insulation 1 as shown in the figure.
2
Applying the insulation 2 as shown in the figure.
* Be sure to cover the entire surface of sheet metal of the duct joint with the insulation.
2
Fix the brackets 3 and 4 (2 pieces each) with bolts.
1-1. When installing OA spacer before hanging the indoor unit
1
After hanging the indoor unit (*), fix the bracket 1 (2 pieces) temporarily
with bolt by 2 turns as shown in the figure.
* For the height (position) of hanging the indoor unit, refer to Section 5.
3
Fix the brackets 3 and 4 (2 pieces each) with bolts.
2
Install OA spacer.
i. Install it in the way that the recess of OA spacer will fit on the bracket
1 fixed temporarily at the step
1
.
ii. Tighten the bolt of bracket 1.
iii. Fix the bracket 2 with bolt. (Tighten up)
1-2. When installing OA spacer after hanging the indoor unit
2. Applying insulation
OA spacer can be installed regardless whether the indoor unit has already been hanged or not.
(It is recommended to install before hanging the unit for convenience of installation.)
Bracket 1
Control box
OA spacer
Bracket 1
Bracket 2
Bracket 2
Bracket 1
Bracket 1
Bracket 1
Bracket 1
Temporary
fixing
)
(
Bolt
Temporary
fixing
)
(
Bolt
Bracket 3
Bracket 3
OA spacer
Bracket 4
Bracket 4
OA spacer
Bracket 2
The recess of
OA spacer
The recess of OA spacer
Bracket 2
Bracket 4
Bracket 3
Bracket 4
Bracket 3
OA spacer
Insulation 2
Insulation 2
Insulation 1
A
A
(Contact closely to
the duct joint and OA
spacer.)
(Contact closely to
the duct joint and OA
spacer.)
Bend and
contact closely
to the duct joint
and OA spacer.
(See section A-A.)
30
Level gauge
T-bar
Indoor unit
OA spacer
Ceiling panel
(Packed together with
the indoor unit)
Use level gauges as
refrence, adjust the
bottom to the face of
the OA spacer.
Control box
A-A
PJZ012D074
B
Summary of Contents for V Multi 100VNX
Page 98: ... 97 13 PAC T 197 Models FDT100VF1 125VF 140VF H H H H H C B A F G D G PJF000Z285 A ...
Page 101: ... 100 13 PAC T 197 Models FDEN60VF 71VF1 C2 C1 A B A B D C1 C2 C1 C2 E G F C PFA003Z817 ...
Page 116: ... 115 13 PAC T 197 b Wireless remote control RCN E1R 60 17 150 Unit mm ...
Page 291: ... 290 13 PAC T 197 261 12 PAC T 173 ー K ...
Page 590: ... 589 13 PAC T 197 3 8 SUPER LINK E BOARD SC ADNA E F ...
Page 591: ... 590 13 PAC T 197 ...

