13
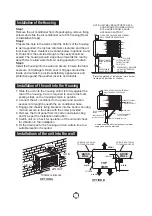
Installation Steps
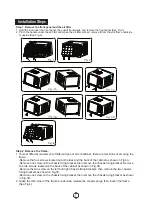
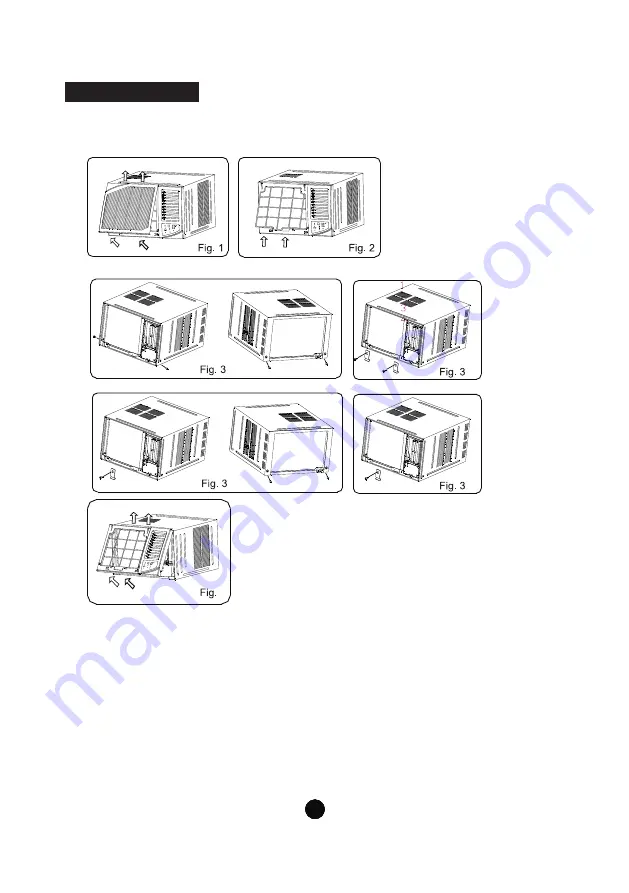
Step 1. Remove the front panel and the air filter
1. Hold the slot under the front panel, then uplift it outwards, and remove the front panel (See Fig.1).
2. Pinch the handle under the air filter and make the air filter arched, remove it from the slot from underside
to upside (See Fig.2).
4
A
B
C
D
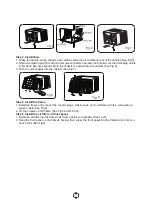
Step 2. Remove the frame.
1. To meet different requrement of different type of air conditioner, there are four kinds of emoving the
frame.
-Remove the four screws located on both sides and the back of the cabinet as shown in Fig.3A.
-Remove one screw on the chassis fixing bracket, then remove the chassis fixing bracket. Remove
the two screws located on the back of the cabinet as shown in Fig.3B.
-Remove the two screw on the letf and right chassis fixing brackets, then remove the two chassis
fixing brackets as shown in Fig.3C.
-Remove one screw on the chassis fixing bracket, then remove the chassis fixing bracket as shown
in Fig.3D.
2. Grasp the left corner of the frame's underside, release the coupler plugs, then loosen the frame
(See Fig.4).
Summary of Contents for WRK20MA1
Page 10: ...OPERATING INSTRUCTIONS 7 ...
Page 11: ...8 ...
Page 23: ...1 內容 1 安全說明 2 2 部件說明 5 3 操作說明 6 4 安裝說明 11 5 故障檢修表 15 6 參數 16 ...
Page 29: ...7 7 POWER MODE MODE 1 30 1 17 FAN FAN SWING SWING TIMER 24 0 5 10 1 ...
Page 30: ...8 8 17 30 SWING ...
Page 31: ... Note 9 9 ...
Page 32: ...1 2 1 2 3 4 1 2 3 40 4 10 10 1 2 3 4 T RUBBER PLUG SCREW DRAIN PAN DRAIN OUTLET ...
Page 35: ...13 13 1 See Fig 1 2 See Fig 2 4 A B C D 2 1 Fig 3A Fig 3B Fig 3C Fig 3D 2 Fig 4 ...
Page 37: ... 15 15 ...
Page 39: ......

