background image

 3. 

.

1. 

 (

 Fig.5).

2. 

 (

 Fig.6).

3. (See 

Fig.7).

4

1. 

 (

 Fig.8).

2.  

(

Fig.3A,3B,3C,3D).

5. .

1. 

  (

 Fig.2).

2. 

"click

 (

 Fig9).


"

5

6

7

8

9

14

14

Summary of Contents for WRK20MA1

Page 1: ...MA1 WRK53MA1 WRK70MA1 本空調器適用於家用 本空調器使用新型環保冷媒 R410A 當需要獲得维修檢查以及保養時 請 對經銷商說明此情況 承蒙選購三菱重工空調器 深表感謝 爲了使空調器長久保持其良好的運 轉性能 在您開始使用空調器之前 務請仔細閱讀本說明書 閱后應將它妥善保 管好 以備必要時查閱 MITSUBISHI HEAVY INDUSTRIES 三菱重工 窗口式冷氣機 Window Type Air Conditioner ...

Page 2: ... established collection systems where electronic waste can be disposed of at least free of charge to the user B When buying a new product the retailer will take back the old product at least free of charge C The manufacture will take back the old appliance for disposal at least free of charge to the user D As old products contain valuable resources they can be sold to scrap metal dealers Wild disp...

Page 3: ...ey do not play with the appliance If the supply cord is damaged it must be replaced by the manufacturer its service agent or similarly qualified persons in order to avoid a hazard The appliance shall be installed in accordance with national wiring regulations Do not operate your air conditioner in a wet room such as a bathroom or laundry room The appliance with electric heater shall have at least ...

Page 4: ...CONTENTS 1 SAFETY PRECAUTIONS 2 2 UNIT PARTS IDENTIFICATION 5 3 OPERATING INSTRUCTIONS 6 4 INSTALLATION INSTRUCTIONS 11 5 TROUBLESHOOTING 15 6 SPECIFICATIONS 16 1 ...

Page 5: ...l the entire house It may cause explosion fire and burns It may cause electric shock or fire due to heat generation It may cause electric shock It may cause failure of machine or electric shock It may cause fire and electric shock It may cause fire and electric shock It may cause electric shock or fire If the power cord is damaged it must be replaced by the manufac turer or an authorised service c...

Page 6: ...es food pets plants and art objects It may cause deterioration of quality etc It may cause failure of product or fire Do not use for special purposes Turn off the main power switch when not using the unit for a long time If water enters the unit turn the unit off at the power outlet and switch off the circuit breaker Isolate supply by taking the power plug out and contact a qualified service techn...

Page 7: ...ries can occur when handling sharp metal edges 2 Do not use water to clean inside the air conditioner Exposure to water can destroy the insulation leading to possible electric shock 3 When cleaning and maintenance the unit first make sure that the power and circuit breaker are turned off SAFETY PRECAUTIONS prior to operation Note Performance may be reduced outside of these operating temperatures 1...

Page 8: ...install the drain tray Drain Joint 1 pec 1pec Drain Tray Rubber Plug 1or 2 depend on model you purchased or 8 Wooden screw optional 5 After the unit has stopped it can not be restarted operation in the first 3 minutes This is to protect the unit Operation will automatically start after 3 minutes Wait 3 minutes before resuming operation If the unit breaks off unexpectedly due to the power cut it wi...

Page 9: ...e of the following CLOSE VENT OPEN To open the vent pull the lever toward you To close it push it in To open the vent set the lever to the right position To close it set the lever in the left position CLOSE OPEN 6 Cooling Only Model Fan Swing Timer Mode SLEEP SWING HIGH MED LOW COOL FAN DRY TEMP AUTO TIMER ON TIMEROFF NOTE The outline of the operation panel is based on typical model the function i...

Page 10: ...OPERATING INSTRUCTIONS 7 ...

Page 11: ...8 ...

Page 12: ...evious display again The CL indicator will display and flash for another 10 seconds at the next time starting the unit To cancel the reminder feaure press the FILTER CLEAN button on the remote controller while the CL indicator is flashing 9 Indicates the requirement of a filter check after 720 hours of fan operation Turn off the unit disconnect unplug from the power supply Clean the filter then re...

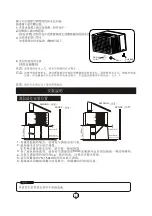
Page 13: ...ice to treat the condensed water Drainage 1 Remove the rubber plug from the bottom of the cabinet and attach to the back drain hole on some models the rubber plug provided with your air conditioner accessory For the units without the bottom rubber plug and the back drain hole just install the drain tray 2 Take out the drain tray and screws which provided with your air conditioner accessory 3 Insta...

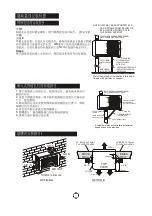
Page 14: ...back of the cabinet because it will prevent heat radiation of the condenser Restriction of outside air will greatly reduce the cooling and heating efficiency of the air conditioner 4 Install the unit a little obliquely outward not to leak the condensed water into the room O about 3 4 with level 5 Install the unit with its bottom portion 75 150cm above the floor level 6 The power cord must be conne...

Page 15: ...CUT AWAY TO CLEAR LOUVRES FRONT AIR OUT AIR IN AIR IN TOP VIEW O 45 BRICK CUT AWAY TO CLEAR LOUVRES 100mm BRICK WALL 100mm OPTION B Step 1 Remove the air conditioner from it s packaging remove fixing screws and slide the air conditioner out of it s housing Refer to Installation Steps Step 2 Prepare the hole in the wall so that the bottom of the housing is well supported the top has minimum clearan...

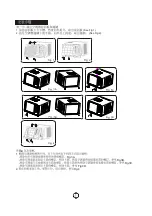
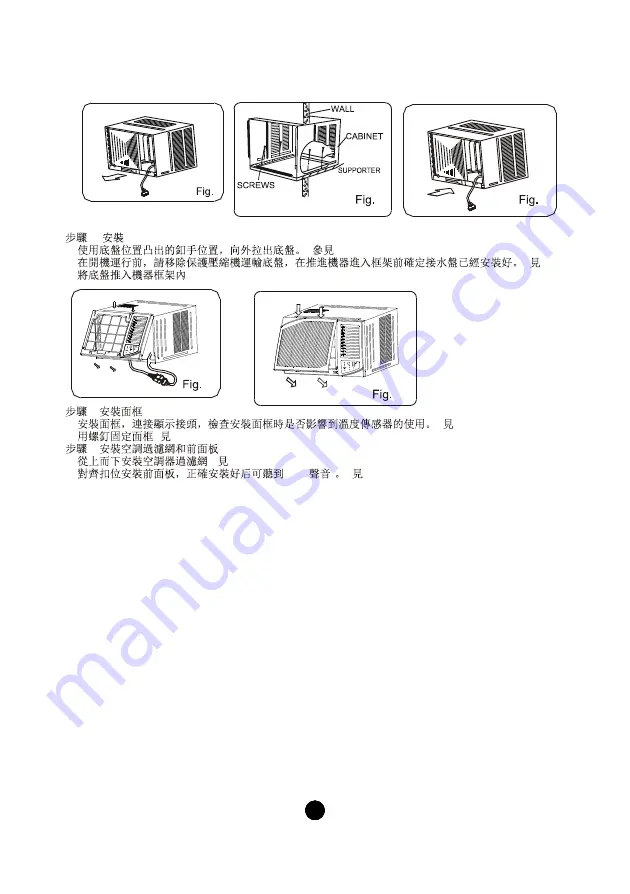
Page 16: ...nds of emoving the frame Remove the four screws located on both sides and the back of the cabinet as shown in Fig 3A Remove one screw on the chassis fixing bracket then remove the chassis fixing bracket Remove the two screws located on the back of the cabinet as shown in Fig 3B Remove the two screw on the letf and right chassis fixing brackets then remove the two chassis fixing brackets as shown i...

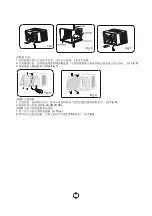
Page 17: ...sh the unit chassis into the cabinet See Fig 7 Step 4 Install the frame 1 Install the frame and connect the coupler plugs making sure not to interfere with the temperature sensor cable See Fig 8 2 Fix the screws on the frame See Fig 3A 3B 3C 3D Step 5 Install the air filter and front panel 1 Install the air filter into the frame s slot from upside to underside See Fig 2 2 Hang the front panel on t...

Page 18: ...compressor has cycled off The fuse is blown circuit breaker is tripped Check the house fuse circuit breaker box and replace the fuse or reset the breaker Power failure If power failure occurs switch off and disconnect unplug the power cord When power is restored reconnect plug in the power cord switch on the power and wait 3 minutes to restart the air conditioner to prevent tripping of the compres...

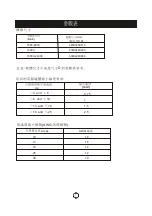
Page 19: ...rea 2 mm 0 75 1 1 5 2 5 Suggest Minimum Wire Size AWG American Wire Gage Appliance Amps AWG Wire Size 10 13 18 25 18 16 14 12 30 10 Unit dimensions NOTE Value of D is for reference only 3 and 6 6 and 10 10 and 16 16 and 25 MODEL Btu h BODY DIMENSION mm W X H X D 7000 9000 445X320X415 450X346X535 660X428X680 18000 24000 12000 ...

Page 20: ...The design and specifications are subject to change without prior notice for product improvement Consult with the sales agency or manufacturer for details ...

Page 21: ...歐盟國家 本產品使用壽命結束時請勿與一般家庭廢棄物一併丟棄 請將該產品放置於政府指定 的回收站 此舉能為環保盡一份心力 禁止在家用生活垃圾中處理本器具 對於處置 下面是可選的方案 1 該區域已建立垃圾收集系統 廢棄電子電器產品應對使用者免費處理 2 在購買新產品時 銷售商應免費回收原舊電子電器產品 3 製造商負責免費從使用者處回收廢棄電子電器產品 4 如若廢棄電子電子產品中包含有價值的資源 他們可以銷售給相應金屬零售商 ...

Page 22: ...把玩空調器 如果空調器的電源線損壞 必須由製造商 或授權的維修中心 或有資 質的人士進行更換 請遵循國家的電器法規 切勿在浴室或者幹衣房間中使用 帶有電加熱器的空調器距離可燃物必須大於1米位置安裝 請聯繫授權的維修人士維修或維護您的空調器 請聯繫授權的安裝人士安裝您的空調器 您的說明書包含 遙控器使用說明書 和 用戶使用說明書 如果兩 者有差異的時候 請以 用戶使用說明書 為准 如果您的空調器在使用過程中被弄翻 請立即關閉空調器 拔下插頭 檢查機器外觀是否破損 如果機器損壞 請聯繫您的技術人員或者維修 中心 在暴風雨的死後 為避免空調器被雷擊 請切斷電源 為了避免電擊危險 請不要使用任何電晶體控速裝置控制該風扇 請不要在地毯下麵走線 不要用毯子類似的覆蓋物蓋住電線 不要在傢 俱下佈線 佈線時候遠離公共區域並避免磕碰 ...

Page 23: ...1 內容 1 安全說明 2 2 部件說明 5 3 操作說明 6 4 安裝說明 11 5 故障檢修表 15 6 參數 16 ...

Page 24: ...接地方式可能導致電擊 風險 將有可能導致電擊或起火 將有可能影響空調器效果 有可能起火 電擊或者燃燒 將有可能因為過熱導致電擊或者起 火 將有可能導致電擊 將有可能導致空調器損壞或者電擊 將有可能導致電擊或起火 將有可能導致電擊或起火 將有可能導致電擊或者起火 為避免危險 電源線損壞的時請聯 繫您的銷售商 維修中心或者有資質 的維修人員進行更換 這會影響閣下的健康 不正確的安裝方式將可能導致電擊 或者起火 將有可能導致電擊和起火 將有可能腐蝕空調和起火 將有可能破壞機器或者電擊 請不要插入或者拔出插頭來開 關空調器 請不要在潮濕的環境下工作 并確保操作者操作時候手是 乾燥的 請不要讓水進入空調器的電器 部件 不要使用鬆脫或者破損的插座 請勿將空調器置於加熱設備 附近 請不要損壞或者使用無認證 的電源線 請不要直吹 安裝時請使用合適規格的保 險 使用過程中請勿拆開機器 請勿將空調器電源線靠近...

Page 25: ...或起火 請勿將空調直吹寵物或者植 物 拔下插頭后請將插頭朝上置 當空調器與火爐一起使用的 時候 請保證房間通風 否則會缺氧 以下場合請不要使用 以免影響 物品品質 精密設備 寵物 植 物等 否則有可能有起火隱患 請勿將空調用於特殊用途 長期不適用的時候請切換電源 拔下插頭 如果有水進入空調器 請立即關閉電源 切斷保險 并聯繫有資質的維修人員 這有可能導致機器故障或損 壞 可能會損壞空調器外觀 請勿在空調器的進風口和 出風口放置遮擋物 請使用軟布擦拭 不要使 用強清洗劑如石蠟 如果支架損壞 空調器有下墜 危險 將有可能電擊或起火 請檢查絕緣支架是否完好 請勿在電源線上放置重物 并確保電 源線不會被重壓 空調器在沒有濾網下運行可能會 損壞機器 可能含有危害健康的物質 請正確的插入過濾網 敬請 每兩周清潔濾網 請勿引用空調器的冷凝水 3 ...

Page 26: ...1 2 3 4 5 6 1 2 3 1 2 3 1 Fig a 2 Fig b 3 4 POWER CORD A E N E Earth wire yellow green N Neutral wire blue A Active wire brown Fig a Wall outlet Air break switch 4 4 Fig b ...

Page 27: ... or 4 Used to install the drain tray 1 pec 1pec 1or 2 or 8 5 5 1 2 3 4 5 6 7 8 9 10 9 MODE MODE SLEEP SLEEP LED LED CLOCK CLOCK CANCEL CANCEL TIMER TIMER FAN FAN RESET RESET LOCK LOCK CLOCK CLOCK E E ON ON OFF OFF SET TEMP SET TEMP FAN SPEED FAN SPEED AUTO AUTO F F SWING SWING 10 ...

Page 28: ... 6 6 Fan Swing Timer Mode SLEEP SWING HIGH MED LOW COOL FAN DRY TEMP TEMP AUTO TIMER ON TIMEROFF MED ...

Page 29: ...7 7 POWER MODE MODE 1 30 1 17 FAN FAN SWING SWING TIMER 24 0 5 10 1 ...

Page 30: ...8 8 17 30 SWING ...

Page 31: ... Note 9 9 ...

Page 32: ...1 2 1 2 3 4 1 2 3 40 4 10 10 1 2 3 4 T RUBBER PLUG SCREW DRAIN PAN DRAIN OUTLET ...

Page 33: ...11 11 1 2 3 90 SEAL DRAIN JOINT RUBBER PLUG 4 1 2 3 50cm 4 3 4 5 75 150cm 6 75 150 cm Over 50cm O About 3 4 AWNING FENCE 75 150 cm Over 50cm O About 3 4 AWNING FENCE I ...

Page 34: ...RICK CUT AWAY TO CLEAR LOUVRES FRONT AIR OUT AIR IN AIR IN TOP VIEW O 45 BRICK CUT AWAY TO CLEAR LOUVRES 100mm BRICK WALL 100mm OPTION B 1 2 A B 5mm Step 3 NOTE UNIT MAY BE SUPPORTED BY A SOLID FRAME FROM BELOW OR BY A HANGER FROM A SOLID OVERHEAD SUPPORT Preferred method of installation into a timber framed wall partition or window FLASH OR SEAL AROUND EXTERNAL WALL FRAME OR ARCHITRAVE STURDY TIM...

Page 35: ...13 13 1 See Fig 1 2 See Fig 2 4 A B C D 2 1 Fig 3A Fig 3B Fig 3C Fig 3D 2 Fig 4 ...

Page 36: ...3 1 Fig 5 2 Fig 6 3 See Fig 7 4 1 Fig 8 2 Fig 3A 3B 3C 3D 5 1 Fig 2 2 click Fig9 5 6 7 8 9 14 14 ...

Page 37: ... 15 15 ...

Page 38: ...16 16 A 2 mm 0 75 1 1 5 2 5 AWG Amps AWG 10 13 18 25 18 16 14 12 30 10 D 3 and 6 6 and 10 10 and 16 16 and 25 Btu h mm W X H X D 7000 9000 445X320X415 450X346X535 660X428X680 18000 24000 12000 ...

Page 39: ......
Reviews: