background image

SAFETY & REGULATORY NOTICES

V I

Notes

All interconnecting cables (for example, microphone, headphones
or external speakers) and communication cables should be less than
2 metres in length.

If cable extensions are used, ensure adequate earth connections are
provided and screened cables are used.

If the system unit top cover, or any other metal part, is removed
and then replaced, all parts must be correctly re-assembled and all
screws tightened.

Legalities

This equipment complies with the relevant clauses of the following
European Directives (and all subsequent amendments):

Low Voltage Directive

73/23/EEC

EMC Directive

89/336/EEC

Telecommunications Directive

91/263/EEC

CE Marking Directive

93/68/EEC

Important

This system complies with the CE Marking Directive and its strict legal
requirements. Use only parts tested and approved by Mitsubishi Electric
PC Division. Failure to do so may result in invalidating both the
compliance and your warranty. All expansion cards, drives and
peripherals must carry the CE mark to ensure continued compliance.

Summary of Contents for Apricot MS Series

Page 1: ...i n c l u d i n g Q uick S tart G uide Apricot MS SERIES Owner s Handbook ...

Page 2: ... START GUIDE APRICOT MS SERIES QUICK START GUIDE COMPACT For your own safety Read through the Safety Regulatory Notices section at the start of the Owner s Handbook before using the computer for the first time ...

Page 3: ...e AC outlet AC outlet 10101 10101 6 Microphone includ ing Quic k Start Guid e Apricot MS SERIES Owner s Handbook APRICOT MULTIMEDIA PCs APRICOT MULTIMEDIA PCs Using the Welcome Mat Use the Welcome Mat to help you unpack and connect the components of your new personal computer The recommended order is 1 Keyboard 2 Mouse 3 Monitor signal cable 4 Stereo speakers and optional sub woofer 5 Modem cable ...

Page 4: ...n to turn on the computer to put it to sleep and to wake it up Turn the POWER button to change the volume of sound through the computer s speakers The colour of Power Mode light shows whether the computer is in Off red On or Standby green or Suspend yellow mode The monitor has its own power button or switch see the monitor s User Guide to find out where it is ...

Page 5: ...e of your files are lost In Suspend mode the Power Mode light is yellow Note Future versions of Windows will allow you to redefine the POWER button so that when you press it the operating system shuts down and the PC goes directly into Off mode Automatic power saving During periods of inactivity the computer automatically reduces the power consumption of idle components For example the monitor scr...

Page 6: ...off except to move or open up the computer Emergency shut down In exceptional circumstances you can shut down your PC without shutting down Windows first To do this press and hold down the POWER button for at least four seconds The computer also shuts itself down if you press the POWER button in MS DOS or before Windows starts Make sure it is an emergency In an emergency shut down you may lose any...

Page 7: ... legal terms and conditions of the Windows 95 Licence Agreement Windows 95 then spends a few minutes analysing your computer and configuring itself to take full advantage of your computer s components Windows 95 also offers you the opportunity to install a printer However you do not have to install a printer at this time if you don t want to You only register once All of this only happens the firs...

Page 8: ...tion for example if you change address Optionally for extra security you can decide that this same password is requested every time the computer is turned on or every time the mains power supply is interrupted If you forget your branding password you can use a specialfall back password instead The fall back password is a 12 digit number that is unique to your computer It is displayed only once the...

Page 9: ... system 1 Right click with the mouse while pointing at the background of the Windows 95 desktop then select Properties from the pop up menu 2 Click the Settings tab of the Display Properties dialog 3 You can now select the Display Area resolution and Colour Palette number of colours We suggest at least 800 by 600 pixels in 256 colours Tips You may have to specify the make and model of your monitor...

Page 10: ... offer are given on the promotional leaflet that came with your computer Infotrade also offers a variety of personal finance services These services are entirely optional and separate from the Internet service To find out more double click the Infotrade Internet Help icon on the Windows 95 desktop Hint Although we recommend the Infotrade Internet service and have made it very easy for Apricot PC u...

Page 11: ...tup is complete you are prompted to restart your computer Once your computer has restarted you are ready to connect to the Internet and register your new account with Infotrade 3 Make sure the modem cable is connected from the back of the computer to your phone socket 4 Double click on The Internet icon on the Windows desktop to start Microsoft s Internet Explorer 5 Follow the instructions on the ...

Page 12: ...sages Easy Manager Configuration allows you to say which parts of the Easy Manager collection you want to use Entertainment Centre offers easy access to a range of games reference and productivity programs some of which may be pre installed on your computer s hard disk or supplied on CD Message Centre is the place where incoming electronic mail e mail voice and fax messages are available for you t...

Page 13: ... CD Player and Microsoft Internet Explorer The remote will only work withTV tuner cards that are approved by Mitsubishi Electric PC Division The remote control operates on two AA batteries which are provided Insert the batteries as shown on the right Hint To find out more about the remote control click on the Mitsubishi Electric symbol in the Windows taskbar then click Help ...

Page 14: ...APRICOT MS SERIES OWNER S HANDBOOK COMPACT DESKTOP MW EDITION ...

Page 15: ...are described in this manual is furnished under a license agreement The software may be used or copied only in accordance with the terms of this agreement It is against the law to copy any disk supplied for any purpose other than the purchaser s personal use No part of this manual may be reproduced or transmitted in any form or by any means electronic or mechanical including photocopying and recor...

Page 16: ...ery may explode Replace a discharged battery with one of the same type another type may explode or ignite Follow the instructions contained in the Owner s Handbook to replace the battery Dispose of a discharged battery promptly and in accordance with the battery manufacturer s recommended instructions Do not recharge disassemble or incinerate the discharged battery Keep away from children Laser pr...

Page 17: ...ial Handling Area SHA as defined by EN 100015 1 1992 This means that working surfaces floor coverings and chairs must be connected to a common earth reference point and you should wear an earthed wrist strap and anti static clothing It is also a good idea to use an ionizer or humidifier to remove static from the air When installing any upgrade be sure you understand what the installation procedure...

Page 18: ...omputer any great distance use the original packing materials Maintenance Do not use sprays solvents or abrasives that might damage the system unit surface Do not use cleaning fluids or sprays near air vents ports or the diskette and CD ROM drives Occasionally wipe the system unit with a soft slightly damp lint free cloth Occasionally wipe over the air vents on the rear and sides of the system uni...

Page 19: ... you must check the voltage and frequency of that country s AC power supply and the type of power cord required there Check the power rating labels on the rear of the computer s system unit and its monitor to ensure that they are compatible with the AC power supply The computer can function within two alternative AC power supply ranges according to the position of the voltage selection switch on t...

Page 20: ...any other peripherals to nearby grounded AC power outlets Then switch on or connect the AC power supply 4 Turn on the system unit first then the monitor then other peripherals Power Cable Connections UK ONLY This equipment is supplied with an AC power cord that has a non removable moulded plug Always replace the fuse with one of the same type and rating which is BSI or ASTA approved to BS1362 Alwa...

Page 21: ...l screws tightened Legalities This equipment complies with the relevant clauses of the following European Directives and all subsequent amendments Low Voltage Directive 73 23 EEC EMC Directive 89 336 EEC Telecommunications Directive 91 263 EEC CE Marking Directive 93 68 EEC Important This system complies with the CE Marking Directive and its strict legal requirements Use only parts tested and appr...

Page 22: ... Reserving ISA legacy resources 4 7 Telling Windows about the new hardware 4 8 5 Motherboard Features Upgrades Motherboard jumper settings 5 3 Motherboard resource assignments 5 5 Adding more memory 5 8 Adding more video memory 5 11 Upgrading the processor 5 12 Replacing the configuration battery 5 16 6 Hard Disk Upgrades Configuring the drive 6 2 Installing the drive 6 3 Partitioning and formatti...

Page 23: ...OWNER S HANDBOOK i i C o n t e n t s 8 Troubleshooting Problems when starting 8 2 Common problems 8 4 Equipment Log ...

Page 24: ...e of the manufacturer s data recorded on the various components product codes serial numbers etc A service engineer may need this information if the computer develops a fault For your own safety Read the Safety Regulatory Notices section at the start of this manual before using the computer for the first time Standard features Pentium MMX processor At least 16 Mbytes of main memory 512 Kbyte memor...

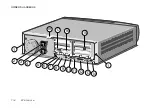
Page 25: ...OWNER S HANDBOOK 1 2 W e l c o m e Pictorial guide to the system unit COMPACT 6 5 1 3 7 4 2 8 9 10 13 12 11 ...

Page 26: ...ode light changes colour to show the current state of the computer Off red Your computer is turned off but is still connected to the AC power supply Suspend yellow Your computer is sleeping to conserve electricity Briefly pressing the POWER button wakes it up again On or Standby green Your computer is awake and working but may reduce power during idle moments Standby mode Move the mouse or press a...

Page 27: ...OWNER S HANDBOOK 1 4 W e l c o m e 1 1 4 2 3 13 12 10 8 9 7 6 14 18 10101 17 16 15 11 5 ...

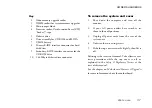
Page 28: ...rt 6 Speaker socket 7 Line Out socket 8 Microphone socket 9 Serial port 10 Keyboard port 11 Mouse port 12 Parallel printer port 13 TV Out port factory option 14 Monitor port 15 Modem port 16 SPDIF digital audio output factory option 17 MIDI Joystick port 18 Security loop for cable or padlock For more information about the various audio video and multimedia options see the Multimedia chapter ...

Page 29: ...OWNER S HANDBOOK 1 6 W e l c o m e 1 5 6 4 7 9 10 8 3 2 ...

Page 30: ...kette drive connector To remove the system unit cover 1 Shut down the computer and turn off the monitor 2 If your AC power outlets have switches set them to their off positions 3 Unplug all power cords from the rear of the system unit 4 Unfasten the two casing screws 5 Slide the top cover rearwards slightly then lift it off Refitting is the reverse of removal Take effective anti static precautions...

Page 31: ...mote control click on the Mitsubishi Electric symbol in the Windows taskbar then click Help CD starts the CD program STANDBY puts the computer into or wakes it up from an energy saving mode MESSAGE starts the Message Centre program OK and CANCEL accept and decline changes TV starts the TV Teletext program works only with TV tuner cards approved by Mitsubishi Electric PC Division EXIT closes the cu...

Page 32: ... relating to ergonomic requirements For example you should ensure that little or no light is reflected off the monitor screen as glare and that the keyboard is placed in a comfortable position for typing Give the computer plenty of room so that air can circulate on all sides Air is drawn into the system unit through vents at the front and on the left hand side and expelled through the vent on the ...

Page 33: ...l safeguard the pre installed software against loss if the hard disk fails or if you accidentally overwrite or delete files The Microsoft Create System Disks utility allows you to create installation diskettes from disk images pre installed on the hard disk To back up other pre installed software and your own files use the Backup tool Click the Start button in the Windows taskbar then Programs Acc...

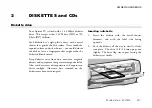
Page 34: ...a fingerprint that might make the diskette difficult to read Keep diskettes away from dust moisture magnetic objects and equipment that generates magnetic fields Also avoid extremes of temperature and exposure to direct sunlight Otherwise data recorded on the diskette may become corrupted Inserting a diskette 1 Insert the diskette with the metal shutter foremost and with the label side facing upwa...

Page 35: ...ove it with tweezers or any similar implement you risk damaging the drive Call an authorised maintainer Write protecting a diskette A diskette can be write protected by sliding a tab towards the edge of the diskette to expose the small hole beneath it see illustration Note that the location of the tab depends on the type of diskette You can read copy or print the files on a write protected diskett...

Page 36: ...normal music CDs the drive has its own headphone jack and associated volume control Keep CDs well away from dust and moisture and avoid touching the surface of the CD Avoid extremes of temperature and exposure to direct sunlight as these may cause the disc to warp Do not attempt to move the computer while a CD is in the drive especially if the CD is being played at the time Warning The laser beam ...

Page 37: ...the platter to draw it back into the drive COMPACT Ejecting a compact disc Ensure that the drive s activity indicator is not showing busy then press the EJECT button To eject the platter manually for example during a power failure you must first ensure that the computer is completely off the Power Mode light must be unlit Insert a thin metal rod such as an unwound paper clip into the emergency eje...

Page 38: ...ptional ports are located in the sixth fake expansion card slot See the Welcome chapter if you need help identifying these ports and sockets Technical summary The video system is ATI Technologies 3D Rage Pro This accelerates 3 D and motion video supports Windows Direct3D and assists DVD MPEG 2 video decoding In some models the 3D Rage Pro is augmented by an ATI ImpacTV part providing TV output The...

Page 39: ...deo In Video Analog Universal Serial Bus In Out Multimedia Digital FireWire IEEE 1394 In Out Multimedia Digital Rear Microphone In Audio Analog Universal Serial Bus In Out Multimedia Digital Speakers Out Audio Analog Line Out Out Audio Analog TV Out S Video Out Video Analog Slot 6 MIDI In Out Multimedia Digital SPDIF Out Audio Digital ...

Page 40: ...visions The front Line In socket could also be used as an alternative to the rear Microphone socket or for input from a personal cassette or CD player S Video and Composite Video These front panel inputs allow you to connect your PC to analog video equipment such as cameras camcorders and VCRs The S Video input is for Hi8 or S VHS devices in which the luminance brightness and chrominance colour si...

Page 41: ...le that is they can be plugged in and disconnected without turning off the computer The USB can supply DC power to certain devices so that they do not need an independent power supply It is also quite fast operating at 12 megabits per second which is appropriate for a wide range of applications including video conferencing cameras The Apricot MS Series has one USB port on the front bezel and anoth...

Page 42: ...ilure to do so may result in invalidating both the compliance and your warranty All expansion cards drives and peripherals must carry the CE mark to ensure continued compliance Expansion cards also known as expansion boards controllers or adapters are small self contained circuit boards which extend the capabilities of the computer For example an MPEG 2 or TV tuner card could enhance the on board ...

Page 43: ...address Base memory address The important thing to understand is that the settings of the card you are installing must not conflict with the settings used by other cards already in the computer or by components on the computer s motherboard The documentation accompanying the card should tell you whether the card supports Plug and Play or if not how to configure it Remember to check any diskettes s...

Page 44: ...changing jumper settings on the motherboard This frees the resources used by those components See the BIOS Setup POST chapter for more information about BIOS Setup See the Motherboard Features Upgrades chapter for more information about jumper settings and the usual assignment of interrupts to motherboard components Direct memory access DMA channel Some hardware devices can use a DMA channel to ac...

Page 45: ...UMB regions with the BIOS Setup utility The card s documentation should list its possible base memory addresses You may also need to know how much memory the card has so that you can leave the right gap between this card s base address and the next More about memory addresses Memory addresses are always written in base 16 or hexadecimal notation Unlike the ten digits of the decimal system 0 9 hexa...

Page 46: ... information see Anti static precautions in the Safety Regulatory Notices at the start of this manual 3 Decide in which of the available slots you wish to install the card according to its type and size In general it is easiest where possible to start with the lowest slot and work upwards 4a If the chosen slot is on the left hand side of the system unit when viewed from the front remove its blanki...

Page 47: ...the AMC connector Some pins carry 5 V power which could damage the expansion card if it is incorrectly attached 7 Position the expansion card alongside the slot in which you wish to install it Align the rear of the card with the slot in the rear of the system unit and if the card is full length align the front of the card with the card guide 8 Slide the card into the slot ensuring that the card ed...

Page 48: ...re information Alternatively you can use the Windows Control Panel to change the resource settings used by devices 1 Click the Start button in the taskbar then Settings then Control Panel 2 Double click on System then click the Device Manager tab of the System Properties dialog 3 Select the device whose resources you want to change then click Properties 4 Click the Resources tab of the device s Pr...

Page 49: ...hould automatically detect and configure cards that support Plug and Play In other cases you may have to tell Windows that you have installed new hardware as follows 1 Click the Start button in the taskbar then Settings then Control Panel 2 Double click on Add New Hardware 3 Follow the instructions in the Add New Hardware Wizard ...

Page 50: ...this manual for advice on how to avoid damaging your computer with static electricity Warning Never carry out any work inside the computer with AC power applied Always shut down the computer and unplug all power cords before removing the top cover Do not change jumper settings unnecessarily Do not alter any jumpers or switch settings other than those identified in this chapter unless told to by yo...

Page 51: ...cessor ZIF socket 9 Front panel connectors 10 CMOS battery 11 Front panel USB internal connector 12 Primary E IDE connector 13 Secondary E IDE connector 14 Wake on Call modem connector 15 CD audio connector 16 SPDIF internal connector 17 1 44 Mbyte diskette drive connector 18 Speakerphone modem audio connector 19 Joystick MIDI internal connector 20 Universal Serial Bus USB port 21 Speaker socket 2...

Page 52: ...ar marking Do not change jumper settings unnecessarily Do not alter any jumpers or switch settings other than those identified in this chapter unless told to by your Mitsubishi Electric PC supplier or an authorised maintainer Otherwise you may damage the system processor the motherboard or both Processor bus speed J10 After upgrading your processor but before turning on the system you need to chan...

Page 53: ...apter If for some reason this does not happen and you experience problems with a newly fitted card you can manually disable the on board video adapter by moving the jumper in block J50 to pins 2 3 Audio disabling J80 The on board audio codec can be disabled by moving the jumpers on jumper block J80 to pins 2 3 Disabling the audio system frees the interrupts and DMA channels used by that system nor...

Page 54: ... 2 3 4 5 6 7 8 9 10 11 12 13 14 15 System timer Keyboard controller PIC daisy chain Infra red remote control BS Serial port 1 BS Audio JS Diskette controller BS Parallel port usually sharable BS Real time clock On board video sharable JS USB sharable BS Mouse Co processor Primary E IDE BS Secondary E IDE BS Refer to next page for an explanation of this table ...

Page 55: ...0 1 2 3 4 5 6 7 Audio JS Diskette controller BS Parallel port in ECP mode BS DMAC daisy chain Key Fixed assignment BS Can be disabled by BIOS Setup Usual assignment JS Can be disabled by changing a motherboard jumper setting Alternative assignment by BIOS Setup Alternative assignment by Plug and Play ...

Page 56: ... the motherboard Any ports between 100h and 3FFh that are not listed may be used by an expansion card Assigned I O ports 000h 00Fh 0A0h 0A1h 278h 27Bh 020h 021h 0B2h 0B3h 2F8h 2FFh 040h 043h 0C0h 0DEh 330h 331h 048h 04Bh 0F0h 376h 37Fh 060h 061h 15Ch 15Dh 388h 38Bh 064h 170h 177h 3BCh 3BFh 070h 071h 1F0h 1F7h 3E8h 3FFh 076h 07Eh 200h 207h CF8h CFFh 080h 08Fh 220h 22Fh ...

Page 57: ...The DIMMs you use must have the following specification gold contacts 3 3V 64 bit unbuffered SDRAM type with Serial Presence Detect SPD and a CAS latency of 2 at 66 MHz If you use any other type of DIMM you risk damaging the motherboard Before you begin 1 Turn off the computer and unplug all power cords 2 Take suitable anti static precautions and remove the system unit cover For more information s...

Page 58: ...out of the socket If you have this type of socket carefully ease apart the clips at each end to free the DIMM The DIMM can then be tilted forward and lifted out of the socket Removing a DIMM If you need to start by removing a DIMM follow the diagrams on the left depending on what type of socket you have Hold the DIMM by its ends and avoid touching the metal contacts Place the DIMM in suitable anti...

Page 59: ...ly remove it and start again When you have finished replace any expansion cards you needed to remove then refit the system unit cover If the computer does not automatically detect the new memory the first time you turn it on start the BIOS Setup utility go to the Advanced menu and change the Reset Configuration Data item to Yes then restart the computer If an error message appears check that the D...

Page 60: ... the Anti static precautions section in the Safety Regulatory Notices at the start of this manual 3 Remove any expansion cards that impede access to the video memory upgrade socket see the diagram at the start of this chapter 4 Unpack the upgrade kit Hold the SODIMM chip by its edges and be careful not to touch the metal pins 5 Insert the SODIMM into the socket as shown below 6 Replace any expansi...

Page 61: ...cords 2 Take suitable anti static precautions and remove the system unit cover For more information see the Anti static precautions section in the Safety Regulatory Notices at the start of this manual 3 Remove any expansion cards that impede access to the processor 4 If the system was in use immediately before starting this procedure the processor will be hot wait at least 15 minutes for it to coo...

Page 62: ...the side of the ZIF socket and raise it to the upright position at right angles to the motherboard There may be a little stiffness at the beginning and end of the lever s movement be careful not to use excessive force 8 Lift the processor with fan sink clear of the system unit and place it on an anti static surface Hold the processor by its edges and avoid touching any of the metal pins 9 Separate...

Page 63: ...lever on the ZIF socket is still in the upright position 11 Take the upgrade processor out of its anti static packaging Hold the processor by its edges and avoid touching the metal pins The upgrade processor A and the ZIF socket B are keyed to ensure that the processor is installed in the correct orientation The pin pattern is totally different at one corner The processor will only fit into the so...

Page 64: ...on If the fan sink power cable is not reconnected properly the processor may run slowly or not at all and there is a risk that it may overheat and be permanently damaged 16 Adjust the processor bus speed selection jumpers in block J10 as described at the start of this chapter When you have finished replace any expansion cards you needed to remove then refit the system unit cover If the computer do...

Page 65: ...tery powered electronic items 3 To replace the battery 1 Turn off the computer and unplug all power cords 2 Take suitable anti static precautions and remove the system unit cover For more information see the section on Anti static precautions in the Safety Regulatory Notices at the start of this manual 3 Remove any expansion cards that impede access to the battery holder 4 Using a non conductive i...

Page 66: ...tery pick up the replacement with the positive terminal upwards Press the battery into the holder using a non conductive implement 7 Replace any expansion cards you removed earlier and refit the system unit cover 8 Dispose of the discharged battery in accordance with the battery manufacturer s instructions The next time you turn on the computer you will have to run the BIOS Setup utility to reset ...

Page 67: ...with the CE Marking Directive and its strict legal requirements Use only parts tested and approved by Mitsubishi Electric PC Division Failure to do so may result in invalidating both the compliance and your warranty All expansion cards drives and peripherals must carry the CE mark to ensure continued compliance Note After you have upgraded your computer it may not at first recognise the new config...

Page 68: ...must be configured as the slave Hard disk drives are normally configured as master or slave by using jumpers on the drive itself Configuration details vary from drive to drive Most drives are supplied with documentation describing how to configure the drive If you are uncertain about configuring the drive consult your supplier Example The example 5 25 inch drive shown below is configured as master...

Page 69: ...egulatory Notices at the start of this manual 4 Disconnect the power and signal ribbon cables from the rear of the diskette drive Take careful note of how they are fitted 5 Loosen the two screws labelled A in the diagram Slide the diskette drive assembly towards the rear of the system and lift it out 6 Disconnect the power signal and CD audio cables from the rear of the CD ROM drive Disconnect the...

Page 70: ...and one for the slave drive 11 Attach a spare power cable to the slave drive and another to the master drive It does not matter greatly which of the available power cables you choose 12 Re attach the CD ROM power signal and CD audio cables 13 Put the diskette drive assembly back into the system unit and tighten the A screws to secure it Re attach the diskette drive power and signal cables 14 Check...

Page 71: ... MS DOS Fdisk program to create partitions on the disk The Fdisk program can be run in an MS DOS window within Windows Type Help Fdisk at the MS DOS command prompt to find out more After using Fdisk you are prompted to restart the computer Once back in Windows you can format the partitions by opening the My Computer folder selecting the new Drive icon and choosing the Format command from the File ...

Page 72: ...he software you use can recognise and exploit the hardware s capabilities The current configuration is kept in a special area of memory called CMOS memory and maintained by a battery so that the configuration is preserved even while the computer is switched off Your computer arrives already configured but may need to be configured again after you add or remove add on options such as memory modules...

Page 73: ...t POST detects a configuration error or fault This may be signalled by one or more POST error messages If a persistent fault is indicated make a note of any error messages and the current configuration settings before calling an authorised maintainer The CMOS battery may be running down This may cause spurious POST error messages If this happens every time you turn on the computer you may have to ...

Page 74: ...enu F9 Restore the default settings for all menus F10 Save the changes you ve made and exit from BIOS Setup Control keys Use the keys listed in the legend bar at the bottom of the BIOS Setup screen to make your selections or exit the current menu Sub menus are marked by a pointer To display a sub menu use the arrow keys to move the cursor to the sub menu you want then press ENTER Changeable fields...

Page 75: ...s Whenever a recoverable non terminal error occurs during POST the BIOS displays an error message describing the problem the most usual are described below After some messages you may be prompted to Press F1 to resume F2 to enter Setup or just Press F2 to enter Setup In general you should respond to these errors as follows Shut down the computer wait 20 to 30 seconds and then turn it on again to s...

Page 76: ...rive is defined correctly in BIOS Setup If necessary open the system unit and check that the drive s signal ribbon cable is connected Incorrect drive A type run SETUP The diskette drive is not correctly specified in BIOS Setup Invalid NVRAM media type Problem with NVRAM non volatile random access memory Keyboard error nn or Keyboard controller error There is a problem with the keyboard or less lik...

Page 77: ...attery is dead replace and run Setup Replace the configuration battery as instructed in the Motherboard Features Upgrades chapter then use BIOS Setup to reconfigure the system System cache error cache disabled The RAM cache failed POST and BIOS disabled it System CMOS checksum bad run Setup System CMOS has been corrupted or modified incorrectly perhaps by an application program that changes data s...

Page 78: ...re or option ROM checksum failure One long two short beeps Terminal POST errors and beep codes There are several POST routines that shut down the computer if they fail If possible the BIOS displays a two digit hexadecimal code and or sounds a sequence of beeps to identify the point at which POST failed The most usual errors are listed in the table on the left The BIOS also issues one long tone fol...

Page 79: ...rds or upgrading the motherboard or indeed anything that requires temporary removal of the system cover If you are apprehensive Make a note of any of the symptoms error codes displayed messages and so on then turn off the computer and unplug all power cords before consulting your supplier or maintenance provider If something goes wrong Read this chapter Review the rest of this manual to make sure ...

Page 80: ...upplier or maintenance provider If the replacement fuse does not blow reconnect a peripheral and turn it on Repeat this step for each peripheral in turn Power on self test POST Whenever the computer is turned on the BIOS POST routine tests various hardware components including memory and compares the actual configuration of the computer with that recorded in CMOS memory If POST detects a hardware ...

Page 81: ...ust insert a system diskette press F1 and format the new hard disk as described in your operating system manuals Fixed disk read failure The hard disk may be defective Press F1 to retry Make sure the drive is correctly specified in the BIOS Setup utility If the problem persists insert a system diskette press F1 backup the data held on the defective hard disk and try reformatting it No boot device ...

Page 82: ...plug if any has not blown If the system still does not seem to be getting power obtain another power cord from your supplier Monitor If there is no display check that the compuuter is not in an energy saving mode see the Welcome chapter that the monitor is turned on and the brightness and contrast controls are not too low If you have fitted a new video controller expansion card and subsequently en...

Page 83: ...mperature If the keyboard still won t work call your supplier or an authorised maintainer Expansion cards If an expansion card does not work check that all internal cables are securely connected that the card is configured correctly that its use of system resources does not conflict another card or motherboard component and that legacy resources if it is an ISA card are properly declared in the BI...

Page 84: ...nal CD ROM drive you cannot write to a CD Hard disk drives If you encounter problems accessing a hard disk drive use the BIOS Setup utility to check that the drive is correctly specified and that the drive s controller is enabled Check also that the disk has been correctly formatted and that the permissions assigned by the operating system allow the intended access Overheating If the system proces...

Page 85: ...e see the Quick Start Guide for more information Record the password in the space provided below then store this page or the whole manual in a safe place Fall back password Manufacturer s data You should record the model codes and serial numbers of the system components You can update this with information about any expansion cards fitted Model Serial number System unit Monitor Keyboard Mouse ...

Page 86: ...Model Serial number Speakers Sub woofer Expansion cards Manufacturer Description Serial number 1 2 3 4 5 ...

Page 87: ...mited 3500 Parkside Birmingham Business Park Birmingham B37 7YS United Kingdom Tel 44 0 121 717 7171 Fax 44 0 121 717 7799 MITSUBISHI ELECTRIC PC DIVISION Apricot Computers Limited Niederlassung Deutschland Gothaer Strasse 27 40880 Ratingen Germany Tel 49 0 2102 4556 Fax 49 0 2102 455700 ...

Reviews: