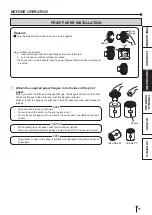
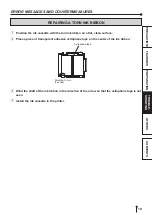
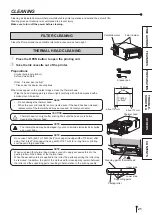
background image

21

PREP

ARA

TION

TROUBLE-

SHOOTING

FEA
TURES

PRECAUTIONS

OTHERS

CONTENTS

FILTER CLEANING

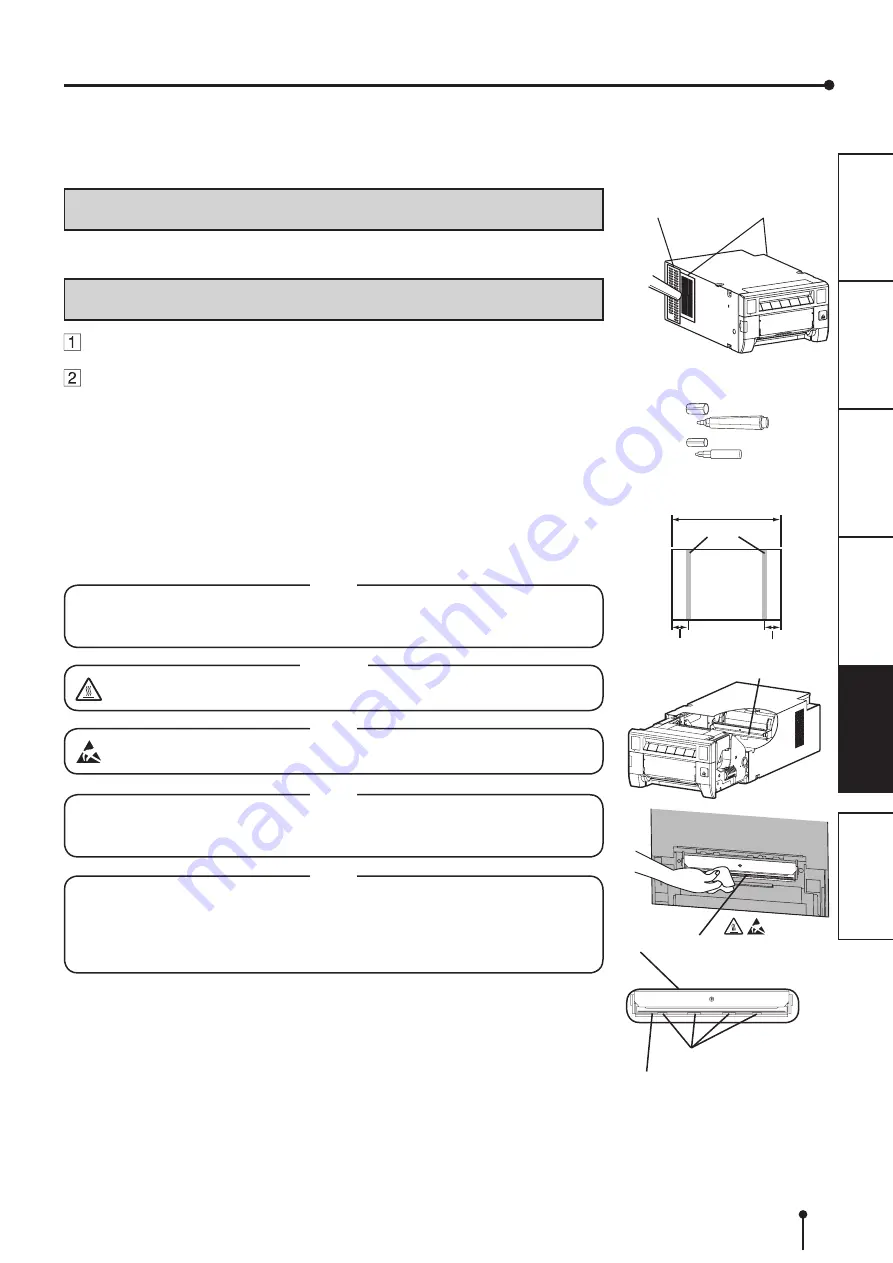
Clean the filter part and the ventilation inlet with a vacuum as shown right.

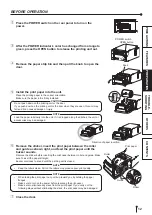
THERMAL HEAD CLEANING

  Press the OPEN button to open the printing unit.

  Take the ink cassette out of the printer.

Preparations

Alcohol (isopropyl alcohol)

Soft and clean cloth

Other : Cleaner pen (option)*

* Please ask the dealer about options.

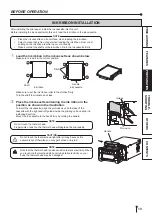
When lines appear on the printed images, clean the thermal head.

  Wipe the head cleaning part (as shown right) carefully with cloth dampened with a 

small amount of alcohol.

NOTE

•  Do not damage the thermal head.

•  When the poor print quality is not corrected even if the head has been cleaned, 

replacement of the thermal head may be required. Contact your dealer.

CAUTION

Thermal head is hot right after printing. Wait until the head cools before 

cleaning the thermal head.

NOTE

The thermal head may be damaged if you touch it while static electricity builds 

up on your body.

NOTE

Do not use 10x15 (4x6”) or 15x20 (6x8”) size paper (having width of 152 mm) after 

using 13x18 (5x7”) size paper (having width of 127 mm) for a long time or printing 

such paper in large quantities.
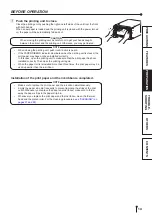
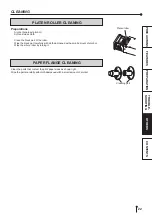
NOTE

When you clean the thermal head, make sure not to apply excessive force to the 

peeling roller on the bottom of the thermal head.

When the excessive force is applied to the roller, the parts supporting the roller may 

be removed. In addition, the part of the cloth used for cleaning may remain between 

the roller and the supporting parts, resulting in deterioration in the printing quality.

Cleaning as indicated below will help maintain stable printer operation and extend the printer’s life.

Wearing gloves at cleaning is recommended to prevent injury.

Make sure to turn off the power before cleaning.

CLEANING

Cleaner pen

Cleaning part of thermal head

Lower side

Upper side

Printing 

surface

about 12 mm

about 12 mm

lines

152 mm

Filter (inside)

Thermal head

Ventilation inlet 

Peeling roller

Supporting parts

Summary of Contents for CP-D707DW-S

Page 1: ...NUAL IS IMPORTANT TO YOU PLEASE READ IT BEFORE USING YOUR DIGITAL COLOR PRINTER CP D70DW S CP D707DW S Hereby Mitsubishi Electric Corporation declares that this digital color printer is in compliance...

Page 2: ...f electric shock The exclamation point within an equilateral triangle is intended to alert the user to the presence of important operating and maintenance servicing instructions in the literature acco...

Page 3: ...cables it may cause interference with radio and television reception WARNING In Europe use the AC power cord according to the recommendations as below in order to comply with EN60950 1 Connect to the...

Page 4: ...9 Positioning of adjustable paper guide 10 Print paper installation 11 12 Ink ribbon installation 13 14 Handling of paper ink ribbon set 15 Connection with USB data signal equipment 16 Error messages...

Page 5: ...e reason water seeps to the inside of the unit unplug the power cord from the source outlet and contact the sales dealer If used without corrective measures the unit may be damaged In the interest of...

Page 6: ...prime cause of damage PLACES THE UNIT ON A HORIZONTAL LEVEL The unit is likely to be affected if it is placed in slanted conditions or in an unstable places PROTECT AGAINST DEW FORMATION In extremely...

Page 7: ...a paper jam may occur Empty the paper strip bin frequently to prevent jamming the strips at the print outlet The paper tray is used for storing the cut print paper temporarily The print paper may fal...

Page 8: ...ITY PRINTING Maximum of 400 prints per roll for 10x15 4x6 is offered CP D70DW S Large economical print capacity per roll reduces frequency of exchanging paper and ink ribbon HIGH QUALITY PRINTS CP D70...

Page 9: ...ull the printer straight up as shown in the figure NOTE Printer weighs about 12 kg for a single deck CP D70DW S or 22 kg for a double deck CP D707DW S Handle them with care Handling the double deck sy...

Page 10: ...pen See page 17 PAPER RIBBON INDICATOR When an error concerning the ink ribbon or print paper occurs this indicator illuminates or blinks See page 17 1 5 3 4 2 6 7 8 CP D70DW S CP D707DW S 1 5 3 4 2 7...

Page 11: ...HANDLE FOR TRANSPORTING CP D707DW S When carrying the printer hold this handle and the front upper part of the printer CP D70DW S CP D707DW S 4 2 1 3 5 4 6 2 1 3 5 SECURING THE POWER CORD AND USB CABL...

Page 12: ...the adjustable paper guides See page 10 Install the print paper to this printer See pages 11 to 12 Install the ink ribbon to this printer See pages 13 to 14 Connect the printer to a personal computer...

Page 13: ...s The paper guide will snap into place Slide other paper guide in the similar way NOTE Make sure to set the adjustable paper guides to the size of the paper width When they are not positioned properly...

Page 14: ...latches on the paper flange the stoppers retract into the shaft Attach the flanges to the print paper with the stoppers retracted Make sure that the flanges are attached to the print paper securely an...

Page 15: ...serting the print paper between roller and guide Make sure to insert the paper straight Buzzer continues to sound until the printing unit is closed NOTE Keep the rollers clean Dirt on the rollers may...

Page 16: ...cassette Handle Ditch Make sure to set the ink ribbon roller to the ditches firmly Turn the shaft to eliminate any slack Place the ink cassette containing the ink ribbon in the position as shown in t...

Page 17: ...ting unit is closed the print paper may have not been installed correctly In this case open the printing unit to make sure that the print paper has been installed correctly Then close the printing uni...

Page 18: ...of prints may not be made In addition if you replace the print paper before it is used up the indicated number of prints may not be made AFTER PRINTING If the paper absorbs nonvolatile organic solvent...

Page 19: ...ITH USB DATA SIGNAL EQUIPMENT To USB port Personal computer Digital color printer To USB port NOTE A USB cable is not supplied with this unit Use the USB 2 0 certified cable of 2 m or less in length C...

Page 20: ...ccurs Refer to Overcoming paper jams 18 Green The temperature of the thermal head is too high or too low Wait until the indication goes off When the indicator stops blinking the printer resumes printi...

Page 21: ...an arrow Cut off the defective part of the print paper with scissors NOTE Make sure to cut off the printed part of the print paper Failure to do this may result in the ink ribbon sticking to the prin...

Page 22: ...ribbon on a flat clean surface Place a piece of transparent adhesive cellophane tape on the center of the ink ribbon ERROR MESSAGES AND COUNTERMEASURES Wind the shaft of the ink ribbon in the directi...

Page 23: ...lug disconnected from the outlet Connect the power cord plug to the outlet firmly The protective circuit may be working Turn off the power and wait for about two minutes Then turn on the power again T...

Page 24: ...ad may be damaged if you touch it while static electricity builds up on your body NOTE Do not use 10x15 4x6 or 15x20 6x8 size paper having width of 152 mm after using 13x18 5x7 size paper having width...

Page 25: ...an cloth Clean the black part of the roller Wipe the black part carefully with cloth dampened with a small amount of alcohol Wipe the whole roller by turning it Cleaning part PAPER FLANGE CLEANING Cle...

Page 26: ...50 60 Hz Power consumption 2 4 A 220 240 V AC 50 60 Hz 4 6 A 120 V AC 50 60 Hz 2 6 A 220 240 V AC 50 60 Hz 5 1 A 120 V AC 50 60 Hz Operating conditions Temperature 5 C 40 C Humidity 30 80 RH no dewing...

Page 27: ...ulevard des Bouvets 92741 NANTERRE cedex France Phone 33 1 55 68 55 00 FAX 33 1 55 68 57 31 Italian Branch Centro Direzionale Colleoni Palazzo Sirio ingresso n 1 Viale Colleoni 7 20041 Agrate Brianza...

Reviews: