background image

2-3

VEHICLE  ELECTRICAL  COMPONENTS

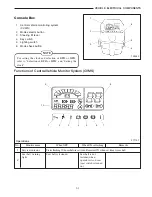
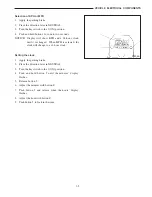
Selection of KPH or MPH

1.

Apply the parking brake.

2.

Place the direction lever in NEUTRAL.

3.

Turn the key switch to the 

I

(ON) position.

4.

Push and hold button 1 for one to two seconds.

NOTICE

:

Display will show KPH and a 24-hour clock
until it is changed.  When MPH is selected, the
clock will change to a 12-hour clock.

Setting the clock

1.

Apply the parking brake.

2.

Place the direction lever in NEUTRAL.

3.

Turn the key switch to the 

I

(ON) position.

4.

Push and hold button 

1

until the minutes’ display

flashes.

5.

Release button 

1

.

6.

Adjust the minutes with button 

2

.

7.

Push button 

1

and release when the hours’ display

flashes.

8.

Adjust the hour with button 

2

.

9.

Push button 

1

to lock in the time.

103043

Summary of Contents for FB16NT

Page 1: ...Service Manual 99759 5B110 Chassis Mast Options FB16NT EFB11 20011 up FB18NT EFB13 20011 up FB20NT EFB13 70001 up MC FC For use with FB16NT FB20NT Controller Service Manual...

Page 2: ...ifications contained in this manual are for trucks with serial numbers in effect at the time of printing Mitsubishi forklift trucks reserves the right to change specifications or design without notice...

Page 3: ...name Suggestion for disassembly 1 Output shaft removal Unit mm in A 0 020 to 0 105 Clearance between 0 00079 to 0 00413 cylinder and piston 0 15 B 0 0059 A Standard value B Repair or service limit Dis...

Page 4: ...this truck This makes it important to use caution when performing service work A knowledge of the system and or components is important before the removal or disassembly of any component Because of t...

Page 5: ...f a guard or shield must be removed to perform the repair work use extra caution 17 Always support the mast and carriage to keep carriage or attachments raised when maintenance or repair work is perfo...

Page 6: ...sembly and reassembly BRAKE SYSTEM STEERING SYSTEM Rear axle Rear wheels Caliper Brake pedal Master cylinder Steering control valve HYDRAULIC SYSTEM MASTS AND FORKS Tank Pump Control valve Lift and ti...

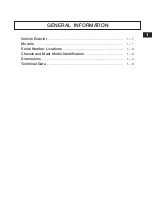
Page 7: ...Vehicle Exterior 1 1 Models 1 1 Serial Number Locations 1 2 Chassis and Mast Model Identification 1 3 Dimensions 1 4 Technical Data 1 5 1 GENERAL INFORMATION...

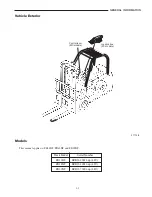
Page 8: ...B16NT EFB11 20011 up 48V FB18NT EFB13 20011 up 48V FB20NT EFB13 70001 up 48V 1 1 GENERAL INFORMATION 211128 Vehicle Exterior Models This manual applies to FB16NT FB18NT and FB20NT Joystick box FC mode...

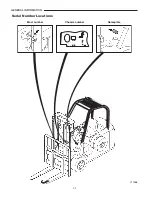
Page 9: ...1 2 GENERAL INFORMATION Mast number Chassis number Nameplate 211268 Serial Number Locations...

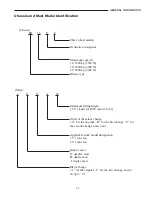
Page 10: ...4400 lb Maximum lifting height 30 stands for 3000 mm 118 in Order of the minor change A for the original B for the first change C for the second change and so on Applicable truck model designation 15...

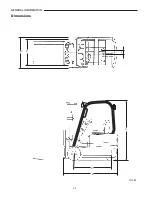
Page 11: ...1 4 GENERAL INFORMATION Dimensions B E F A D C 211269...

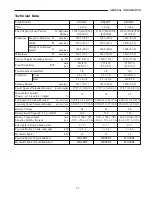
Page 12: ...10 Rear 15 4 5 8 15 4 5 8 140 55 9 Turning Radius mm in 1517 59 7 1620 63 8 1645 64 8 Travel Speeds Unloaded Loaded km h mph 17 17 10 6 10 6 17 17 10 6 10 6 17 17 10 6 10 6 Gradeability Loaded 27 25...

Page 13: ...ponents in Console Box 2 5 Disassembly and Reassembly 2 6 Direction Lever 2 7 Accelerator Control 2 8 Key Switch 2 9 Lighting Switch 2 9 Fuses 2 10 Lamp Specification Chart 2 10 Troubleshooting of Lig...

Page 14: ...light fastened when 2 operator sits on seat seat switch is turned on 2 1 VEHICLE ELECTRICAL COMPONENTS Console Box 1 Central vehicle monitoring system CVMS 2 Mode selector button 3 Steering tilt lever...

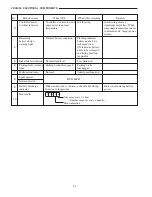
Page 15: ...attery needs to be warning light recharged soon 4 ON indicates battery needs to be recharged and lifting function inoperable 5 Brake fluid level indicator Normal fluid level Low fluid level 6 Parking...

Page 16: ...ock until it is changed When MPH is selected the clock will change to a 12 hour clock Setting the clock 1 Apply the parking brake 2 Place the direction lever in NEUTRAL 3 Turn the key switch to the I...

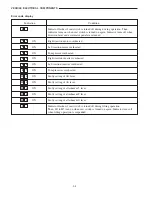
Page 17: ...erheated ON Right traction inverter overheated ON Left traction inverter overheated ON Pump inverter overheated ON Faulty setting of lift lever ON Faulty setting of tilt lever ON Faulty setting of att...

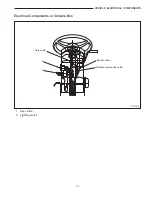
Page 18: ...2 5 VEHICLE ELECTRICAL COMPONENTS Electrical Components in Console Box 2 1 Horn cable Monitor cable Direction lever switch cable 1 Key switch 2 Lighting switch 211132...

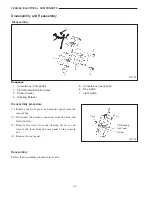
Page 19: ...panel 6 Key switch 7 Light switch Disassembly procedure 1 Remove the front panel and monitor panel from the console box 2 Disconnect the harness connectors from the horn and direction lever 3 Remove t...

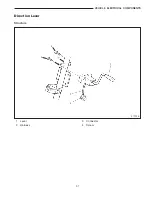
Page 20: ...2 7 VEHICLE ELECTRICAL COMPONENTS Direction Lever Structure 1 2 3 4 4 211135 1 Lever 2 Harness 3 Connector 4 Screw...

Page 21: ...BUY NOW Then Instant Download the Complete Manual Thank you very much...

Reviews: