background image

EN-

LAN Control Utility 
User Manual (for FL7000U/FL7000LU)

Contents

Preparation/SetUp..........................................................................2

Preparation.before.using.the.network.function............................................2
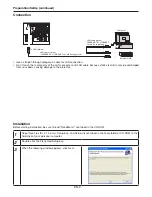
.Connection...................................................................................................3
Installation....................................................................................................3
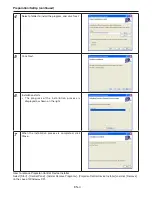
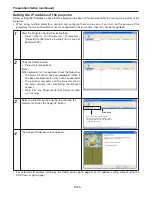
Setting.the.IP.address.of.the.projector........................................................5

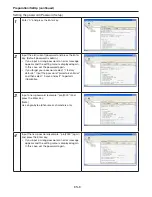
When.using.a.DHCP.server............................................................................................6
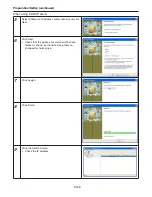
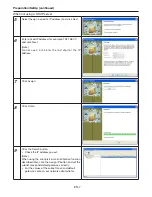
When.not.using.a.DHCP.server......................................................................................7

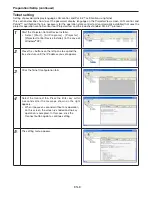
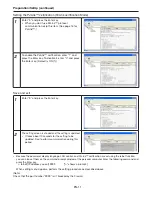
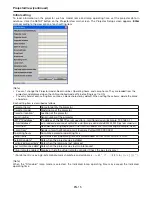
Telnet.setting................................................................................................8

Setting.the.password.(Password.Setup)........................................................................9
Setting.the.display.language.of.ProjectorView.(language)...........................................0
Setting.the.LAN.control.(LAN-Controlled.Mode)..........................................................0
Setting.the.PJLink™.certification.(PJLink.certification.Mode)......................................
Save.and.exit................................................................................................................

ProjectorView................................................................................2

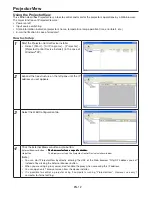
Using.the.ProjectorView.............................................................................2

How.to.start.up.............................................................................................................2
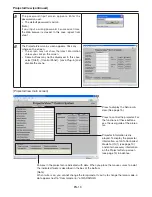
VIRTUAL.REMOTE.controller........................................................................................4
E-mail.notification.function...........................................................................................4
Initial.setting..................................................................................................................5

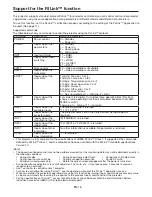
Support.for.the.PJLink™.function................................................6

Summary of Contents for FL7000LU

Page 1: ...using a DHCP server 7 Telnet setting 8 Setting the password Password Setup 9 Setting the display language of ProjectorView language 10 Setting the LAN control LAN Controlled Mode 10 Setting the PJLink...

Page 2: ...2 MB or more Web browser Internet Explorer Ver 6 0 Java Plug in 3 should be installed and JavaScript should be enabled 2 How to install Microsoft NET Framework Version 1 1 1 Download NET Framework Ver...

Page 3: ...tion be sure to read ReadMe txt contained in the CD ROM Connection Use a straight through category 5 cable for LAN connection Don t touch the metal parts of the LAN connector and LAN cable because sta...

Page 4: ...tarts The progress of the installation process is displayed as shown on the right 7 When the installation process is completed click Close How to remove Projector Control Device Installer Select Start...

Page 5: ...showing the projector and click the Assign IP button Click here Don t select this side When you execute IP assignment with this side selected it may become impossible to control the projector 4 The As...

Page 6: ...Next 6 Click Next Check that the options are marked with check marks as shown on the right Keep them un changed for normal use 7 Click Assign 8 Click Finish 9 Click the Search button Check the IP addr...

Page 7: ...Click Assign 8 Click Finish 9 Click the Search button Check the IP address you set Note When using the error alert e mail notification function described later click the Assign IP button and set the s...

Page 8: ...t any operation on this screen the screen is shaded and no key operation is accepted In this case click the Connect button again to continue setting 5 The setting menu appears Telnet setting Setting o...

Page 9: ...tory defaults input the password projectorcontroller and then select 9 save and exit to perform initialization 3 Input a new password example proj2000 and press the Enter key Note Use single byte alph...

Page 10: ...View enter 1 and press the Enter key Default is OFF 0 See pages 12 15 for ProjectorView function Setting the LAN control LAN Controlled Mode Preparation SetUp continued 1 Enter 1 and press the Enter k...

Page 11: ...l computer Enter the following command and press the Enter key telnet IP address you set 9999 shows a prompt When setting menu appears perform the setting procedure as described above Note Check that...

Page 12: ...owser http IP address you set instead of by clicking the External Browser button When you are using a proxy server don t enable the proxy when accessing this IP address You can open only 1 browser scr...

Page 13: ...iew continued Press to display the Setup win dow See page 15 Press to control the projector For the functions of these buttons see the user guide of the projec tor Failures in the projector are indica...

Page 14: ...0Factory 5F Serial number 12345 Operating hours 2146 hours and 43 minutes Lamp hours 4000 hours and 0 minute Installation date 2008 01 01 Last lamp replacement date 2008 01 01 Last maintenance date 20...

Page 15: ...r Serial number of the projector SMTP IP address IP address of the SMTP server used for e mail transmission Example 192 168 0 1 E mail address e mail address to receive alert notification e mail Examp...

Page 16: ...out the projector name The projector name set on the ProjectorView Setup window is returned INF1 Inquiry about the manufacturer name MITSUBISHI is returned INF2 Inquiry about the model name FL7000U or...

Page 17: ...amic Host Configuration Protocol This protocol automatically assigns IP addresses to networked devices Gateway A server or router to communicate across networks subnets that are divided by subnet mask...

Reviews: