16 - 5
16.3 BootOS and Standard Monitor OS Installation Using CF Card
16.3.1 Installation method when the GOT is turned on
9
UTILIT
Y
FUNCTION
10
C
O
MMUNICA
TION
INT
E
RF
A
C
E
SETTI
NG
11
DISP
LA
Y AND
OPE
R
A
T
IO
N
SETTIN
G
S
12
CLOCK
SE
T
T
IN
GS
AND
BA
TTER
Y
ST
A
T
US
DI
SPL
A
Y
13
FIL
E
D
ISP
LA
Y AND
COP
Y
14
G
O
T SE
L
F
C
H
EC
K
15
CLE
A
NING OF
DISPL
A
Y
S
E
CTION
16
IN
ST
AL
LA
TI
ON
O
F
BOO
TOS
AN
D
ST
ANDA
RD MONI
TO
R O
S
16.3.1 Installation method when the GOT is turned on
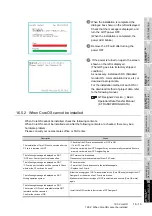
The displayed message is different depending on the installation condition of Standard monitor OS. When
the screen requesting operation is displayed, operate the GOT according to the instructions on the screen.
1
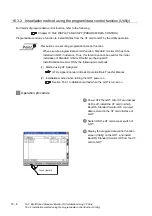
Operation procedure
1
Power OFF GOT and CF card access
switch. Insert the CF card in which
BootOS, Standard monitor OS or project
data is stored in the CF card interface of
GOT.
2
Switch ON the CF card access switch of
GOT.
3
Power ON the GOT touching the upper and
lower left corners of the GOT screen.
4
BootOS and Standard monitor OS are
installed in the built-in Flash memory.
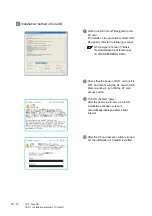
5
The CF card access LED is lit during
installation.
Do not pull out the CF card or power off the
GOT while the CF card access LED is lit.
6
GOT restarts automatically after installation
is completed.
(When Standard monitor OS is already
installed, touch the
button to reboot
the GOT.)
7
After confirming that GOT restarted
normally, switch OFF the CF card access
switch of GOT.
8
Confirm the CF card access LED is
extinguished, remove the CF card from the
CF interface of GOT.
OK
Summary of Contents for GOT1000 GT11
Page 1: ......
Page 2: ......
Page 251: ...Index 2 U Utility function list 9 2 W Wiring 7 1...
Page 252: ...Index 3 MEMO...
Page 255: ......
Page 256: ......

