background image

Gpredict User Manual

The 

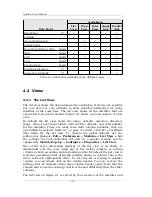
Refresh Rates 

page allows you to tune how often the module should 

perform the calculations, as well as how often the views should be updated. 
The data refresh rate is specified in milliseconds. This is the time between 
two calculation-cycles. Every cycle the module will recalculate the data for 
all satellites associated to the module. The refresh rates for the views are 
specified in integer cycles of data refresh. If the data refresh rate is 400 
msec   and   the   list   view   refresh   rate   is   2   cycles,   the   list   view   will   be 
refreshed every 800 msec.
The map and the polar view do not need to be refreshed very often. For 
these views visible changes will normally occur over 3-4 seconds. The list 
and the single-satellite view, on the other hand, looks pretty cool when they 
are refreshed every 100-200 msec, 

but be careful with the CPU load

, in 

particular if you have many modules open at the same time.
The rest of the pages in the module property editor define the look and feel 
of the views. Most of the parameters are self-explaining and you should not 
be afraid of experimenting with the different settings. If you somehow end 
up with a useless configuration, you can always reset to the default values 
by clicking on the 

Reset

 button that is available on all pages.

Chapter 4 describes the modules in more details and also gives a detailed 
description of the configuration parameters.

18

Summary of Contents for Gpredict 1.2

Page 1: ...Updated for Gpredict 1 2 by Alexandru Csete OZ9AEC Gpredict User Manual ...

Page 2: ...hat it will be useful but WITHOUT ANY WARRANTY without even the implied warranty of MERCHANTABILITY or FITNESS FOR A PARTICULAR PURPOSE See the GNU General Public License for more details You should have received a copy of the GNU General Public License along with this document if not write to the Free Software Foundation Inc 675 Mass Ave Cambridge MA 02139 USA Revision History Date Issue Notes 12...

Page 3: ...25 3 2 3 Geographical Coordinates 28 3 2 4 Measurement Units 28 3 3 Ground Stations 28 3 4 TLE Update 30 3 5 Message Logs 30 4 Modules and Views 31 4 1 Data Fields 31 4 2 Views 32 4 2 1 The List View 32 4 2 2 The Map View 33 4 2 3 The Polar View 36 4 2 4 The Single Satellite View 39 4 2 5 The Upcoming Passes View 40 5 Advanced Pass Predictions 41 5 1 Customising the Prediction Parameters 41 5 1 1 ...

Page 4: ...ground station editor window 16 Figure 2 7 The module properties editor 17 Figure 2 8 Satellite popup 19 Figure 2 9 Data presented about the next upcoming pass 20 Figure 2 10 The sky at a glance 21 Figure 3 1 The preferences dialogue 24 Figure 3 2 The table showing the existing ground stations 29 Figure 4 1 The list view illustrating the auto sort feature 33 Figure 4 2 The map view using the defau...

Page 5: ......

Page 6: ...te orbit as well as the position and velocity of the satellite at a given time t0 2 Position of the ground station on Earth 3 The date and time at which the satellite position and velocity should be calculated Given the data above gpredict calculates the position and velocity of any Earth orbiting satellite using the NORAD SGP4 SDP4 algorithms These algorithms solve Kepler s equation of orbital mo...

Page 7: ...vanced users to customise both the functionality and look feel of the program Automatic updates of the Keplerian elements from the web via HTTP and FTP or from local files Support for automated ground station operation providing both Doppler tuning for radios and antenna rotator control Robust design and multi platform implementation integrates gpredict well into modern computer desktop environmen...

Page 8: ...s in the gpredict database Chapter 7 describes how to setup and operate gpredict with your radios and antenna rotators 1 4 Your Feedback is Appreciated Both gpredict and this user manual is work in progress Your comments questions and bug reports are highly appreciated There is a web forum at http forum oz9aec net where you can discuss everything related to gpredict and ask the community for help ...

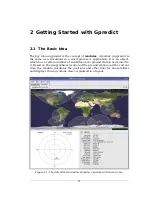
Page 9: ...tion It is an object which has a certain number of satellites and a ground station associated to it Based on the geographical location of the ground station and the current time the module calculates the positions and other data for the satellites and displays it using various views organised in a layout 11 Figure 2 1 The default main window showing a module with three views ...

Page 10: ...te is where at a given time The map view can also show the ground track of the satellites for several orbits The Polar View or radar view shows the satellites within range on a polar plot The polar axis corresponds to the azimuth and the radial axis to the elevation It can be used to give you an idea of where to look for a satellite The Single Satellite View can very efficiently show detailed info...

Page 11: ... the pop up menu is Sky at a glance This function is intended to give you a quick overview of which satellites are up now and which satellites will be up during the next 8 hours This function is described in section 2 5 The Time controller menu item pops up a small window see figure 2 4 containing widgets for controlling the time of the module By default the module will run in real time but using ...

Page 12: ... of open modules except the processing power and available memory of your computer It is also up to you how many modules should be docked in the notebook and how many should be in their own window Needless to say only one module can be in full screen state at the same time The last two menu items in the pop up menu Delete and Close do exactly what they promise If you select Delete the module will ...

Page 13: ...ct The sample module uses a ground station called sample which defines a place in Denmark To add your own ground station click on the button located right of the ground station name This should pop up a small dialogue window as shown on figure 2 6 where you can enter the data for your ground station The only required parameter here is the Name which you have to enter according to the same rules as...

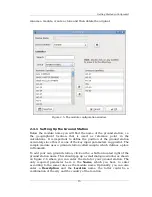
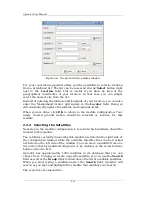
Page 14: ... 2 Selecting the Satellites Next step in the module configuration is to select which satellites should be tracked in this module The satellites currently tracked by this module are listed in the right side of the configuration window while the available satellites that can be tracked are listed on the left side of the window You can move a satellite from one list to the other by double clicking on...

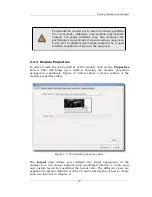
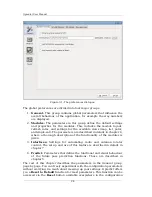
Page 15: ...the look and feel of the module click on the Properties button This will bring up a window showing the module properties grouped in a notebook Figure 2 7 below shows a screen capture of the module properties editor The Layout page allows you configure the visual appearance of the module You can choose between nine predefined layouts or create your own custom layout by specifying the layout code Th...

Page 16: ... need to be refreshed very often For these views visible changes will normally occur over 3 4 seconds The list and the single satellite view on the other hand looks pretty cool when they are refreshed every 100 200 msec but be careful with the CPU load in particular if you have many modules open at the same time The rest of the pages in the module property editor define the look and feel of the vi...

Page 17: ...right click on a satellite in any view This brings up a pop up menu for the selected satellite and in this pop up menu you can select either the Show next pass or the Future passes menu item Figure 2 8 shows how the satellite pop up menu looks like when you right click on a satellite in the map view The satellite popup for other views look slightly different however there will always be two menu i...

Page 18: ...ayed in the pass prediction dialogues is static This means that the shown data will not be updated automatically if you leave the dialogues open You will have to request a new prediction as described above You may have noticed that the above mentioned pop up menu does not come up if you right click in the single satellite view To bring up the pop up menu in the single satellite view you should cli...

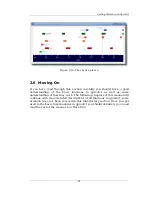
Page 19: ...me understanding of how they work The following chapters of this manual will continue with more detailed descriptions of all functions in gpredict some of which have not been covered in this introductory section Once you get used to the basic functionalities in gpredict you should definitely go on and read the rest of the manual too Have fun 21 Figure 2 10 The sky at a glance ...

Page 20: ...provide default values for the modules These settings can be accessed from the main menu bar via the Edit Preferences menu item 2 Module Level These settings allow the user to customise each module independently of the others They are accessed via the pop up menu of each module Configure Properties The preferences dialogue for editing the global settings is shown on figure 3 1 If you compare it wi...

Page 21: ...e functionality of the modules is given 3 Interfaces Settings for automating radio and antenna rotator control The set up and use of this feature is described in details in chapter 7 4 Predict Parameters that define the functional and visual behaviour of the future pass prediction functions These are described in chapter 5 The rest of this chapter describes the parameters in the General group page...

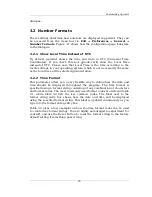
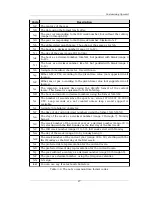
Page 22: ...tion 3 2 2 Time Format This parameter offers you a very flexible way to define how the date and time should be displayed throughout the program The time format is specified using a format string consisting of any combination of characters and format codes The most commonly used format codes are listed in table 3 1 while table 3 2 lists the less common codes The label next to the format string entr...

Page 23: ...rrent locale d The day of the month as a decimal number range 01 to 31 e The day of the month padded with blank range 1 to 31 F The date using the format Y m d H The hour as a decimal number range 00 to 23 m The month as a decimal number range 01 to 12 M The minute as a decimal number range 00 to 59 S The seconds as a decimal number range 00 through 60 z Numeric time zone e g 0600 or 0100 Z The ab...

Page 24: ...e in decimal numbers using the format H M s The number of seconds since the epoch i e since 1970 01 01 00 00 00 UTC Leap seconds are not counted unless leap second support is available t A single t tabulator character T The time of day using decimal numbers using the format H M S u The day of the week as a decimal number range 1 through 7 Monday being 1 U The week number of the current year as a d...

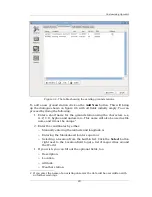
Page 25: ... gpredict will always use the metric system and this setting will only affect how the data is presented 3 3 Ground Stations This page allows you to add edit and delete ground stations You can define as many ground stations as you want but you need at least one You can always choose between the pre defined ground stations when you create or configure a module Figure 3 2 shows how the corresponding ...

Page 26: ...ust be unique2 2 Enter the coordinates by either Manually entering the latitude and longitude or Entering the Maidenhead locator square or Selecting a location from the built in list Click the Select button right next to the Location field to get a list of major cities around the World 1 If you wish you can fill out the optional fields too Description Location Altitude Weather station 2 If you ent...

Page 27: ...rian Elements TLE data for the satellites These data can be updated from the internet and gpredict can actually do most of the work for you The settings on this configuration page allows you to configure how gpredict should manage the update of the TLE files Most of the settings should be pretty self explanatory nevertheless they are described in details in chapter 6 Until then you can leave the v...

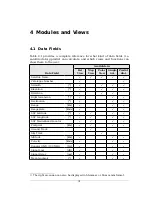
Page 28: ... List View Map View Polar View Single Sat Predict dial Satellite Name Catalogue Number Azimuth Elevation Direction Right Ascension 3 Declination Range km Range Rate km s SSP Latitude SSP Longitude SSP Maidenhead Locator Footprint km Ground Track Sky Track Altitude km Velocity km s Doppler Shift 100 MHz Hz Signal Loss dB Signal Delay ms Mean Anomaly 3 The right ascension can also be displayed in hh...

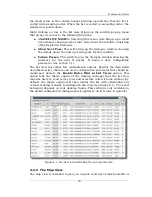
Page 29: ... columns available they are just hidden by default Table 4 1 on page 32 shows a full list of available data fields for the list view To change the global defaults use the preferences dialogue Edit Preferences Modules List View while the settings for each individual list view in a specific module can be changed via Module Pop Up Configure Properties List View One of the more interesting features of...

Page 30: ...passes N being a user configurable parameter see section 5 1 The list view has rather few configuration options Besides the data fields described earlier there is one more configuration parameter that should be mentioned namely the Enable Rules Hint in List Views option This option tells the theme engine of the desktop manager that the list view requires users to read across rows and associate cel...

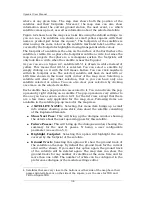
Page 31: ...cted at a time You can also clear your selection by clicking once more on the selected satellite Each satellite has a pop up menu associated to it You can activate the pop up menu by right clicking on a satellite The pop up menu is very similar to the one you have seen in section 4 2 1 for the list view except that there are a few items only applicable for the map view Following items are availabl...

Page 32: ...e West to the left and East towards the right Besides that there are no restrictions on the map size or the aspect ratio Extra Contents Using these setting you can determine which extra content should be displayed on the polar view QTH Info Checking this box will show the name of the ground station in the upper left corner of the polar view The map view on figure TBD shows sample since this is the...

Page 33: ...nt circles Selected Sat The colour of the selected satellite its label and its footprint circle Ground Track The colour used to draw the ground track of a satellite Coverage Area This colour is used to highlight the area covered by the footprint of the satellite It is strongly suggested to make this colour very transparent Info Text FG The foreground colour used for the additional information e g ...

Page 34: ...nutes and 45 seconds You can only have one satellite selected at a time thus clicking on an unselected satellite will clear any previous selection Clicking on a selected satellite will deselect it You can also right click on a satellite in order to bring up the satellite pop up menu shown on figure 4 4 The satellite pop up menu in the polar view gives you quick access to the following functions SA...

Page 35: ... that should be placed at the top of the graph then it continues clockwise with the second third and fourth letters N E S W default North is at the top South at the bottom East on the right side and West on the left side N W S E Same as the above but East and West swapped hence we have West on the right side S E N W North and South swapped as compared to the default setting S W N E Both North Sout...

Page 36: ...satellite Info Text The colour used for the additional information e g Next Event Miscellaneous Show the sky tracks automatically If you enable this check box the polar view will display the sky tracks for satellites as soon as they come in range This means that you don t have to right click then select sky Track for each satellite You can still hide the sky tracks manually There is no support to ...

Page 37: ...View This view shows a simple list of the satellites in the module together with their Azimuth Elevation and a count down clock until the next AOS LOS You can right click on the satellites to get info and predict future passes as in the other view This view has no configuration options 40 Figure 4 5 The single satellite view Figure 4 6 The upcoming passes view ...

Page 38: ...button You will be presented with a notebook containing the prediction parameters organised in four notebook pages see figure 5 1 5 1 1 Pass Conditions The parameters on this page define how gpredict predicts future passes for satellites Minimum elevation This parameter define what gpredict should consider as a satellite pass If the elevation of the satellite stays below this threshold gpredict wi...

Page 39: ...led pass prediction window The exact number might deviate from this but it will always be around this number Twilight threshold This parameter has influence on when gpredict considers a satellite to be visible Theoretically a satellite can be visible if it is in sunlight but the ground station is in darkness The problem is that darkness in this respect is not an absolute entity and this parameter ...

Page 40: ...e The satellite Azimuth at the time of closest approach The azimuth when the satellite goes out of range The orbit during which the pass will occur The visibility of the satellite during the pass Note that the visibility can change during the pass This field will show a combination of three letters each of them indicating a visibility state V visible D daylight E eclipsed 43 Figure 5 2 Configurati...

Page 41: ...elect which data fields gpredict should include when showing details about a pass The choices are pretty much the same as for the list view and the single satellite view 5 2 Sky at a Glance 44 Figure 5 4 The sky at a glance Figure 5 3 Configuration options for single pass predictions ...

Page 42: ...of the time axis i e the time within which the passes should occur Besides that you can customise the colours used for each satellite The sky at a glance window will show up to 10 satellites from the given module 5 3 Communication Windows This function is currently under development 5 4 The Advanced Predictor This function is currently under development 45 Figure 5 5 Configuration options for the ...

Page 43: ...ifferent ways to update the orbital elements at Epoch T0 1 Automatic updates from the web via HTTP or FTP This is the most convenient way to update the orbital elements since gpredict will automatically download the latest data and update the local database 2 Automatic updates from local files This method can be used to update from files that have been acquired from sources that can not be accesse...

Page 44: ...n connection time out of 10 seconds per data file If gpredict fails to retrieve fresh TLE data the process will go through but at the end you will see that the number of satellites updated is 0 As mentioned earlier in this chapter it is rather important to have the TLE data updated at regular intervals Gpredict can help you remembering when it is time to update the TLE data by reminding you once p...

Page 45: ... from CelesTrak but you may want to perform the updates from somewhere else or using other files There are three parameters that are relevant here 1 Remote server This specifies the complete remote URL consisting of the network protocol HTTP FTP etc the server name as well as the directory on the server where the files are located 2 Proxy server If you are behind a proxy server you can enter the n...

Page 46: ...enu bar Gpredict will then ask you to specify a directory where the fresh TLE files are located see figure 6 2 Click the button select Other in the list of entries and find the directory where the fresh TLE files are located Click OK and you ll see the same progress dialogue as in the case of updating from the internet If you plan to update the TLE from local files often it is recommended to use a...

Page 47: ...t for these tasks If you have difficulties understanding this section or you miss some information feel free to seek support on the gpredict forum at http forum oz9aec net Before you set up gpredict to control your hardware devices it is very important to ensure that the hamlib interface works properly with your devices Many low level drivers in hamlib have been written from specs and might not ha...

Page 48: ...ws you to send commands to your antenna rotator via a network interface using TCP IP protocol For testing the hamlib driver with your radio and or rotator you will use rigctl and rotctl For setting up gpredict to control your devices you will use rigctld and rotctld All of these command line utilities have their own manual pages that can be accessed by typing man rigctl in a terminal While this tu...

Page 49: ...nd CTS settings Some special interfaces e g Microham USB I F use the DTR and CTS lines for specific purposes such as PTT and CW keying Hamlib sets these lines ON by default and you might need to disable it explicitly Hamlib provides a driver for a fictive radio and rotator called dummy This driver has model number 1 and you can use this driver while you learn to use the command line utilities It i...

Page 50: ...and line options for rigctl For a complete reference you should consult the rigctl manual page i e man rigctl Command Description m ID model ID Specify the model ID of your radio See rigctl list for a complete list of supported radios or on the web http hamlib sourceforge net support html r dev rig file dev The file name of the device where your radio is connected Serial ports usually have file na...

Page 51: ...set freq f get freq and t get ptt commands 7 2 2 Rotctl Rotctl is very similar to rigctl in terms of command line options the only significant difference being that you can not specify the CI V address Once you have the rotctl command prompt you can set and get the position of your rotator using P and p As with rigctl you can get the full list of available commands by typing At the rotctl command ...

Page 52: ... of the dialogue will show the list of already configured radios which is initially empty At the bottom you will find three buttons for adding editing and deleting your radio configurations Click this button to add a new radio configuration You will get a small dialogue window as shown and explained in the following section section 7 3 1 Click this button to edit an existing configuration This bri...

Page 53: ... is the same computer on which gpredict is running you can enter localhost Port The port number where rigctld is listening By default rigctld uses port 4532 Radio type The type of this radio RX only The radio should only be used as receiver This is useful if you have a radio where the TX frequency can not be adjusted via the CAT interface e g Yaesu FT 817 TX only The radio should only be used as t...

Page 54: ... For FT817 857 897 you should select this option If you have a radio that could be used as Simplex TRX but it does not support reading PTT status via CAT you might be able to use the Read DCD option This requires that your radio outputs some signal that indicates the PTT status most transceivers do that and that you use a special CAT interface that can route this signal to either CTS or DSR and co...

Page 55: ...s with your rotator Min Max Az El When you select Az type gpredict will automatically provide the proper ranges However if your rotator has a wider or narrower range for either Az or El you can specify it here 7 4 Controlling your Devices with Gpredict The radio and rotator control interfaces are attached to a specific module You can control one radio and one antenna rotator per module at any give...

Page 56: ...uency just click on the proper arrow below or above a digit The Uplink area shows the control and status widgets for the satellite uplink It has the same properties as the Downlink area Note that the status widgets are updated even if you are using a receive only radio This is particularly useful if you are using radios where the frequency can not be set via CAT while they are in TX mode This is t...

Page 57: ...e button is used to toggle the connection between the controller and the hamlib driver s Commands are sent to the radio device only if the device is engaged You can use up to two devices in any controller The 1 Device is the primary device and will be used as downlink and uplink depending on the device type and the selection in the 2 Device The 2 Device is the secondary device and is used for upli...

Page 58: ... Engage Description OFF OFF No Doppler correction is performed No commands are sent to the radio s The current frequency of the radio s is not read ON OFF Doppler correction is applied but no commands are sent to the radio s and the current frequency of the radio s is not read back either ON ON Doppler correction is applied and the frequency setting commands are sent to the radio s The current fre...

Page 59: ... rotator device You can change the value by clicking on the corresponding arrows however if tracking is enabled your changes will be overridden with the Elevation of the target satellite The bottom of the area contains a field showing the current Elevation as read back from the rotator device If the device is not engaged this field will simply show instead of a number If there was error in the com...

Page 60: ...cally disengaged The Polar Plot area on the right side of the window is provided to guide you while you are tracking a satellite It shows the next pass of the currently selected target satellite The small rectangle represents the currently selected target satellite if it is within range The circle around the rectangle represents the current position of the controller while the cross represents the...

Page 61: ...urrent rotator position is not read back either ON OFF Controller widgets are updated with target position but no commands are sent to the rotator Current rotator position is not read back either If the target satellite is out of range the controller widgets will be set to the position where the satellite is expected to appear at the next AOS ON ON Controller widgets are updated with target positi...

Page 62: ...isible grid The size of the grid is dynamic in the sense that it is determined at runtime according to the coordinates in the layout string The coordinate system in the layout grid has its origin 0 0 in the upper left corner see figure 8 1 The coordinates for a view are specified using a LEFT RIGHT TOP BOTTOM sequence Thus if we want to place a map view in the upper 2 3 part of the grid on figure ...

Page 63: ... the views are specified doesn t matter The complete sequence above would generate a layout that looks like the one on figure 8 2 below This layout is included as one of the predefined layouts and you can use this and the other predefined layouts as examples 68 ...

Page 64: ...a vector pointing towards a satellite The horizon is 0 and zenith is 90 Full duplex A communication device radio where tranmission and reception can occur at the same time Hamlib Ham Radio Control Libraries see http hamlib sf net LO Local oscillator In gpredict it is used to specify the frequency offset introduced by using a transverter LOS Loss of signal the time when a satellite goes out of rang...

Reviews: