Note
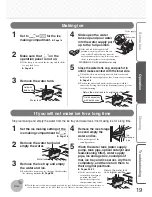
Wash the water tank, water supply pipe and ice tray before making ice for the fi rst time, or
if you have not made ice for more than a week. Odors or dust may adhere to the parts.
Before Use
Operation
Cleaning
Troubleshooting
Operation
19
Hold with
both hands
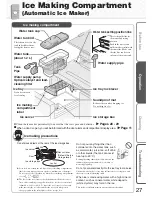
Water tank
Return the water tank to its original position
Hold horizontally
with both hands
Ice
storage
box
Stop ice making and empty the water from the ice tray and water tank if not making ice for a long time.
Water tank
Return the water tank
to its original position
3
Remove the water tank.
1
Set to
or
for the ice
making compartment.
Page 18
5
Close the water tank cap, and push it in
until it makes contact with the inner side.
Check that there are no foreign objects between the tank
holder and the water supply pipe area. It may cause freezing.
Page 28
Push in the water tank until it makes contact with the
inner side. Setting the water tank incorrectly may prevent
ice from forming.
Full position
Water supply
port
4
Slide open the water
tank cap and pour water
into the water supply port
up to the full position.
If the tank is fi lled beyond the full
position, water may spill out when you
carry or tilt it. Further, this may cause the
water channels in the ice tray to freeze, or cause
the ice to join together or form a protrusion.
WARNING-Fill with potable water only.
2
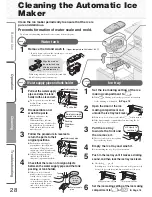
Make sure that
on the
operation panel is not on.
If the lamp is on, insert the ice tray and lock the
ice tray lock lever.
Page 28
2
Remove the water tank and
empty the water.
3
Remove the ice tray and empty
the water and ice.
For details on removal, see the page that describes
the cleaning methods.
Page 28
4
Remove the ice storage
box and empty the
water and ice.
Do not dispose of the
soundproof mat.
5
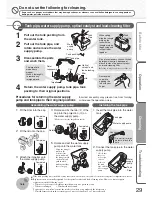
Wash the water tank (water supply
pump, tank pipe, optical catalyst and
lead-cleaning fi lter), water supply
pipe, ice storage box, soundproof
mat, ice tray and ice server, dry them
completely, and then return them to
their original positions.
Pages 28-29
If the water tank is not
returned to its original
position, the food
inside the refrigerator
compartment may freeze.
If you will not make ice for a long time
1
Set the ice making setting of the
ice making compartment to
.
Page 18
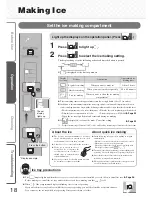
Making ice
Summary of Contents for MR-BX52W-BR-ML
Page 39: ...Memo...
Page 40: ...58 60 ECO 63 58 ECO 3 24...
Page 42: ...42 44 45 44 44 44 44 45 70...
Page 43: ...43...
Page 44: ...2 10 1 44 5cm 24 10 2 50 60 2...
Page 45: ...3 4 45 2 3mm 100kg R600a 1 2...
Page 46: ...46 62 63 48 49 62 64 64 64 65 56 57...
Page 47: ...30 47 3 9 0 6 9 5 22 16 54 55 3 3...
Page 48: ...ECO 30 61 48 3 58 ECO ECO 58 60 50 51 56 52 53 53 52 60 30...
Page 49: ...1 4 60 1 2 3 4 5 60 2 49 3 71 71 1 1...
Page 50: ...30 5 50 1 56 2 5 72 6 16 9 5 17 8 3 19 6 1 21 5 0 22 3...
Page 51: ...51 2 3 53 1 52 5 7 9 12 15 18 2 72 6...
Page 52: ...52 2 30 2 1 1 1 56 2 1 2...
Page 53: ...30 53 1 60 2 2 1 3 3 12 2 3 1 1 54 55...
Page 54: ...1 2 54 80 70 1 2 100 400g 2 5 15 30 1...
Page 55: ...7 24 1 2 3 5 15 50 51 55 53 1 2 1 1cm 250cc 2 1 300g 60 100g 2 3...
Page 56: ...2 60 80 1 1 10 12 80 140 10 24 66 56 1 2 1 10 12 ECO 58 60 1...
Page 57: ...1 57 3 1 56 5 66 4 2 66 2 3 66 4 5 66 67 1 56...
Page 58: ...58 ECO 60 1 30 ECO 1 1 2 3 0 1 0 3 4 1 ECO ECO ECO 30 30 ECO Eco Mode ECO ECO 3 24...
Page 59: ...59 ECO 30 30 ECO ECO ECO...
Page 60: ...60 10 0 2 5 57 1 3 2 1 1 2 3 30 3...
Page 61: ...61 1 3 1 3 1 3 48 ECO 3 3...
Page 62: ...3 3 62 10 LED 75 49...
Page 63: ...63 LED 68 68 69 1 2...
Page 64: ...64 49...
Page 65: ...65 60 66 67 49 80 140 1 2L...
Page 66: ...66 2 3 2 2 56 1 6 56 4 3 5 1 60 1 2 3 4 1 2...
Page 67: ...2 3 67 1 4 5 2 3 1 2 1 2 3 4...
Page 68: ...2 1 68 10 4 4 4 4 3 2 4 3...
Page 69: ...3 69...
Page 70: ...70 1 45 2 3 66 67 57 66 3cm 30 2 2...
Page 71: ...71 2 5 1 1 5 5...
Page 74: ...74 24 30 50 60 48 66 67 62 71 4 5 24 44 58 60 60 66 4 5 24 66 57 67 66 60 56...
Page 75: ...75 61 53 45 5 30 60 1 4 5 49 55 53 53...
Page 76: ...76 1 2 1 2 100 58...
Page 77: ...Memo...
Page 78: ...Memo...
Page 79: ...Memo...


