background image


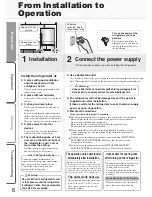
Connect the power supply

* Connect power supply soon after installing the refrigerator

2

Install the refrigerator at:


A place with good ventilation 

and not exposed to direct 
sunlight or hot air

To keep good cooling performance and 
reduce power costs.


A place with low humidity

To prevent it from rusting, electric shock 
and fi re.


 A strong and level place

To prevent vibration, noise, and ajar or 
tilting doors.
To prevent deformation or discoloration of 
the fl oor materials due to the weight or heat.

If the refrigerator supports may sink into the 
fl oor, lay a strong plate or board underneath.


A place away from other 
devices

To prevent noise or video interference 
with devices such as televisions.


There should be space of 2 cm 
or more on the left and right of 

the refrigerator, and 10 cm or 

more from the ceiling.

To allow heat to dissipate from the top 
and the sides of the refrigerator.


Use a dedicated outlet

Use a dedicated outlet for the power supply that meets the rating specifi ed on the rating 
label. (The rating label is located on the door-liner of the refrigerator compartment.)


The refrigerator will not be damaged even if the power is 
supplied soon after installation. 
It takes a while for the refrigerator to cool, therefore supply 
power as soon as possible.


Electrical Connections

Make sure this unit is properly grounded.


The refrigerator should always be plugged into its dedicated electrical outlet.
This will provide the best performance and prevent electrical circuits 
from being overloaded and causing a fi re.
Make sure that the electrical outlet provides the proper voltage.
Extension cords are not recommended.


If your refrigerator is installed in the high humidity location, not only 
ground connection but also installation of the earth leakage breaker is 
recommended.


If the power cord is damaged, purchase a new cord from MITSUBISHI 
ELECTRIC SERVICE CENTER. Make sure that the power cord is 
designed for this model.


If the power cord is damaged, call our MITSUBISHI ELECTRIC 
SERVICE CENTER for the replacement, in order to avoid a hazard.

Installation

1

It takes time for cooling even 

after turning on the refrigerator.

The outer walls heat up.

The operation noise gets louder 

immediately after installation.

Immediately after instillation, when: the 
weather is hot, the doors are frequently opened 
or closed, the fast cooling operation is engaged, 
or any similar situation; the operation noise will 
get louder because the refrigerator will switch to 
high-speed operation to cool with high power.

Warning

Using outlets that do not meet the specifi ed rating or plugging in too 
many leads into a single socket can cause heat buildup or fi re.

6

Before Use

Operation

Cleaning

Troubleshooting

Before Use

•  Wait until the refrigerator has been 

fully cooled before storing non-
cooled food or ice cream.

•  Do not open the doors more than 

necessary, and close them as soon as 
possible.

When the weather is hot in summer, 
it may take more than 24 hours.

When making ice for the fi rst time

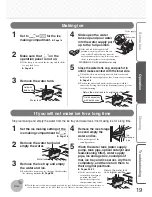
Space of 10 cm 

or more

Space of 2cm or 

more

•   Heat dissipation causes the temperature 

to rise to about 50°C to 60°C or more 
when operation is fi rst started, and 
during the summer.

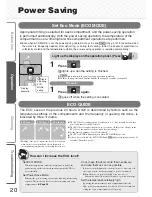
Dedicated 
outlet that meets 
the specifi ed rating.

Turn on the power of the 

refrigerator as soon as 

possible.

The refrigerator will not be 
damaged even if you turn on 
the power immediately after 
the installation.

Warning

Do not obstruct the refrigerator vents 

or the space around the refrigerator.
If refrigerant leaks, it may accumulate 

and catch fi re or explode.

Corrosion control treatment may be 
required for the refrigerant circuit (pipe) 
due to generation of corrosive gases.
Contact the retail store where you 
purchased the refrigerator.

Use in hot spring areas

From Installation to 
Operation

Summary of Contents for MR-BX52W-BR-ML

Page 1: ...X52W N H 220V Non Freon Refrigerators This refrigerator uses non Freon refrigerant isobutane and non Freon foam insulation cyclopentane These materials are harmless to the environment which does not a...

Page 2: ...al cyclopentane The material names are indicated on the main plastic parts to facilitate recycling ECO MODE Power Save Mode Deliciousness convenience and even power saving Smart power saving by contro...

Page 3: ...tings Setting Reset Child Safety Lock 23 Refrigerator Compartment 24 25 Versa Freezer and Vegetable Compartments 26 Ice Making Compartment Automatic Ice Maker 27 Cleaning the Automatic Ice Maker 28 29...

Page 4: ...cing down and fully insert the prongs Inserting the plug upside down places stress on the cord and may cause heat generation or fire Power and power plug Remove the power plug before cleaning Otherwis...

Page 5: ...d do not touch the refrigerator and avoid using flames Open windows to ventilate If the refrigerant circuit is damaged contact the retail store If an abnormality occurs such as a burning odor unplug t...

Page 6: ...mmended If the power cord is damaged purchase a new cord from MITSUBISHI ELECTRIC SERVICE CENTER Make sure that the power cord is designed for this model If the power cord is damaged call our MITSUBIS...

Page 7: ...of 2 to 3 mm Adjust the adjustable supports as shown in the figures below Right Left Adjustable support cover Adjustable support Caster Rear support Caster support or strong board If the installation...

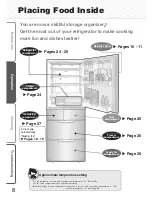
Page 8: ...compartment in your preferred setting Initial settings at time of purchase refrigerator freezer and vegetable compartments M versa compartment Soft freezing M Approximate temperature setting Refrigera...

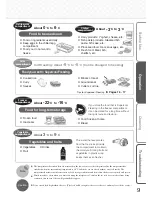
Page 9: ...9 C to 5 C Can be changed to freezing Versa compartment About 22 C to 16 C Freezer compartment Food or ingredients used daily Keep eggs in the chilled egg compartment Food you do not want to freeze Th...

Page 10: ...he display for the supercool freezing fast cooling button changes depending on the displayed compartment or the temperature setting Display names Displayed compartment When displaying the versa compar...

Page 11: ...tment display area Example When the doors of the refrigerator and ice making compartments are open blinks in time with the door alarm sound Before Use Operation Cleaning Troubleshooting Operation 11 I...

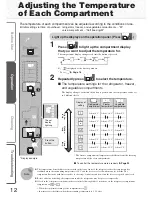
Page 12: ...ton is pressed is displayed at the time of purchase To set Page 18 2 Repeatedly press to select the temperature The temperature settings for the refrigerator freezer and vegetable compartments The dis...

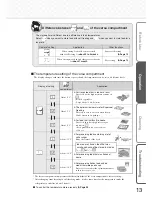
Page 13: ...en when frozen Can be frozen in its package About 9 C For food that is difficult to freeze Store food that has a high salt or sugar content on Food pickled in soy sauce or miso Cod roe About 12 C For...

Page 14: ...ress the button when is displayed This lights up if fast cooling is set Display example When you buy foods in bulk and store them the foods can be cooled quickly to preserve their freshness Fast cooli...

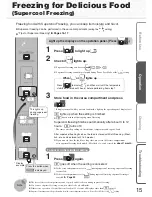
Page 15: ...performing from step 1 3 Store food in the versa compartment and press If display turns off while you store food inside light up the operation panel display to set lights up when the setting is finish...

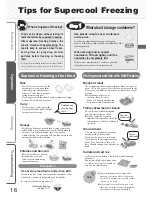
Page 16: ...l freeze it Can be frozen without losing moisture and taste It can be preserved for about 2 weeks with soft freezing It thaws well with no unevenness Curry Leftover curry can be put in the versa compa...

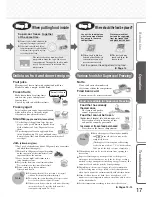
Page 17: ...o Natto can be mixed immediately after removal from the compartment Fried bean curd You can cut out the necessary amount Food that has already thawed once The texture and quality cannot be guaranteed...

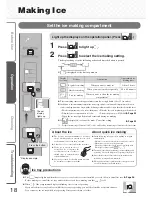
Page 18: ...ce tray or ice tray lock lever is not installed correctly How to install ice tray Page 28 Before making ice install the ice tray and lock the ice lock lever making sure that is off When of the compart...

Page 19: ...cap and pour water into the water supply port up to the full position If the tank is filled beyond the full position water may spill out when you carry or tilt it Further this may cause the water cha...

Page 20: ...ion is performed automatically With the power saving operation the temperature of the compartment is set a little higher while compartment operations are performed Even when ECO MODE is set the power...

Page 21: ...ions of the each compartment lights up for the compartment in the power saving operation Example When the freezer compartment and the refrigerator compartment are in the power saving operation Note Af...

Page 22: ...ng is stopped automatically Ice cannot be stored Empty the water in the water tank as well as the water and ice in the ice tray and the ice storage box and then set to Power Save Mode The operation in...

Page 23: ...elected compartment or temperature Page 10 To return each setting to their initial condition at the time of purchase if you have forgotten the settings etc The temperature setting of the versa compart...

Page 24: ...e lower Egg shelf Air outlet The interior light uses 10 LEDs AUTO Shelf If food with a high water content is placed near the air outlets it may freeze Page 37 When a door is open you will be informed...

Page 25: ...p a door ajar or the bottle may break Also food may fall and cause an injury Do not attach a case that you purchased separately onto the outside of a pocket It may keep a door ajar and reduce the cool...

Page 26: ...ot be closed Food may be damaged Food may be thawed Versa case Infrared sensor The food temperature is detected with an infrared sensor Aluminum tray The cold tray quickly cools the food When a door i...

Page 27: ...e an ajar door malfunction or damage Do not store foods other than ice when the ice making compartment is set to or The level of the ice storage is checked automatically by the sensor lever and ice ma...

Page 28: ...remove it Mark 2 Open the door of the ice making compartment and unlock the ice tray lock lever When the ice tray lock lever is unlocked the display turns on If the buzzer sounds continuously after r...

Page 29: ...e triangle mark on the filter and push in while making sure that there is no gap 2 Fit the lid onto the cap 3 Attach the impeller onto the water supply pump Remove the cap while opening the tab with y...

Page 30: ...supports in turn from above A clicking sound is made Move the lever to the left and right and check that the AUTO Shelf is kept level when moved up and down If the shelf is not kept level remove the...

Page 31: ...shock or a fire Fully pull out the door Lift the upper case out to the front Pull out while slightly lifting up the door and then tilt Lift the lower case out to the front The illustration represents...

Page 32: ...ator is not dried sufficiently it may cause mold odors or refrigerant gas leaks due to condenser corrosion Pages 19 28 Empty any water or ice from the water tank and ice tray Wear protective gear glov...

Page 33: ...tration mode has not been canceled Demonstration mode status When the entire display blinks 3 times at regular intervals even though you have not operated any buttons When the compartment and temperat...

Page 34: ...a blinking display Display of setting Refrigerator freezer compartments Versa compartment Freezing setting 1 Low setting Page 12 About 12 C Page 13 2 2 3 4 5 About 0 3 C lower than L About 2 4 C high...

Page 35: ...Use Operation Cleaning Troubleshooting Troubleshooting 35 Refrigerator Compartment Ice making compartment Versa compartment Vegetable Compartment Freezer Compartment MR BX52W N P and MR BX52W BR P ar...

Page 36: ...Page 22 Has ice been stored inside the ice storage box for a long time Is the ice making compartment set to Power Save Mode If the ice is stored for a long time ice cubes may join together or shrink...

Page 37: ...the refrigerator compartment to freeze Food freezes in the refrigerator and vegetable compartments Food in the versa compartment melts Has enough time passed after temperature adjustment or installat...

Page 38: ...nges A rattling or squeaking sound is made sometimes every 1 to 2 hours After turning on the power a thumping or creaking sound is made sometimes in the ice making STOP mode every 1 to 2 hours A whist...

Page 39: ...Memo...

Page 40: ...58 60 ECO 63 58 ECO 3 24...

Page 41: ...42 43 44 45 46 47 48 49 50 51 52 53 54 55 56 57 58 60 61 62 63 64 65 66 67 68 69 70 72 73 74 76 53 55...

Page 42: ...42 44 45 44 44 44 44 45 70...

Page 43: ...43...

Page 44: ...2 10 1 44 5cm 24 10 2 50 60 2...

Page 45: ...3 4 45 2 3mm 100kg R600a 1 2...

Page 46: ...46 62 63 48 49 62 64 64 64 65 56 57...

Page 47: ...30 47 3 9 0 6 9 5 22 16 54 55 3 3...

Page 48: ...ECO 30 61 48 3 58 ECO ECO 58 60 50 51 56 52 53 53 52 60 30...

Page 49: ...1 4 60 1 2 3 4 5 60 2 49 3 71 71 1 1...

Page 50: ...30 5 50 1 56 2 5 72 6 16 9 5 17 8 3 19 6 1 21 5 0 22 3...

Page 51: ...51 2 3 53 1 52 5 7 9 12 15 18 2 72 6...

Page 52: ...52 2 30 2 1 1 1 56 2 1 2...

Page 53: ...30 53 1 60 2 2 1 3 3 12 2 3 1 1 54 55...

Page 54: ...1 2 54 80 70 1 2 100 400g 2 5 15 30 1...

Page 55: ...7 24 1 2 3 5 15 50 51 55 53 1 2 1 1cm 250cc 2 1 300g 60 100g 2 3...

Page 56: ...2 60 80 1 1 10 12 80 140 10 24 66 56 1 2 1 10 12 ECO 58 60 1...

Page 57: ...1 57 3 1 56 5 66 4 2 66 2 3 66 4 5 66 67 1 56...

Page 58: ...58 ECO 60 1 30 ECO 1 1 2 3 0 1 0 3 4 1 ECO ECO ECO 30 30 ECO Eco Mode ECO ECO 3 24...

Page 59: ...59 ECO 30 30 ECO ECO ECO...

Page 60: ...60 10 0 2 5 57 1 3 2 1 1 2 3 30 3...

Page 61: ...61 1 3 1 3 1 3 48 ECO 3 3...

Page 62: ...3 3 62 10 LED 75 49...

Page 63: ...63 LED 68 68 69 1 2...

Page 64: ...64 49...

Page 65: ...65 60 66 67 49 80 140 1 2L...

Page 66: ...66 2 3 2 2 56 1 6 56 4 3 5 1 60 1 2 3 4 1 2...

Page 67: ...2 3 67 1 4 5 2 3 1 2 1 2 3 4...

Page 68: ...2 1 68 10 4 4 4 4 3 2 4 3...

Page 69: ...3 69...

Page 70: ...70 1 45 2 3 66 67 57 66 3cm 30 2 2...

Page 71: ...71 2 5 1 1 5 5...

Page 72: ...5 0 3 2 4 3 0 6 2 1 4 0 9 1 8 5 1 2 1 5 6 50 1 2 7 9 7 8 0 9 0 9 8 0 6 0 6 9 0 3 0 3 10 50 15 51 11 13 11 12 0 3 0 3 12 0 6 0 6 13 0 9 0 9 14 50 1 2 15 15 16 17 18 1 2 1 5 16 0 9 1 8 17 0 6 2 1 18 0...

Page 73: ...MR BX52W 1 2 1 1 4 1 1 1 1 1 1 1 1 1 1 1 1 1 1 1 73 MR BX52W N P MR BX52W BR P MR BX52W N ML MR BX52W BR ML MR BX52W N H...

Page 74: ...74 24 30 50 60 48 66 67 62 71 4 5 24 44 58 60 60 66 4 5 24 66 57 67 66 60 56...

Page 75: ...75 61 53 45 5 30 60 1 4 5 49 55 53 53...

Page 76: ...76 1 2 1 2 100 58...

Page 77: ...Memo...

Page 78: ...Memo...

Page 79: ...Memo...

Page 80: ...t be used in any other country No servicing is available outside of Malaysia MR BX52W N H is designed for use in Hong Kong only and can not be used in any other country No servicing is available outsi...

Reviews: