4
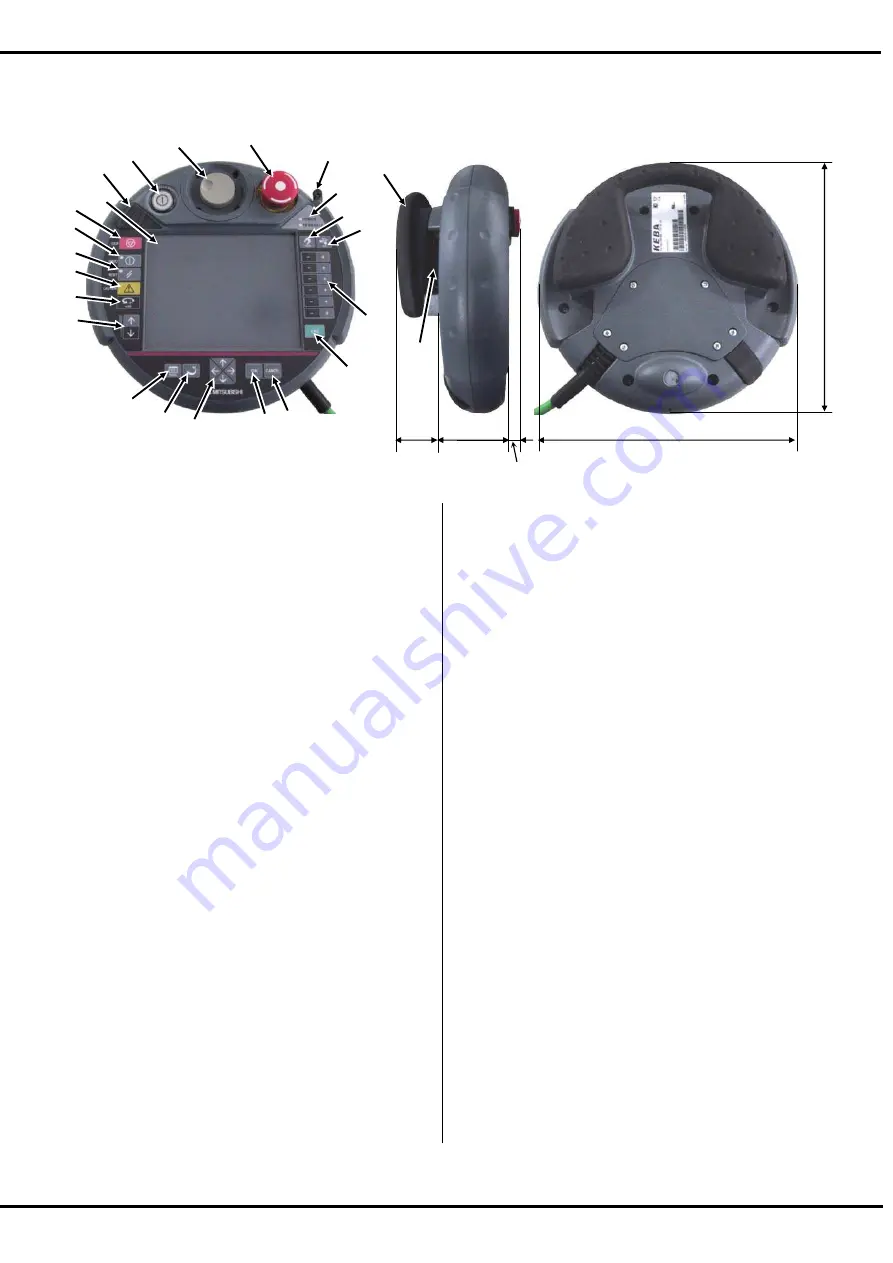
3.2. Construction
1) TEACH button
This changeover switch is used to enable or
disable the T/B key operations. The lamp
(white) lights up during enabling state.
2) Wheel
Move the cursor to select the menu and so on.
3) Emergency stop button
This stops the robot in an emergency state. The
servo turns OFF. Turn to the right to cancel.
4) Touch stylus (Integrated in housing)
The pen which operates the touch panel.
5) Power supply LED, T/B enable LED
POWER LED lights up during supplying the
power supply.
TB ENABLE LED lights up during enabling
state.
6) Touch panel
Tap to operate with the stylus pen and the
screen is displayed.
7) USB connecter
Plug-in the USB memory stick.
8) STOP button
This stops the robot immediately. The servo
does not turn OFF.
9) SERVO button
This turns ON the servo power simultaneously
with the enable switch. The LED (green) lights
during servo ON.
10) RESET button
This key resets an error state that has occurred.
11) CAUTION button
If this button is pushed in jog operation, the
limit switch can be canceled.
Moreover, push this button, when releasing the
brake.
12) HOME button
Return the robot to the Home position that set
beforehand. This function is available with
Ver.2.3 or later of this software.
13) OVRD button
This scrolls override up or down.
14) HAND button
Display the screen of hand operation.
15) JOG button
Display the screen of jog operation.
16) +/- button
This button operates corresponding to the
selected operation.
17) EXE button
Move the robot, such as hand alignment.
18) MENU button
Display the menu screen.
19) RETURN button
Close each operation screen.
20) Arrow button
Move the cursor.
21) OK button
Fix each screen operation.
22 CANCEL button
Cancel each screen operation.
23) Multi grip handle
Holds the T/B.
24) Enable switch
When the TERACH button 2) is enabled, and
this switch is released or pressed with force,
the servo will turn OFF. Press this switch lightly
when carrying out functions with the servo ON,
such as jog operations. If emergency stop or
servo OFF have been applied, and the servo is
OFF, the servo will not turn ON even when this
switch is pressed. In this case, carry out the
servo ON operation again.
252
240
37.2
55.3
21.5
24)
23)
1)
2)
3)
4)
5)
8)
9)
12)
13)
14)
15)
16)
17)
18)
19) 20)
21)
7)
11)
22)
6)
10
)
Summary of Contents for R56TB
Page 1: ...Mitsubishi Industrial Robot CR750 CRn 700 Series R56TB R57TB Instruction Manual BFP A8684 F...
Page 4: ...8 CAUTION CAUTION WARNING...
Page 6: ......
Page 12: ......
Page 126: ...114 Current2 a...
Page 173: ...161 17 4 9 5 Hand 17 4 9 6 Warm up...
Page 174: ...162 17 4 9 7 Start each slot 17 4 9 8 Stop each slot...
Page 175: ...163 17 4 9 9 Servo ON OFF each robot 17 4 9 10 Machine lock each robot...
Page 179: ...167...


