193
19.1.5.1. Button
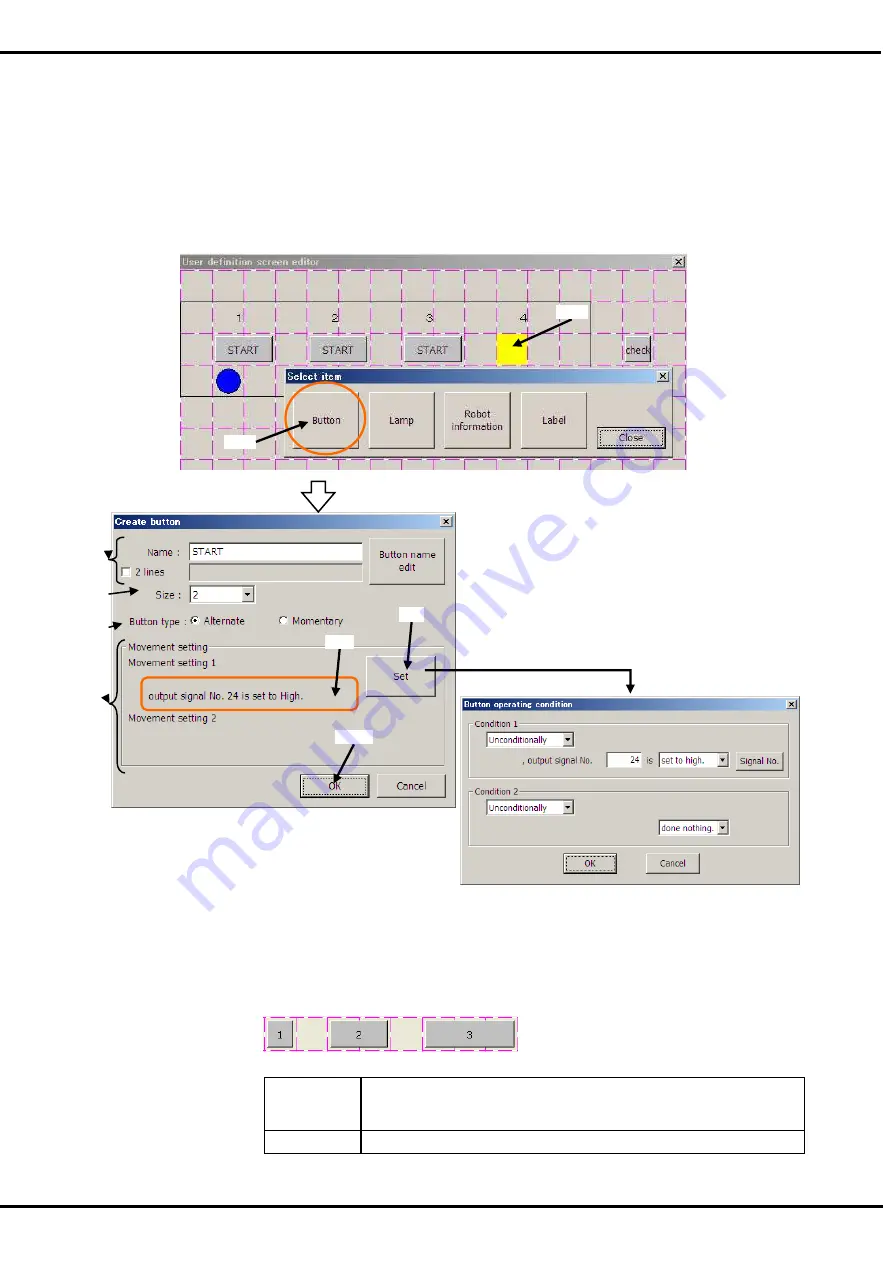
(1) Tap the position (block) in which the button is made (<a>). Left side of the button is arranged in this
position.
(2) After "Select item" window is displayed, tap [Button] button (<b>).
(3) Set the button name, button size and the kind of button on "Create button" windows.
(4) The movement of when the button is tapped is set by [Set] button (<c>). The set content is displayed in
"Movement setting" (<d>).
(5) After the setting is completed, tap [OK] button (<e>).
<1> Name
: The name of the button is set.
The button name can be input by [Button name edit] button.
The button name can be displayed by two lines by checking "2 lines".
<2> Size
: The width of the button can be set.
The width of the button that can be set is 1/2/3.
<3> Button type
: The kind of the button can be set.
Alternate
When the button is tapped once, the button keeps ON state. And
when the button is tapped again, it returns to OFF state.
The signal output is kept too.
Momentary
The button keeps ON state while it is being pushed.
<a>
<b>
<1>
<2>
<3>
<4>
<e>
<c>
<d>
Summary of Contents for R56TB
Page 1: ...Mitsubishi Industrial Robot CR750 CRn 700 Series R56TB R57TB Instruction Manual BFP A8684 F...
Page 4: ...8 CAUTION CAUTION WARNING...
Page 6: ......
Page 12: ......
Page 126: ...114 Current2 a...
Page 173: ...161 17 4 9 5 Hand 17 4 9 6 Warm up...
Page 174: ...162 17 4 9 7 Start each slot 17 4 9 8 Stop each slot...
Page 175: ...163 17 4 9 9 Servo ON OFF each robot 17 4 9 10 Machine lock each robot...
Page 179: ...167...


