20
21
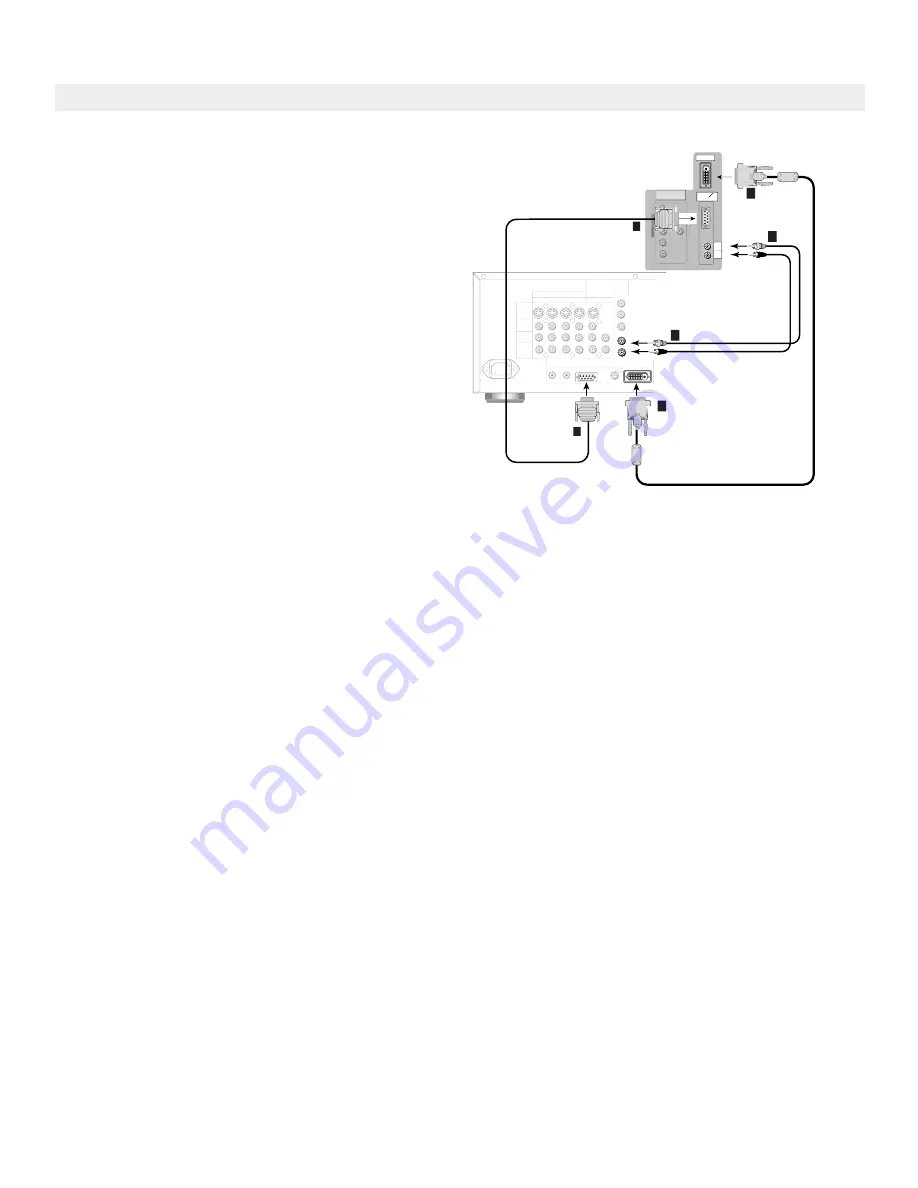
Connecting MonitorLink™
Figure 14.
Connecting MonitorLink
MonitorLink
(Figure 14)
1. Connect a MonitorLink/DVI cable from the
TV back panel to the Mitsubishi HD Receiver/
Controller back panel.
2. Connect the MonitorLink Control/RS-232 cable
from the TV back panel to the Mitsubishi HD
Receiver/Controller back panel.
3. Connect the L (left) and R (right) audio cables
from the HDTV receiver to AUDIO LEFT and
AUDIO RIGHT on the MonitorLink section of
the TV back panel.
NOTE: The 29 pin MonitorLink/DVI and RS-232
cables can be found at your local electronics
store.
CAUTION:
To assure continued FCC
compliance, the user must use a shielded video
interface cable with bonded ferrite cores at each
end, when using the MonitorLink/DVI input.
Note: The TV back panel and connections shown here are for reference only and may vary by model.
AUDIO-
LEFT/
(MONO)
AUDIO-
RIGHT
WS-48313, WS-55313, WS-65313
back panel
403XF-5K
1
1
2
2
OUTPUTS
TO
DISPLAY
1
2
3
4
MONITOR
PIP
INPUT
TO
AV RECEIVER
AC IN
DIGITAL AUDIO
OUTPUT
MonitorLinkTM
/DVI
MonitorLink TM
CONTROL/RS-232
IR OUTPUT
NetCommand R
S-VIDEO
VIDEO
AUDIO
LEFT
AUDIO
RIGHT
White
Red
MitsubishiHD-5000
receiver/controller back panel
3
White
Red
3
ferrite
core
ferrite
core
Y
G
Pb
B
P r
R
V
H
DTV(YPbPr/ GBRHV)
480 i / 480P /1080 i
MONITORLINK
TM
/DVI
MONITORLINK
TM
CONTROL
RS-232C
40
3X
F-
5K
Summary of Contents for WS - 48313
Page 58: ...58...
Page 64: ...64 This page intentionally blank...
Page 70: ...70 Cabinet Separation for Model WS...
Page 75: ......


