background image


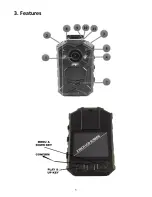
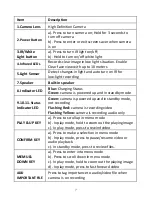
Item Description 

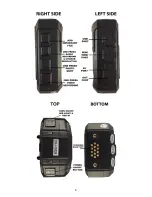
1.Camera Lens 

High Definition Camera


2. Power Button


a). Press to turn camera on; Hold for 3 seconds to 
turn off camera   
b). Press to enter or exit screen saver when camera 
is on


3.IR/White 
Light button 

a). Press to turn IR light on/off;
b). Hold to turn on/off white light


4.Infrared LEDs


Records clear image in low light situation. Enable 
Clear face view with up to 10 meters 

5.Light Sensor 

Detect changes in light and auto turn on IR for 
low-light recording 

7.Speaker Built-in 

speaker 

8.

 Indicator LED 

Blue: 

Charging Status

Green:

 camera is powered up and in standby mode 

9.10.11.

 Status


Indicator LED 

Green: 

camera is powered up and in standby mode, 

not recording 

Flashing Red: 

camera is recording video 

Flashing Yellow:

 camera is recording audio only


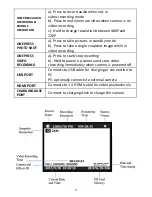
PLAY & UP KEY   

a). Press to scroll up in menu mode
b). In play mode, hold to zoom out the playing image
c). In play mode, press to rewind video 

CONFIRM KEY 

a). Press to make a selection in menu mode 
b). In play mode, press to pause/resume video or 
audio playback. 
c). In standby mode, press to review files. 

MEMU & 
DOWN KEY 

a). Press to enter into menu mode
b). Press to scroll down in menu mode 
c). In play mode, hold to zoom out the playing image 
d). In play mode, press to fast forward video 

ADD 
IMPORTANT FILE


Press to tag importance to audio/video file when 
camera is on recording 

Summary of Contents for EH15

Page 1: ...1 MIUFLY Body Camera User Guide...

Page 2: ...2 TABLE OF CONTENTS 1 Introduction Product Overview Box contents 2 Technical Specifications 3 Features 4 Main Manu Optional Detail 5 Operation 6 Troubleshooting...

Page 3: ...able and offers multiple recording quality super full HD 1296p video down to 720x480 resolution giving users the options to adjust the recording quality according to their storage capabilities EH15 ca...

Page 4: ...Image Max 32 Megapixels Image Format JPEG Burst 2 3 5 10 15 20 Snap Shots Video Image Review LCD Screen 2 0in TFT LCD High Resolution Color Display Audio Playback Yes Video Output Not support Video T...

Page 5: ...3 Features 5...

Page 6: ...6...

Page 7: ...d up and in standby mode 9 10 11 Status Indicator LED Green camera is powered up and in standby mode not recording Flashing Red camera is recording video Flashing Yellow camera is recording audio only...

Page 8: ...in standby mode b Press to take a single snapshot image while in video recording ONE PRESS VIDEO RECORDING a Press to start stop recording b Hold to power up camera and start video recording immediat...

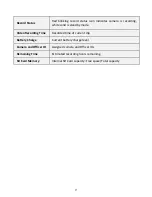
Page 9: ...lid is standby mode Video Recording Time Recorded time of current clip Battery Charge Current battery charge level Camera and Officer ID Assigned camera and Officer IDs Remaining Time Estimated record...

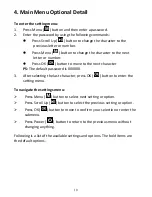
Page 10: ...o move to the next character PS The default password is 000000 3 After selecting the last character press OK button to enter the setting menu To navigate the settings menu Press Menu button to select...

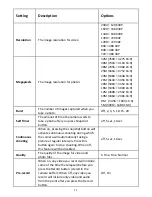
Page 11: ...elf Timer The amount of time the camera waits to take a photo after you press Snapshot button off 5 sec 10 sec Continuous shooting When on pressing the snapshot button will activate continuous shootin...

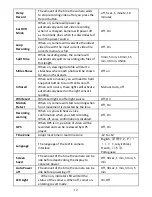
Page 12: ...LEDs on off When set to Auto these lights will activate automatically based on the light sensor s reading Manual Auto off White Led White Led light to offer light source Off On Motion Detect When on c...

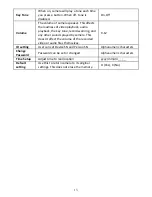
Page 13: ...nd any other sounds played by camera This doesn t affect the volume of the recorded video or audio files themselves 0 12 ID setting User can set Device SN and Person SN Alphanumeric characters Change...

Page 14: ...Power off image z Power off music z Camera vibrates 5 2 Resetting Press reset button inside HDMI port to have camera resetting when camera works abnormally Please note DO NOT PRESS this button except...

Page 15: ...D display there will be a flashing green square which refers to that a photo has been taken while video is recording 5 6 Video Recording In standby mode PRESS record button indicator LED flashes Alter...

Page 16: ...ght of the LCD screen 5 11 Device ID User ID In standby mode PRESS Menu button to enter settings Find ID setting PRESS OK button to select Enter the password the default password is 00000 After right...

Page 17: ...input will be switched to external camera automatically Meanwhile the external camera can be controlled by the main body camera Drive by wire button operating instructions When the camera is in stand...

Page 18: ...omputer powered on z The included USB power adapter connect to a power outlet z The included car charger 5 17 GPS tracking When GPS turns on location information will be embedded into the video and ca...

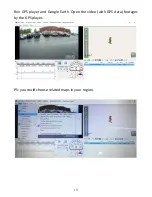
Page 19: ...19 Run GPS player and Google Earth Open the video with GPS data footages by the GPS player PS you could choose related maps in your region...

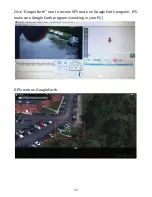
Page 20: ...20 Click Google Earth icon to review GPS route on Google Earth program PS make sure Google Earth program is working in your PC GPS route on Google Earth...

Page 21: ...t go to Body Camera s menu and select LED Light menu option Ensure that it is set to ON 6 4 Body Camera only records for short periods of time A In event of Body Camera recording for brief moments the...

Reviews: