6
|
MIVARDI
EN
I. M ‑CELL lithium batteries
BEfoRE CoMMISSIoNINg
Remove the M ‑CELL battery and accessories from the transport pack and completely remove all packaging materials. Check
the contents of the product package and its completeness. Missing or damaged parts must be immediately claimed at the
workshop.
CoMMISSIoNINg AND USE
Connect the appliance’s power cables to the plus and minus terminals of the M ‑CELL battery. Pay attention to the correct polarity!
No switching is necessary, once both poles of the appliance are connected, the M ‑CELL battery will supply it with current and can
thus drive it. Always use a fuse between the M ‑CELL battery and the device you want to drive via the M ‑CELL battery. Use only
high ‑quality jumper cables and connectors with sufficient diameter. Please refer to the owner’s manual of the appliance concerned.
WARNINg!
the M ‑CELL battery must never be charged and simultaneously used to charge/power an
external device. Make sure that only appliances that are compatible with the M ‑CELL battery
are connected to the battery. Check the technical characteristics of the appliance you want to
connect to the battery, or you can ask the manufacturer directly. All M ‑CELL battery models are equipped
with under ‑discharge /overcharging protection, discharge current control and temperature protection.
USINg USB CoNNECtoRS
Both USB connectors, like the LCD display, are switched on via a switch. Be careful that the COVERS OF THE USB connectors
are not exposed to water ingress, as they do not provide complete protection against its ingress. Therefore, make sure at all
times that the covers are properly fitted and that the M ‑CELL battery is not exposed to constant rain or sinks under water.
Use a designated transport bag to minimise weather conditions and prevent potential damage.
CHARgINg
•
Charge M ‑CELL batteries exclusively with original M ‑CELL chargers, which allow safe and fast charging (full charge in
5 – 6 hours).
•
Loosen the screw connectors on the plus and minus terminals of the M ‑CELL battery. Then connect both charger cables,
paying attention to the correct polarity. Now tighten both contacts tightly, no need for additional tools. Once the two
connection cables are connected, plug the charger with the AC cable into a 230 V outlet. The charging process begins,
the charger fan immediately starts and runs until the charger disconnects from the mains. You can see the current charge
status on the battery LCD. When the M ‑CELL battery is fully charged, unplug the charger. The battery charge status is also
indicated by the charger LED. If this one is green, the M ‑CELL battery is fully charged. Remove the charger plug from the
outlet, then disconnect the connection cables from the plus and minus terminals of the M ‑CELL battery.
•
You can charge the battery to full capacity or even partially.
•
Before longer storage, it is optimal to charge the battery to about 60 %.
CHECkINg tHE M ‑CELL BAttERy CHARgE StAtUS
You can check the battery charge status on the LCD. For this purpose, turn on the LCD display using the switch on the battery.
The LCD will now display a value in % to show the battery charge status. By pressing a small button on the LCD display, it
is possible to change the percentage data to the data in volts.
DISCHARgINg
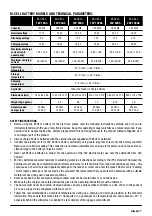
When using the battery, always respect the maximum values of the continuous / peak current.
Summary of Contents for M-CELL
Page 15: ...MIVARDI 15...


