background image

Input and Output Connector Wiring

The XLR connectors on the LFE-4 are wired as follows:

Pin 3:

Minus

Pin 2:

Plus

Pin 1:

Ground

General Connection Guidelines

To avoid loud transients that may damage your speakers and hurt your ears, turn off your power amplifiers

before connecting or disconnecting any cables or the power supply on the LFE-4.

Certain types of audio cables have high capacitance in the range of 0.75pf/ft. Long runs of high capacitance

cable can cause a decrease in high frequency performance of the LFE-4. Approximately 300 feet of 0.75pf/ft cable
will cause a drop of 3dB at 24kHz. In order to keep this effect to a minimum, use high-quality, low capacitance
cable or keep your cable runs from the LFE-4 to your amplifier to under a hundred and fifty feet.

5.

GROUNDING

The LFE-4 was designed so as not to add noise to an already clean system. To eliminate the possibility of the

extra safety ground introducing ground loop hum, the LFE-4 uses an external double-insulated UL approved power
transformer that does not require a safety ground. The LFE-4 is grounded to the audio signal ground of the mixer
and power amplifiers through the XLR cables. In order to minimize the grounding problems between the LFE-4
and equipment racks, the internal audio signal ground can be separated from the chassis ground. On the rear of
the unit are two binding posts. The black binding post is connected to the chassis. The red binding post is
connected to the audio signal ground. Normally, these binding posts are shorted together with a gold-plated
jumper. However in a situation where the chassis may be connected to a "dirty" ground, this jumper can be
removed, separating the audio and chassis ground. In addition, the binding post can be used to attach an
additional heavy gauge grounding wire.

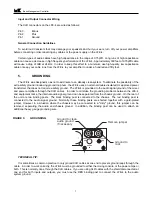
TECHNICAL TIP:

It is sometimes a common practice to only ground XLR cables at one end to prevent ground loops through the

cable. In order to work correctly, the LFE-4 must be grounded to either the mixing console or the power amps or
both. This is normally done through the XLR cables. If you are using XLR cables with the shield disconnected at
one end for both inputs and outputs, you must use the RED binding post to connect the LFE-4 to the audio
system ground.

Bass Management Controller

7


24 VAC

IN

CHASSIS

GND

SIGNAL

GND

Remove jumper

Ground to clean
audio ground
if necessary

Ground to

rack

FIGURE 3:

GROUNDING

Summary of Contents for LFE-4

Page 1: ...LFE 4 Miller Kreisel Sound Inc 9351 Deering Avenue Chatsworth CA 91311 5858 USA 818 701 7010 fax 818 701 0369 www mkprofessional com 2003 Miller Kreisel Sound Inc bass management operation manual...

Page 2: ...FOR STEREO 8 7 CONNECTING FOR DOLBY DIGITAL 9 8 CONNECTING FOR DTS 10 9 CALIBRATING YOUR M K PROFESSIONAL SYSTEM 11 THE M K PROFESSIONAL TEST DISC 11 10 SPEAKER PLACEMENT 12 ITU R BS 775 1 RECOMMENDAT...

Page 3: ...his product from the wall outlet and refer servicing to qualified personnel under the following conditions When the power supply cord or plug is damaged If liquid has been spilled or objects have fall...

Page 4: ...DTS and other surround sound formats are faced with numerous challenges when trying to accurately monitor complex and dynamic material and determine how this material will sound in its intended playb...

Page 5: ...e Bass management is equally suited to all formats from 2 channel stereo to 5 1 and beyond Indeed existing control rooms that are doing stereo 2 channel mixes especially with smaller nearfield monitor...

Page 6: ...way it will ultimately be played back The LFE 4 together with a properly set up and calibrated M K monitor system allows the mixer to hear his work with more accuracy than might otherwise be possible...

Page 7: ...of the mixer and power amplifiers through the XLR cables In order to minimize the grounding problems between the LFE 4 and equipment racks the internal audio signal ground can be separated from the ch...

Page 8: ...ower amplifiers 5 Locate the external power supply for the LFE 4 and plug it into the 4 pin power connector on the back of the LFE 4 Secure it in place by turning the outer ring clockwise Plug the ext...

Page 9: ...to plus and set the gain switch to the THX position 5 If you are using passive speakers with external amplifiers connect your speaker system to the power amplifiers 6 Locate the external power supply...

Page 10: ...E 4 2 Connect the outputs of LFE 4 to the inputs of your power amplifiers or directly to your powered loudspeakers 3 Connect the mixer output assigned to the low frequency effects channel LFE to the 0...

Page 11: ...el of 4dB with 20dB of headroom the maximum signal level from the source console etc can be 24dB Therefore at very high signal levels you can only add around 3dB of gain with the trim pots before the...

Page 12: ...dation is based on placing the speakers at equal distances around a 2 5 meter circle with the height of each speaker at 1 2 meters The center speaker is placed directly in front of the listener with t...

Page 13: ...eaking it is not a good idea to place the subwoofer directly in the center between the left and right speakers There s usually a null in this location which absorbs low frequencies rather than reinfor...

Page 14: ...off your body and into the microphone Point the meter at the center speaker at about ear height Play track one of the test CD through the selected speaker and read the SPL Adjust the level to 85dB usi...

Page 15: ...ut clipping level 27 dBu Gain Adjustment 12dB THD 1kHz 4 dBu 0 002 LFE Inputs Input impedance 20K ohm balanced Nominal input level 4 dBu Maximum input level 24 dBu Gain Adjustment 12dB Gain 10dB input...

Page 16: ...LFE 4 manual PN 70360 7 08 2003 rev 1 pt qrk...

Reviews: