background image

2.

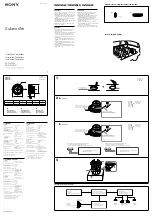
You can also connect your satellite speakers to the subwoofer.  If you choose to do this, connect the
amplifier to the "From Amplifier" terminals on the back of the subwoofer and connect the satellite speakers
to the "To Speakers" terminals on the back of the subwoofer.  For each channel, make sure that the Positive
(+) terminal on the amplifier is connected to the Positive (+) "From Amplifier" terminal (and the Negative
(-) terminals are connected), and that the Positive (+) "To Speakers" terminal is connected to the Positive
(+) terminal on the speaker (the Negative (-) terminals should also be connected.

If your amplifier has two sets of speaker outputs (e.g., A and B), you can connect the satellites to one set and the

subwoofer to the other.  But if you get weak or no output when you connect your speaker this way, connect both sets of
speaker wires to the same output terminals.

PLUGGING IN THE SUBWOOFER

Once all the speaker wires or preamp interconnect cables are in place, you are ready to plug in the subwoofer.  Set

the "BASS LEVEL" control to "MIN".  Attach the power cord to the receptacle on the subwoofer’s back panel.  Then plug
the cord into the AC outlet.

Slide the power switch to either the “AUTO” or “ON” position.  If your hear a “thump” from the subwoofer, this is the

normal sound of its power supply charging.

“AUTO” SWITCH POSITION

In the “AUTO” switch position, the subwoofer is in an idle condition when your system is turned off and no signal is

being fed to the subwoofer.  When the subwoofer receives a signal from your receiver or processor, it automatically
switches on.

“ON” SWITCH POSITION

In the “ON” switch position, the subwoofer is fully active, whether or not your other components are turned on.

Do not plug the subwoofer into a switched outlet on another component.

Now, play some music through your system to make sure that the satellite speakers are working properly.  If they

are, carefully advance the "BASS LEVEL" control.  The subwoofer should begin to play.  Set the "BASS LEVEL" control

POWERED SUBWOOFER

REF

+

+

AMPLIFIER OR RECEIVER

+

+

RIGHT

LEFT

SATELLITE SPEAKERS

8

FIGURE 4 - SATELLITE SPEAKER WIRING (OPTIONAL)

Summary of Contents for VX-850

Page 1: ...VX 860 VX 850 Miller Kreisel Sound Inc 9351 Deering Avenue Chatsworth CA 91311 5858 USA 818 701 7010 fax 818 701 0369 www mksound com 2004 Miller Kreisel Sound Inc powered subwoofer operation manual...

Page 2: ...E SPEAKER WIRING OPTIONS 8 PLUGGING IN THE SUBWOOFER 8 6 Use OF THE PHASE CONTROL 9 7 USE OF THE LOW PASS FILTER CONTROL 9 8 USE OF THE BYPASS SWITCH 9 9 USING MULTIPLE SUBWOOFERS 10 10 HOME THEATRE U...

Page 3: ...NG SERVICE Unplug this product from the wall outlet and refer servicing to qualified personnel under the following conditions When the power supply cord or plug is damaged If liquid has been spilled o...

Page 4: ...o the subwoofer BEFORE the cord is plugged into the AC wall socket 4 WHERE TO LOCATE YOUR SUBWOOFER M K subwoofers perform well in most room locations Unless your ear is a foot or two away from the su...

Page 5: ...an exceptionally sharp 36 dB octave low pass filter to remove the midbass and midrange frequencies unwanted in a subwoofer This makes your M K subwoofer truly non directional Your M K subwoofer is ma...

Page 6: ...omponent to the LINE LEVEL jacks on the Subwoofer s backplate If you run one cable connect it to the LEFT input jack See Figure 1 It is not necessary to use both input jacks on the sub woofer POWERED...

Page 7: ...FROM AMPLIFIER terminals A Connect the Amplifier s Left channel Positive terminal and the subwoofer s Left RED FROM AMPLIFIER terminal B Connect the Amplifier s Left channel Negative terminal and the...

Page 8: ...in place you are ready to plug in the subwoofer Set the BASS LEVEL control to MIN Attach the power cord to the receptacle on the subwoofer s back panel Then plug the cord into the AC outlet Slide the...

Page 9: ...hase You need to perform this test because when satellite speakers are located separate from a subwoofer each speak er is at a different distance from your ear In some cases the difference will be jus...

Page 10: ...ontroller is from a SUBWOOFER OUTPUT or MONO RCA jack This connection insures that a full bass signal is fed to the subwoofer If your component doesn t have a sub woofer output jack connect the subwoo...

Page 11: ...Satellite speakers sounds weak Refer to Section 6 Phasing Test on page 9 Reverse the and connections at the back of BOTH Satellite speakers OR switch the PHASE switch from to or vice versa The wiring...

Page 12: ...and speakers dam aged in shipping or by accident If you have any questions about the warranty please contact M K 13 M K 5 1 MULTICHANNEL PRO LOGIC SYSTEM SETUP GUIDE The 5 Most Important Items In Sys...

Page 13: ...nnects E Aim the front speakers this is a must for THX front speakers Use a laser level to align each speaker Place the level on the flat surface between the midranges and tweeters that is roughly in...

Page 14: ...test signal Set the meter to C weighting and Slow response Set the levels to 75 dB if you have a THX processor receiver receiver or are using the Video Essentials disc as a source for setting levels N...

Page 15: ...UENCY RESPONSE 20Hz 200Hz 3dB DIMENSIONS HxWxD 0 x 0 x 0 WEIGHT lbs kg VX 850 ENCLOSURE TYPE Sealed Box WOOFER Single 12 Driver POWER RATING 250 watts RMS FREQUENCY RESPONSE 20Hz 200Hz 3dB DIMENSIONS...

Reviews: