background image

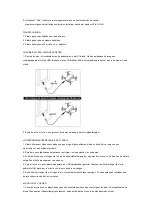
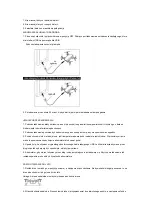
najniższego punktu. Kiedy lampka świeci się, oznacza to, że łączenie powiodło się. 


3. Jednocześnie przesuń lewy i prawy drążek do dołu w lewo pod kątem 45 stopni. Lampka przestaje migać i świeci 

się, co oznacza, że kompas został wyregulowany.  


4. Przesuń lewy i prawy drążek w tym samym czasie do dołu w prawo pod kątem 45 stopni. Światło quadkoptera 

przestaje migać i świeci się na stałe. Usłyszysz pojedynczy dźwięk, który, oznacza to, że regulacja powiodła się. 


KIERUNKI 


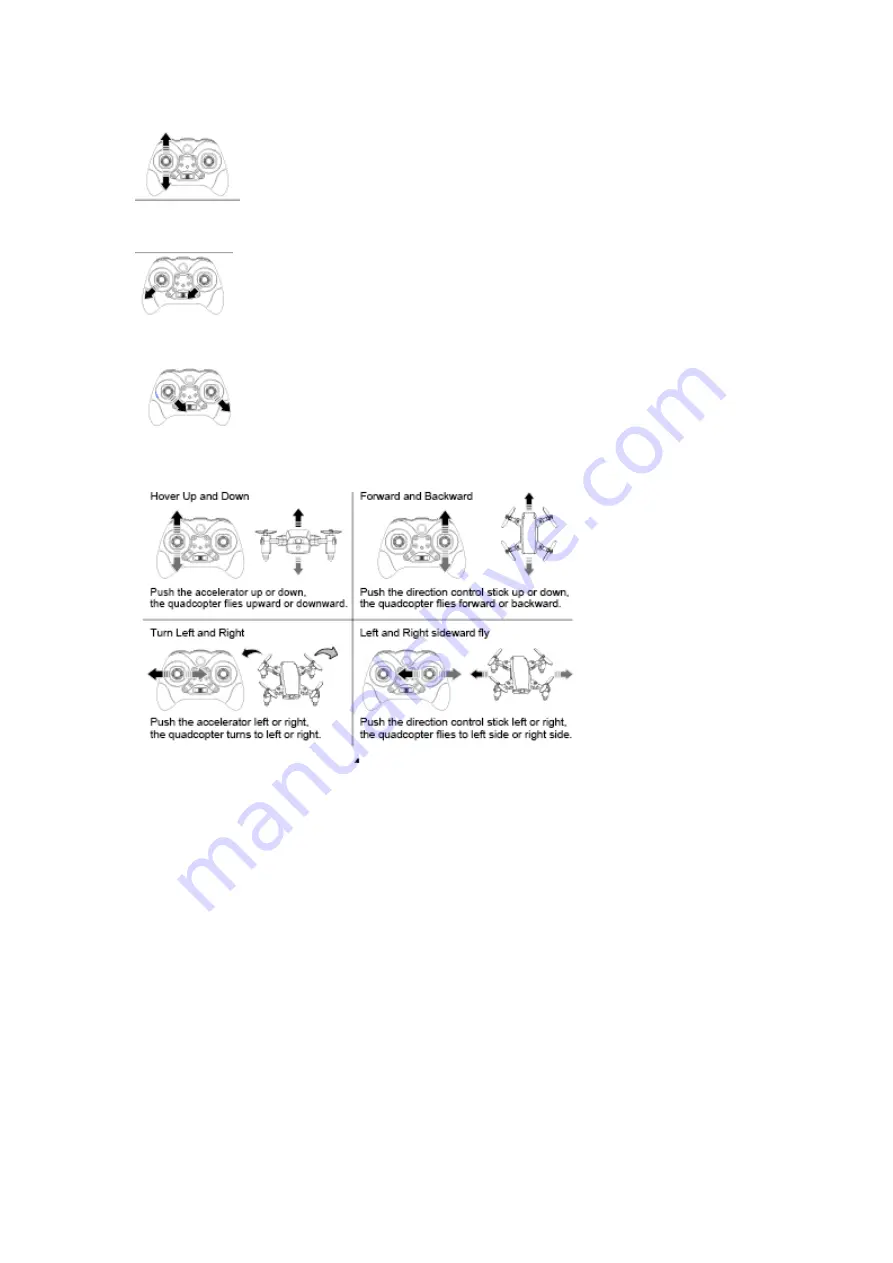
Lot w górę/w dół 

Przesuń drążek przyspieszania w dół/górę, dron leci w dół/  w górę.  


Lot w przód/ w tył 

Przesuń drążek przyspieszania w górę/w dół, dron leci w przód/ w tył. 


Skręt w prawo/lewo 

Przesuń drążek przyspieszania w prawo/lewo, dron leci w prawo/lewo. 


Lot w prawo/lewo  

Przesuń drążek kontroli kierunku lotu w prawo/lewo, dron leci w prawo/lewo.  

Korekta lotu 

Summary of Contents for MO9379

Page 1: ...O9379 is in Compliance with the essential requirements and other relevant conditions of Directive 2014 53 EC A copy of the DOC declaration of conformity is available at DOC reclamond com or MOB PO BOX...

Page 2: ...mal wear of parts improper assembly or operation in an unsafe manners 3 This RC drone requires highflying skills Any damages caused by wrong operations of disassemble and usage cannot be replaced retu...

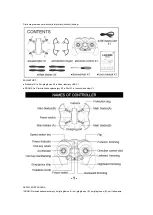
Page 3: ...ion ringX2 Remote control X1 User manual X1 NAMES OF CONTROLLER DRONE Protection ring Main blades A Main blades B Main blades B Charging port Camera Main blades A Power switch Controller Accelerator O...

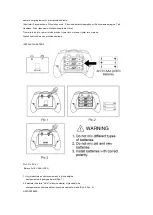
Page 4: ...THE BATTERY Pic 3 Pic 2 Pic 1 3x1 5V AAA LR03 Batteries 1 Use a screwdriver to remove the screw on the back of transmitter then open the battery cover Pic 1 2 Install 3 AAA batteries not included into...

Page 5: ...to cause an accident 3 After flying please do not charge the Quadcopter if the surface temperature is still not cool Otherwise it may cause a swollen battery or even a fire hazard 4 Please make sure t...

Page 6: ...same time to bottom right in 45 degree The quadcopter s light stops flash and always light up At the same time the transmitter buzzer beep once it means that horizontal adjustment successfully OPERAT...

Page 7: ...the antenna of the transmitter must be aligned the tail of the quadcopter when it take off Press the one key return button to go into return mode with the light flash Press the button again to exit re...

Page 8: ...rottle the quadcopter would remain hovering at the altitude it was at when the left control stick throttle was let go TURNING OFF THE QUADCOPTER Method 1 Shift the two control sticks outwards or inwar...

Page 9: ...erschlei von Teilen unsachgem e Montage oder unsachgem en Betrieb 3 Diese RC Drohne erfordert gewisse F higkeiten Sch den die durch unsachgem e Demontage und Benutzung entstehen k nnen im Rahmen der G...

Page 10: ...torblatt X4 USB Ladekabel X1 Quadcopter X1 Schutzring X2 Fernbedienung X1 Bedienungsanleitung X1 ERL UTERUNG DER FERNBEDIENUNG DROHNE Schutzring Rotorblatt A Rotorblatt B Ladebuchse Kamera Rotorblatt...

Page 11: ...n ppel Netzschalter EINSETZEN DER BATTERIEN Abb 3 Abb 2 Abb 1 3x1 5V AAA LR03 Batterien 1 Verwenden Sie einen Schraubenzieher um die Schraube auf der R ckseite der Fernbedienung zu l sen ffnen Sie dan...

Page 12: ...rmeiden 3 Bitte laden Sie den Quadcopter nach dem Fliegen nicht sofort auf wenn die Oberfl che noch nicht abgek hlt ist Andernfalls kann es zu einer berhitzung der Batterie oder sogar zu Brandgefahr k...

Page 13: ...leuchtet konstant Gleichzeitig ert nt der Summer der Fernbedienung einmal Dies bedeutet dass die horizontale Einstellung erfolgreich war BEDIENUNG Hoch und runter schweben Dr cken Sie den Geschwindigk...

Page 14: ...Modus zu verlassen W hrend der R ckkehr kann die Vorw rts und R ckw rtsbewegung des rechten Hebels diese Funktion unterbrechen Wechsel zwischen hoher und niedriger Geschwindigkeit W hrend des Fluges...

Page 15: ...osgelassen wurde AUSSCHALTEN DES QUADCOPTERS Methode 1 Schieben Sie die beiden Steuerkn ppel f r etwa eine Sekunde nach au en oder innen in eine A oder V Form und die Propeller des Quadcopters h ren a...

Page 16: ...ation non s curis e 3 Ce drone RC n cessite des comp tences de haut niveau En cas de dommage caus par de mauvaises op rations de d montage et d utilisation il ne pourra tre remplac retourn et chang so...

Page 17: ...X1 Manuel d utilisation X1 NOMS DE LA TELECOMMANDE DRONE Bague de protection H lices principales A H lices principales B H lices principales B Port de chargement Cam ra H lices principales A Interrupt...

Page 18: ...INSTALLATION DE LA BATTERIE Image 3 Image 2 Image 1 3 piles 1 5V AAA LR03 1 Utilisez un tournevis pour retirer la vis l arri re de la t l commande puis ouvrez le couvercle du compartiment piles Image...

Page 19: ...surveill par un adulte afin d viter tout accident 3 Apr s le vol veuillez ne pas charger le Quadcopter si sa temp rature en surface est encore chaude Sinon cela peut provoquer un gonflement de la batt...

Page 20: ...45 degr s La lumi re du quadcopter arr te de clignoter et s allume fixement Dans le m me temps l metteur buzzer bip une fois cela signifie que le r glage horizontal a r ussi DIRECTION DE FONCTIONNEMEN...

Page 21: ...outon de retour peut rappeler le quadcopter Apr s la fixation du quadcopt re l antenne de l metteur doit tre align e la queue du quadcopt re lors de son d collage Appuyez sur le bouton de retour pour...

Page 22: ...IQUE ET FONCTION DE MAINTIEN D ALTITUDE Utilisez le levier de commande gauche acc l rateur pour contr ler l ascension descente du quadcopt re Lorsque vous l chez le levier de commande gauche acc l rat...

Page 23: ...Este producto no es adecuado para usuarios menores de 12 a os El producto debe utilizarse en un entorno seguro El fabricante y distribuidor no asumen ninguna responsabilidad en caso de da os por acci...

Page 24: ...lugares inseguros como por ejemplo cerca de fuentes de calor cables de alta tensi n y zonas prohibidas para volar aparatos teledirigidos La Compa a tiene el derecho de interpretaci n en ltima instanc...

Page 25: ...cipal Controlador Acelerador bot n de retorno Bot n de velocidad Paro de emergencia Modo headless sin cabeza bot n de despegue aterrizaje Indicador de corriente Giro Compensaci n hacia atr s compensac...

Page 26: ...incluidas en la parte trasera del transmisor a continuaci n coloque la tapa de las pilas y vuelva a cerrarla con el tornillo Imagen 2 Imagen 3 ATENCI N 1 No mezcle tipos de pilas diferentes 2 No mezcl...

Page 27: ...carga USB original suministrado Cuando la bater a no vaya a usarse durante un periodo prolongado o cuando esta parezca hinchada debe sustituirla 5 Una bater a que no se utilice durante el largo period...

Page 28: ...vez significa que se ha ajustado horizontalmente con xito MOVIMIENTOS DE VUELO Desplazamiento hacia arriba y hacia abajo Al mover el acelerador hacia arriba o hacia abajo el cuadric ptero volar hacia...

Page 29: ...aleje volando la tecla de retorno le har volver Despu s de sincronizar el cuadric ptero la antena del transmisor debe alinearse con la cola del cuadric ptero para despegar Pulse la tecla de retorno p...

Page 30: ...N BAROM TRICA PARA PLANEO Utilice la palanca de control izquierda acelerador para regular el ascenso y descenso del cuadric ptero Al soltar la palanca de control izquierda acelerador el cuadric ptero...

Page 31: ...odotto non adatto a utenti di et inferiore a 12 anni Assicurarsi che il prodotto sia utilizzato in un ambiente sicuro Il produttore e il rivenditore non si assumono alcuna responsabilit per danni acci...

Page 32: ...fonti di calore cavi di alimentazione ad alta tensione e aree proibite per i droni volanti L azienda si riserva il diritto della corretta interpretazione di questo manuale CONTENUTI Cacciavite X1 Lame...

Page 33: ...odalit senza testa Avvio atterraggio Indicatore di alimentazione Flip Taglio all indietro taglio in avanti taglio a destra taglio a sinistra Stick di controllo direzione interruttore di accensione INS...

Page 34: ...alore o prodotti esplosivi 2 Durante la ricarica il prodotto deve essere controllato da un adulto in modo da non causare incidenti 3 Dopo il volo non caricare il drone se la temperatura della superfic...

Page 35: ...i La luce del drone smette di lampeggiare e rimane fissa significa che la regolazione della bussola avvenuta con successo CONTROLLO DEL DRONE Su e gi Spingere l acceleratore verso l alto o verso il ba...

Page 36: ...po aver fissato il drone l antenna del trasmettitore deve essere allineata alla coda del drone durante il decollo Premere il tasto di ritorno per passare alla modalit di ritorno con la luce flash Prem...

Page 37: ...ONE DI SPINTA E DI ALTITUDINE DELLA PRESSIONE BAROMETRICA Usare il joystick sinistro acceleratore per controllare la salita discesa del drone Quando si lascia andare il joystick sinistro acceleratore...

Page 38: ...aar Zorg ervoor dat het product in een veilige omgeving wordt gebruikt De fabrikant en de dealer zijn niet aansprakelijk voor schade door abnormale slijtage van onderdelen onjuiste montage of gebruik...

Page 39: ...onveilige plaatsen zoals in de buurt van warmtebronnen hoogspanningskabels en verboden gebieden voor vliegende drones INHOUD Schroevendraaier X1 Hoofdbladen X4 USB laadkabel X1 Quadcopter X1 Beschermi...

Page 40: ...odstopknop headless modus opstijgen landen knop stroomindicator flipknop Achterwaarts trimmen voorwaarts trimmen naar rechts trimmen naar links trimmen Richtingscontrolestick aan uitschakelaar INSTALL...

Page 41: ...opladen op een droge of geventileerde plaats en houd het ver weg van een warmtebron of een explosief product 2 Zorg dat een volwassenen het opladen controleert om ongelukken te voorkomen 3 Laadt de d...

Page 42: ...mpje van de drone stopt met knipperen en brandt continue dit betekent dat de kalibratie van het kompas is voltooid 4 Druk de linker en rechter controlestick tegelijkertijd in naar draai 45 graden naar...

Page 43: ...HEADLESSMODE drukt wordt deze modus afgesloten Retourfunctie Wanneer de drone ver weg vliegt kan de one key return knop de drone oproepen Na het verbinden van de drone moet de antenne van de controll...

Page 44: ...ck om het opstijgen dalen van de drone te besturen Wanneer je de linker controlestick loslaat blijft de drone zweven op de hoogte waarop hij was toen de linker controlestick werd losgelaten DE DRONE U...

Page 45: ...u yciem cz ci niew a ciwym monta em lub eksploatacj w spos b niebezpieczny 3 Ten dron RC wymaga umiej tno ci obs ugi latania Jakiekolwiek uszkodzenia spowodowane niew a ciwym demonta em i u ytkowaniem...

Page 46: ...instrukcji obs ugi ZAWARTO rubokr t X1 mig a g wne X4 Kabel aduj cy USB X1 DRON X1 Pier cie zabezpieczaj cy X2 Pilot X1 Instrukcja obs ugi X1 NAZWY KONTROLERA DRON Pier cie zabezpieczaj cy mig a g wne...

Page 47: ...do ty u trymer lotu do przodu trymer lotu w prawo trymer lotu w prawo Dr ek kontroli kierunku przycisk zasilania INSTALACJA BATERII Pic 3 Pic 2 Pic 1 Baterie 3x1 5V AAA LR03 1 U yj rubokr ta do odkr...

Page 48: ...aby nie spowodowa wypadku 3 Po zako czeniu lotu nie aduj drona je li temperatura powierzchni nadal nie jest ch odna W przeciwnym razie mo e to spowodowa spuchni cie akumulatora lub nawet po ar 4 Upew...

Page 49: ...pod k tem 45 stopni wiat o quadkoptera przestaje miga i wieci si na sta e Us yszysz pojedynczy d wi k kt ry oznacza to e regulacja powiod a si KIERUNKI Lot w g r w d Przesu dr ek przyspieszania w d g...

Page 50: ...p b yskow Naci nij ponownie przycisk aby wyj z trybu powrotu Podczas powrotu przesuni cie prawego dr ka do przodu i do ty u mo e przerwa t funkcj Prze czanie pr dko ci niska rednia wysoka Podczas lotu...

Page 51: ...etoda 1 Przesun dwa dr ki steruj ce na zewn trz lub do wewn trz w kszta t A lub V a mig a drona przestan si obraca Metoda 2 Poci gnij lewy dr ek steruj cy przepustnica do najni szego punktu przez trzy...

Page 52: ......

Reviews: