background image

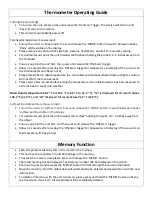
Thermometer Operating Guide 

 
Turning the unit on/off: 


To turn on the unit, simply press and release the 

‘On/Scan’ Trigger. The device will turn on and 

‘beep’ (if sound is turned on)


This unit will automatically power off.  

 
Forehead temperature measurement: 


Ensure the unit is in ‘body mode’. Press and release the ‘MODE’ button to switch between modes, 
‘Body’ will be visible on the display. 


Please remove any obstructions like hats, beanies, headbands, and hair for accurate reading.  


For optimal results point the unit towards the forehead holding the probe 0.4 - 2 inches away from 
the forehead. 


Ensure you point the unit first, then press and release the ‘ON/Scan’ trigger.  


Allow 1-

2 seconds after pressing the ‘ON/Scan’ trigger for temperature to display (if the sound is on 

the thermometer will ‘beep’ o

nce). 


Please remember to take temperature in a controlled environment where direct sunlight or cold air 
will not affect the measurement. 


Please wait a few minutes before taking the temperature of an individual who has been exposed to 
extreme heat or sever cold weather. 
 

Note: Results shown from 93.2 

°F to 109.2 °F (34.0 °C to 42.9 °C

). “HI” is displayed for all results above 

109.2 °F (42.9°C

), and “LO” displayed for result below 

93.2 °F (34.0°C). 

 
Surface/food temperature measurement:  


Ensure the unit is in ‘surface mode’. Press and release the ‘MODE’ button to switch between modes, 
‘surface’ will be visible on the display. 


For optimal results point the unit towards the ‘surface’ holding the probe ۠.4 

- 2 inches away from 

the object. 


En

sure you point the unit first, and then press and release the ‘ON/Scan’ trigger.  


Allow 1-

2 seconds after pressing the ‘ON/Scan’ trigger for temperature to display (if the sound is on 

thermometer will ‘beep’ once).


Memory Function


Each temperature taken by this unit is stored in the memory 


This unit has the capability to hold 50 readings in the memory. 


To access the memory data please press and release the 

MEMO

 button.  


The latest reading will be displayed. The Memory number will be displayed on the screen.  


Continue to press (and release) the ‘MEMO’ button to filter through the stored information.


Once the memory is full the oldest data will automatically be deleted and overwritten with the new 
information. 


To delete all memory, with the unit turned on, please press and hold the 

MEMO

 button until you 

see the screen show 

CLR

’.

 All stored date will be completely deleted. 


Summary of Contents for 70113

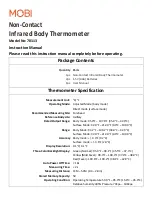
Page 1: ... Auto Power Off Time Measuring Time Measuring Distance Stored Memory Capacity Operating Condition C F Adjusted Mode body mode Direct mode surface mode Forehead Axillary Body mode 95 0 F 107 6 F 35 0 C 42 0 C Surface Mode 32 0 F 212 0 F 0 0 C 100 0 C Body Mode 93 2 F 109 2 F 34 0 C 42 9 C Surface Mode 32 0 F 212 0 F 0 0 C 100 0 C Body mode 0 4 F 0 2 C Surface mode 3 6 F 2 0 C 0 1 C 0 1 F Green Norm...

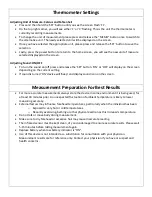
Page 2: ...the battery cover Insert two AAA batteries to match the and as illustrated in the battery compartment Close the battery cover and ensure it is locked in place before operation When replacing batteries always replace with new AAA batteries ensuring to again match polarities indicated in the battery compartment If the thermometer does not power on after replacing the batteries please remove the batt...

Page 3: ...ed ON device will beep and display sound icon on the screen Measurement Preparation For Best Results For more accurate measurements always store the device in same environment it is being used for at least 30 minutes prior An unexpected fluctuation of ambient temperature is likely to lower measuring accuracy External factors may influence forehead temperatures particularly when the individual has ...

Page 4: ... 2 F to 109 2 F 34 0 C to 42 9 C HI is displayed for all results above 109 2 F 42 9 C and LO displayed for result below 93 2 F 34 0 C Surface food temperature measurement Ensure the unit is in surface mode Press and release the MODE button to switch between modes surface will be visible on the display For optimal results point the unit towards the surface holding the probe 4 2 inches away from the...

Page 5: ...ll residual alcohol has evaporated before use Equipment Symbols Warning Compliance with WEEE Standard Non Sterile Packaging DO NO THROW AWAY intended for multiple use Refer to Operating Instructions Operating atmospheric pressure Operating Temperature Serial number Operating Humidity Recyclable Manufacturer This device compiles with Part 15 of FCC federal commuinications Commission Rules IP22 The ...

Page 6: ...ot use this thermometer if it has been malfunctioning or it has been broken or damaged This product is not waterproof Do not use this product under any wet conditions and do not immerse in any liquid or water This product should not be left alone with children or pets when not in use by an adult Do not store the thermometer in extreme temperatures below 4 F 20 C or over 131 F 55 C ...

Page 7: ...agnetic environment specified below The user of Non Contact Infrared Body Thermometer should ensure that it is used in such an environment Immunity Test IEC 60601 Test Level Compliance Level Electromagnetic Environment Guidance Electrostatic discharge ESD IEC 61000 4 2 6 kV contact 8 kV air 6 kV contact 8 kV air Floors should be wood concrete or ceramic tile If floors are covered with synthetic ma...

Page 8: ...mplete with its original parts accessories along with a copy of the original purchase gift or registry receipt to us This warranty does not cover damage caused by any tampering accident misuse abuse improper maintenance unauthorized modification or connection to an improper power supply There will be a charge for repair caused for such damage This warranty excludes all incidental or consequential ...

Reviews: