background image

Using the BIOS Setup Utility


34


Boot Menu 

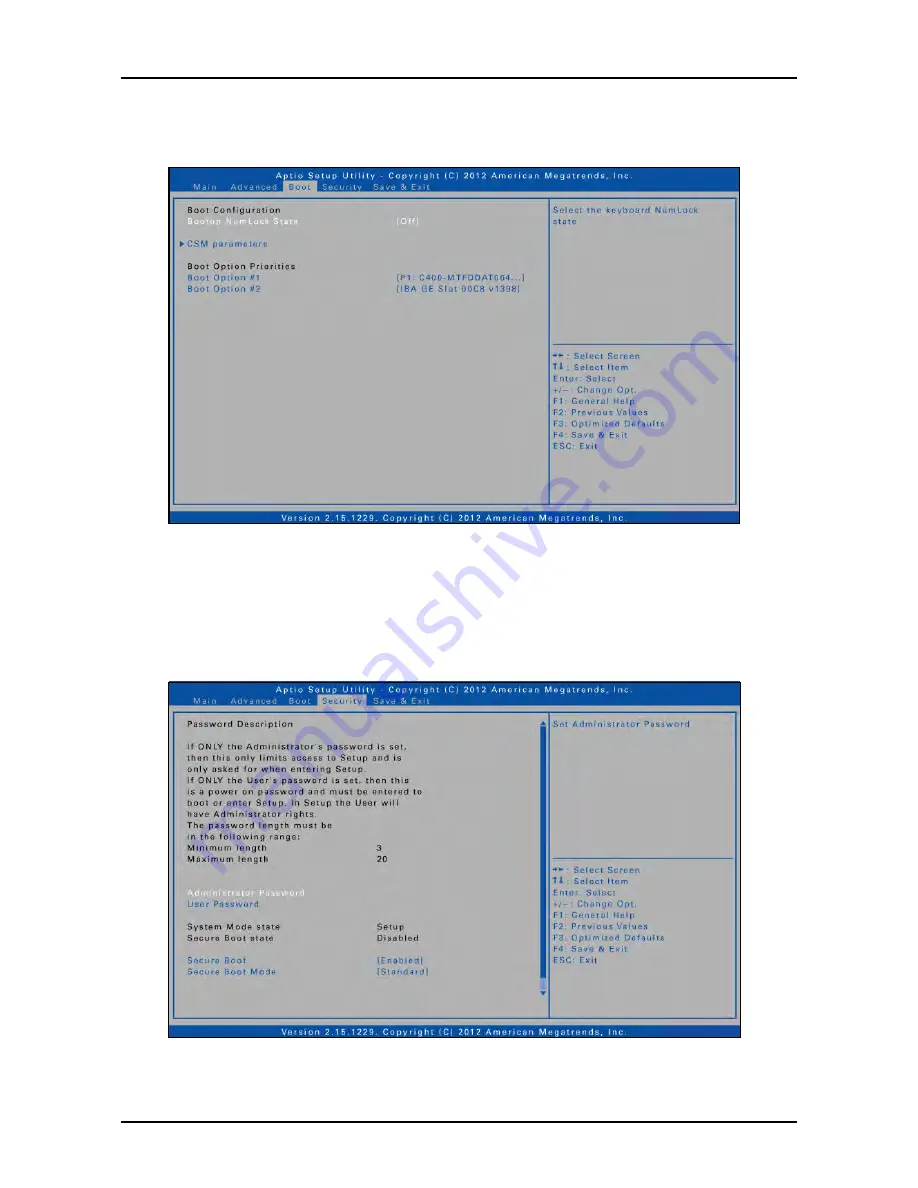
The Boot menu allows you to configure the boot type and boot sequence. 


Security Menu 

The Security menu allows you to set or change the Administrator and User 
passwords, and configure Secure Boot settings. 


Summary of Contents for xTablet T1200

Page 1: ...xTablet T1200 Rugged Tablet PC User s Guide ...

Page 2: ...ned in this document or from the use of programs and source code that mayaccompanyit In no event shall the publisher and the author be liable for anyloss of profit or anyother com m ercial damage caused or alleged to have been caused directlyor indirectly bythis document 2009 2013 MobileDemand LC Products that are referred to in this document maybe either trademarks and or registered trademarks of...

Page 3: ...ors 15 GETTING STARTED 16 POWERING UP YOUR TABLET PC 16 Connecting the AC Adapter 16 Using Battery Power 16 INSTALLING THE BATTERIES 17 Charging the Battery 17 Charging Time 18 When to replace the Battery Pack 18 Removing the Batteries 19 Enabling power on Pin 9 of Serial Ports 19 STARTING YOUR TABLET PC 20 Turning On Your Tablet PC 20 Changing the Display Orientation 20 Shutting Down Your Tablet ...

Page 4: ...ORK LAN 27 CONNECTING HEADPHONES 28 POWER MANAGEMENT 29 USING THE POWER PLAN 29 USING THE POWER SAVING MODE 30 USING THE BIOS SETUP UTILITY 31 BIOS SETUP MENU 31 STARTING THE BIOS SETUP UTILITY 31 NAVIGATING AND ENTERING INFORMATION IN BIOS 32 MAIN MENU 33 ADVANCED MENU 33 BOOT MENU 34 SECURITY MENU 34 SAVE EXIT MENU 35 SPECIFICATIONS 36 ...

Page 5: ...lation If this equipment does cause harmful interference to radio or television reception which can be determined by turning the equipment off and on the user is encouraged to try to correct the interference by one or more of the following measures Reorient or relocate the receiving antenna Increase the separation between the equipment and the receiver Connect the equipment into an outlet on a cir...

Page 6: ...ion of the device Radio Frequency RF Exposure Information The radiated output power of the Wireless Device is below the Industry Canada IC radio frequency exposure limits The Wireless Device should be used in such a manner such that the potential for human contact during normal operation is minimized This device has been evaluated for and shown compliant with the IC Specific Absorption Rate SAR li...

Page 7: ... 1 LASER PRODUCT LASERSCHUTZKLASSE 1 PRODUKT TO EN60825 CAUTION THIS APPLIANCE CONTAINS A LASER SYSTEM AND IS CLASSIFIED AS A CLASS 1 LASER PRODUCT TO USE THIS MODEL PROPERLY READ THE INSTRUCTION MANUAL CAREFULLY AND KEEP THIS MANUAL FOR FUTURE REFERENCE IN CASE OF ANY TROUBLE WITH THIS MODEL PLEASE CONTACT YOUR NEAREST AUTHORIZED SERVICE STATION TO PREVENT DIRECT EXPOSURE TO THE LASER BEAM DO NOT...

Page 8: ...RY SAFETY DANGER OF EXPLOSION IF BATTERY IS INCORRECTLY REPLACED REPLACE ONLY WITH THE SAME OR EQUIVALENT TYPE RECOMMENDED BY THE MANUFACTURER DISPOSE OF USED BATTERIES ACCORDING TO THE MANUFACTURER S INSTRUCTIONS CAUTION FOR RJ 45 The RJ 45 jack is not used for telephone line connection ...

Page 9: ...e range of working environments Before you begin using your tablet PC read this chapter to familiarize yourself with the main components installed in the system Package Contents If any of following items is damaged please contact your retailer T1200 Tablet PC Power adapter Power cord Stylus Pen Hand strap Back Strap NOTE The pictures are for reference only actual items may slightly differ ...

Page 10: ... feature 5 feet drop and dust waterproof IP 65 10 4 XGA LCD with Multi touch function Two battery packs support 9 10 hrs battery life and hot swapping Support LTE and 3G WWAN USB Modules via add on enclosure Optional barcode scanner support 1D 2D barcode reading Optional Integrated GPS ...

Page 11: ...Press to power on and off the tablet PC 5 Scanner button Press to trigger the Barcode scan function if the barcode scanner is on It can also be assigned to launch a specific Windows based program via Quick Menu 6 Number 0 9 button Press to enter 0 9 7 Decimal or Dot button Press to emulate the Decimal Dot key 8 Enter button Press to emulate the Enter key 9 Backspace button Press to emulate the Bac...

Page 12: ... WWAN Bluetooth GPS Off 2 WWAN BT GPS on WLAN off 3 WLAN BT GPS on WWAN off 9 Emulate the Escape key Emulate Ctrl C Copy tab Emulate Ctrl P Paste Enter Emulate F8 key Backspace Emulate key Emulate key Emulate key 13 Arrow up button Press to emulate the Up key 14 Minus button Press to emulate the Minus key 15 Plus button Press to emulate the Plus key 16 Arrow left button Press to emulate the Left k...

Page 13: ...s 3 Battery latch Lock the battery in place 4 Battery compartment Contain the battery 5 Battery LED indicator Press the button to display the remaining battery power level 6 Battery latch release button Press and hold the button to slide the battery latch to the unlock position Bottom View No Item Description 1 Docking station port Connect the tablet PC to a docking station ...

Page 14: ... other device with serial port 4 LAN RJ 45 port Connect to a local area network LAN using an Ethernet cable 5 DC in jack Connect the power adapter Right View No Item Description 1 Earphone jack Connect headphones or external speakers 2 USB 3 0 ports Connect USB peripheral devices 3 PC Card slot Use to insert Type II PC Card 4 SIM card slot Not applicable 5 SDHC Card reader Use to insert SD memory ...

Page 15: ...een light means the system is calibrating the battery Orange light means the battery is being charged Blinking orange light means the battery is being charged but the battery temperature is out of charging range 0 60ºC the battery is being charged for more than 10 hours or the charging current is 0 for more than 3 minutes with the battery capacity lower than 85 Blinking red light means the battery...

Page 16: ...rges the battery 1 Connect the AC adapter to the DC in jack of your tablet PC 2 Connect the AC adapter to the power cord 3 Plug the power cord to an electrical outlet Using Battery Power 1 Install a charged battery in the battery compartment 2 Remove the AC adapter if plugged Your tablet PC will automatically use the battery power NOTE If your tablet PC is connected to an electrical outlet and the...

Page 17: ...tch to the lock position to secure the battery 4 Repeat Step 1 to 3 to insert the second battery Charging the Battery The Lithium ion battery is not fully charged upon purchase To charge the battery follow the steps below 1 Install the battery to your tablet PC See procedures above 2 Connect the AC adapter to the DC in jack of your tablet PC 3 Connect the AC adapter to the power cord 4 Plug the po...

Page 18: ...AC adapter Using other AC adapters may damage the battery or your tablet PC Checking the Battery Level It is important that you monitor the battery status regularly to ensure you do not run out of power at a critical moment To check the remaining battery power double tap the battery icon in the system tray The battery screen appears When to replace the Battery Pack The battery performance graduall...

Page 19: ...attery latch release button to slide the second battery latch to the unlock position 2 Remove the second battery out of the battery compartment 3 Repeat Step 1 and 2 to remove another battery Enabling Power on Pin 9 of the Serial Port Remove Rear Cover Jumper is on the top two pins Move Jumper to the lower pins ...

Page 20: ...ion You can rotate the display orientation to suit your preference Shutting Down Your Tablet PC It is important to properly shut down your tablet PC to avoid the loss of unsaved data To shut down your tablet PC do the following Tap Start Shut down Wait for your tablet PC to turn off power completely before removing the power source if necessary ...

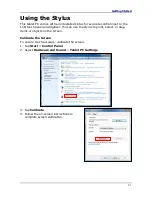
Page 21: ...uch panel and digitizer You can use the stylus to point select or drag items or objects on the screen Calibrate the Screen To ensure touch accuracy calibrate the screen 1 Tap Start Control Panel 2 Select Hardware and Sound Tablet PC Settings 3 Tap Calibrate 4 Follow the on screen instructions to complete screen calibration ...

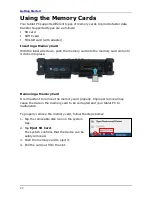
Page 22: ... the memory card slot until it clicks into place Removing a Memory Card It is important to remove the memory card properly Improper removal may cause the data in the memory card to be corrupted and your tablet PC to malfunction To properly remove the memory card follow the steps below 1 Tap the removable disk icon on the system tray 2 Tap Eject SD Card The system confirms that the device can be sa...

Page 23: ...tification and information using a smart card Inserting a Smart Card Insert a smart card into the smart card slot Using the SIM Card You can use a SIM card for wireless internet access NOTE Check the availability of service and plan rates of data connection with your network service provider Inserting a SIM Card Insert a valid SIM card into the SIM card slot until it clicks into place ...

Page 24: ...C supports Type II PC Card which can perform a variety of functions NOTE Refer to the PC Card manual for specific instructions on the card installation Inserting a PC Card Insert a PC card firmly into the PC card slot until it clicks into the connector ...

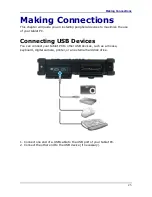
Page 25: ...ximize the use of your tablet PC Connecting USB Devices You can connect your tablet PC to other USB devices such as a mouse keyboard digital camera printer or an external hard disk drive 1 Connect one end of a USB cable to the USB port of your tablet PC 2 Connect the other end to the USB device if necessary ...

Page 26: ...other peripheral devices such as a printer or other device with serial port 1 Connect one end of an RS 232 cable to the RS 232 port of your tablet PC 2 Tighten the two screws on the side of the cable plug 3 Connect the other end to the RS 232 port of a printer or other peripheral device ...

Page 27: ... a Local Area Network LAN You can connect your notebook to a local area network LAN using the RJ 45 LAN port 1 Connect one end of an RJ 45 cable to the LAN port of your tablet PC 2 Connect the other end to a network hub or a wall socket ...

Page 28: ...Making Connections 28 Connecting Headphones You can connect your tablet PC to a headphone or external speakers Plug the audio jack of the headphone or speakers to the Headphone jack of your tablet PC ...

Page 29: ... Plan To improve energy efficiency you can use the power plan to reduce the amount of power your tablet PC uses maximize the performance or balance the two 1 Tap Start Control Panel 2 Select System and Security Power Options 3 Select a power plan 4 To adjust the selected power plan settings tap Change plan settings ...

Page 30: ... turn off the tablet PC or set the tablet PC to enter sleep mode To set the tablet PC to enter sleep mode follow the steps below 1 Tap Start 2 Select Shut down Sleep To wake up the tablet PC from sleep mode do one of the following Press the button Press any key on the external keyboard ...

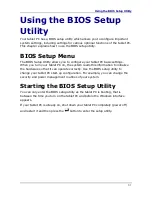
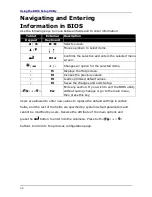
Page 31: ... PC on the system reads this information to initialize the hardware so that it can operate correctly Use the BIOS setup utility to change your tablet PC start up configuration For example you can change the security and power management routines of your system Starting the BIOS Setup Utility You can only enter the BIOS setup utility as the tablet PC is booting that is between the time you turn on ...

Page 32: ...2 Invokes the previous values F3 Loads optimized default values F4 Saves the changes and exits Setup 9 Esc Exits any section If you wish to exit the BIOS utility without saving changes or go to the main menu then press this key Users are allowed to enter new values to replace the default settings in certain fields and the rest of the fields are specified by system default parameters and cannot be ...

Page 33: ...n CPU features and total memory size You can also set the system date and time Advanced Menu The Advanced menu allows you to select SATA mode set the keypad backlight timer BIOS hotkey press calibrate fan and battery and configure devices power management Intel Rapid Start Technology and Trusted Computing settings ...

Page 34: ...Utility 34 Boot Menu The Boot menu allows you to configure the boot type and boot sequence Security Menu The Security menu allows you to set or change the Administrator and User passwords and configure Secure Boot settings ...

Page 35: ...Using the BIOS Setup Utility 35 Save Exit Menu The Save Exit menu allows you to save or discard the changes or restore the default values for all setup options before leaving the BIOS Setup Menu ...

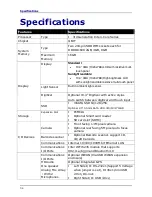
Page 36: ... touch input SSD mSATA SSD 64 128 256 Optional 2 5 9 5mm SATA HDD 320 500 750GB Storage Expansion Slot PCMCIA Optional Smart card reader SD card slot SDHC I O Devices Camera Front facing 1 3M pixel camera Optional rear facing 5M pixel auto focus camera Barcode scanner Optional Barcode scanner support 1D 1D 2D barcode Communications Internal 10 100 1000M bit Ethernet LAN Communications I O Ports In...

Page 37: ...e 20 60 Storage Temperature 51 71 Environment Operating Humidity 5 95 Drop 26 drops with 5 feet high to 2 plywood over concrete unit on with SSD Dust Proof Water Sealing IP65 Vibration Mil Std 810G 514 6 Procedure I category 24 Figure 514 6E 1 Transportation General Minimal Integrity unit on with SSD Salt fog Mil Std 810G 509 5 TPM 1 2 Kensington Lock slot Intel AT or Computrace Operating System S...

Reviews: