background image


31 

www.LiteGait.com 

1-800-332-9255 

Symptom: Patient is complaining of groin or harness discomfort.


1. Possible Cause:


Resolution:


The  harness  wrap  and/or  the  groin  piece  are 
not tight enough. 

The  harness  and  groin  piece  should  be  securely  tightened  from  the  start.*  The 
harness  wrap  should  be  tight  enough  to  grab  on  to  the  fatty  tissue  around  the 
abdomen.  The  groin  piece  should  then  be  tightened  securely  to  keep  the  harness 
from riding up on the patient and creating unwanted pressure in the groin area. A 
towel or a piece of foam can be wrapped around the patient’s abdomen for added 
padding if needed. 

Symptom:  Harness is riding up on the patient causing pressure in the groin piece area


1. Possible Cause:


Resolution:


Groin  piece  has  slack,  harness  rides  up  making 
groin straps the only source of support 

The  bottom  two  straps  on  the  harness  wrap  must  be  tightened  securely,  the  top 
one only if it rests below the rib cage.   Applying the harness and groin piece loosely 
will cause them to slide upward.* 

Symptom:  Frontal overhead straps are causing discomfort in the chest area of female patients.


1. Possible Cause:


Resolution:


The  distance  between  the  overhead  straps 
places load on breasts. 

Use  an  extender  to  increase  the  front  panel  size  and  distance  between  the 
overhead  straps  possibly  avoiding  the  chest  tissue.  Conversely,  the  harness  wrap 
placed  on  the  patient  with  opening  in  the  back  results  in  overhead  straps  getting 
closer to each other in the front. 

Troubleshooting -  Harness 

Symptom: The overhead straps slip off of patients shoulders


1. Possible Cause:


Resolution:


The overhead straps are too far apart. 

Place the harness wrap with the opening in the back.  This will bring the overhead 
straps closer to each other. 

Symptom: The patient cannot stand to properly position and tighten the harness and groin piece.


1. Possible Cause:


Resolution:


Patient is too weak or unsafe to stand 

Apply  the  harness  in  supine  position.    Avoid  harness  application  in  sitting  as  it 
reinforces flexed hip position. 

Symptom: BiSym Display Is Not Powering On


1. Possible Cause:


Resolution:


Battery is Not Connected to BiSym Display 

Connect Battery cable to BiSym Display 

2. Possible Cause:


Resolution:


Low Battery Charge   

The  Digital  BiSym  is  powered  by  a  separate  battery  located  near  the  top  of  the 
Lite

Gait®

.  Charge  the  BiSym  Battery  following  the  Digital  BiSym  charging 

procedure. 

3. Possible Cause:


Resolution:


Battery Needs to be Replaced 

Contact Technical Support for replacement battery information. 

Symptom: BiSym Display is Not Reading Weight


1. Possible Cause:


Resolution:


Load Cell Cables are Not Connected  

On the left side of the scale there should be three cables, two that look like phone 
jack connectors and one that connects to the top of the LiteGait®. Confirm that the 
cables are securely attached to the BiSym display. 

NOTE: If load cells are connected properly and the BiSym continues not to read weight, contact Technical Support for further information. 

Symptom: BiSym Display is Not Reading Zero When No Weight is on LiteGait.


1. Possible Cause:


Resolution:


Harness is Moving Slightly 

Any movement in the harness may cause some noise in the BiSym Scale reading. A 
reading near zero is a normal occurrence. 

2. Possible Cause:


Resolution:


BiSym scale requires Zero Calibration 

Refer to Zero Calibration Instructions from BiSym section of manual. 

Symptom: BiSym Does Not Automatically Power Down.


1. Possible Cause:


Resolution:


Auto Shut OFF is set too long or set to ZERO 

Refer to the Change Settings from BiSym section of manual. 


2. Possible Cause:


Resolution:


Issue with BiSym   

Contact Technical Support for further troubleshooting instruction. 

Troubleshooting -  Digital BiSym (Optional) 

Summary of Contents for LiteGait I 360E

Page 1: ...LiteGait I 400E LiteGait I 500ES Operator Service Manual LiteGait I 360E 400E 400ES 500E 500ES LiteGait is a Registered Trademark of Mobility Research Inc...

Page 2: ......

Page 3: ...umber of Your Device Note Please keep your serial number in a safe and secure location The serial number must be pro vided when seeking service for your LiteGait device The serial number provides us a...

Page 4: ......

Page 5: ...s until transfer from one location to another is initiated Operate on smooth and level surfaces ONLY READ ALL INSTRUCTIONS BEFORE USING LiteGait WARNING Maximum Unit Height Maximum Patient Weight Lite...

Page 6: ......

Page 7: ...fers valuable information Like all quality therapy equipment LiteGait requires regular inspections Enclosed is a check list for your convenience Please complete the checklist every 6 months to ensure...

Page 8: ......

Page 9: ...Control Unit 16 II Charging LiteGait 16 III How to Adjust Yoke Height 17 IV FlexAble 17 V Adjusting Handle Bars 17 VI Base and Casters 18 VIII BiSym Scale Optional 19 VII Harness Application 22 Train...

Page 10: ...ent at 800 332 9255 EXT 7104 3 Open the cardboard box containing the following Rechargeable Battery Battery Charger Harness Harness Accessories Digital BiSym Optional 2 Loosen handle bar knobs and rai...

Page 11: ...2 Lower handle bars on actuator and tighten knobs before lifting 13 Using two people lift actuator up onto base such that the yoke and handle bars are facing the same direction as the legs of the base...

Page 12: ...ging cord connected to the control box within the LiteGait base To charge connect charging cord to outlet 20 Turn control box on by rotating the red button clockwise The battery capacity display shoul...

Page 13: ...BiSym Scale Digital BiSym Display A BiSym Charger B 3 Slide Digital BiSym Display onto Digital BiSym bracket near the yoke of the LiteGait 1 Remove Digital BiSym box from harness and accessories box 4...

Page 14: ...Page Left Intentionally Blank...

Page 15: ...the piece ACTUATOR The mechanism that raises and lowers the yoke The actuator consists of a concentric expanding and retracting square tower that houses the DC motors gearing and the screw mechanism I...

Page 16: ...e is turned OFF or is connected to an outlet the display indicates the STOP and Plug Icons 100 Charge 25 Charge 0 Charge Charging LiteGait LiteGait is equipped with a 24 volt battery pack that needs t...

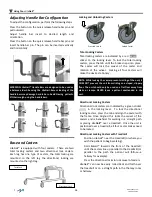
Page 17: ...oke Verify that LiteGait has clearance below the yoke Depress the button with the down arrow on the hand switch Release the button when the yoke lowers to the desired height Lowered Raised Emergency L...

Page 18: ...until the brake snaps into place The caster will lock the swivel of the caster and rotation of the wheel Locking all four casters will make the device stationary Directional Locking Casters Directiona...

Page 19: ...ital recording on to a PC These signals vary as the weight bearing load changes from the right to left side during the gait cycle This can be used as biofeedback for the patient The more weight bearin...

Page 20: ...Auto Shut Off The Auto Shut Off should be set between 3 and 60 minutes WARNING SETTING THE AUTO SHUT OFF TO 0 WILL DISABLE THE AUTO SHUT OFF THIS WILL DISABLE AUTO OFF FUNCTION ON THE BISYM SCALE RESU...

Page 21: ...ditional weight attached to the harness Zero Calibration should be performed WITHOUT a patient in the device Press the CAL button and hold for three seconds or until the monitor displays ZERO CALIB Co...

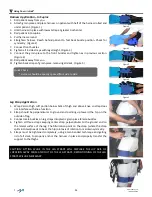
Page 22: ...atient 2 Adjust the groin strap buckles so there is symmetry in the straps equal strap length available on both ends of the padded groin piece and equal from side to side 3 Attach the groin piece to t...

Page 23: ...weight evenly throughout harness wrap Attaching Groin Pieces 1 Route the groin piece between legs to front 2 Connect both buckles one on each side 3 Tighten the groin strap snugly so there is NO slack...

Page 24: ...5 Straps must be tightened completely using a two handed technique and getting rid of all slack to properly anchor the harness in place and properly transfer the support to the thighs Harness Applicat...

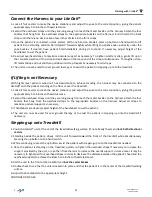
Page 25: ...all four casters to make the device stationary and adjust the yoke to the correct position giving the patient approximately 5 to 6 inches of head clearance 2 Extend the overhead straps until they are...

Page 26: ...ural support for ADL etc Please refer to your booklet Protocols for Partial Weight Bearing Gait and Balance Therapy for more information or email our clinical support department at clinicalsupport lit...

Page 27: ...fection control procedures Use of bleach is discouraged and may effect the permeability of the harness material iHarness iGroin Pieces Overhead Straps Frequency Facility infection control guidelines C...

Page 28: ...s Loose Rusted Bolts Discoloration Degradation Battery 24 30 Months Charger Hand Switch Harness Wrap 18 24 Months Groin Pieces 18 24 Months Overhead Straps Casters Knobs Pins Grips Covers Caps Buckles...

Page 29: ...29 www LiteGait com 1 800 332 9255 Unit Care and Maintenance...

Page 30: ...n in service for 30 months or more Contact Technical Support for replacement battery information 6 Possible Cause Resolution Other Power System Issue Contact Technical Support for further troubleshoot...

Page 31: ...The patient cannot stand to properly position and tighten the harness and groin piece 1 Possible Cause Resolution Patient is too weak or unsafe to stand Apply the harness in supine position Avoid har...

Page 32: ...all adult Adult Harness HSCS 2 Junior Harness Harness Wrap w Overhead straps covers and groin pieces HJ 1 Junior Harness Wrap A rigid washable cloth wrap used with attachments that provide postural su...

Page 33: ...Yoke FlexAble Yoke Assembly Complete Straight The complete top Y shaped portion of the unit with buckles attached Unit Includes FlexAble Straight Bracket and load cells for BiSym Scale Y50E 1 FlexAbl...

Page 34: ...eGait org EMAIL DIRECTORY Service Parts Department Service LiteGait com Clinical Support ClinicalSupport LiteGait com Education Department Education LiteGait com Sales Department Sales LiteGait com PO...

Page 35: ...HORIZED TO MAKE ANY MODIFICATION EXTENSION OR ADDITION TO THIS WARRANTY MOBILITY RESEARCH IS NOT RESPONSIBLE FOR DIRECT SPECIAL INCIDENTAL OR CONSEQUENTIAL DAMAGES RESULTING FROM ANY BREACH OF WARRANT...

Reviews: