background image

1

2


No.  

   1

   1

   1

       2

 Name 

Quantità

   1

    3

3

User’s Guide 

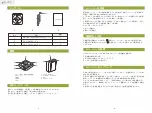
Panoramica

 Clipper Ricevitore Bluetooth   

1. Pulsante Accensione/Play/Pausa/Ricevere Chiamata
2. Volume -
3. Traccia Successiva
4. Traccia Precedente
5.

6. Porta Micro USB 
7. 3.5mm Audio Out
8. Microfono
9. Indicatore LED 

 Guida Avvio Rapido 

Cavo Micro USB   

-13-

-14-

Confezione

-Rosso =Micro USB connessa e in ricarica (La luce rossa si spegnerà a ricarica completa)
-Blu (lampeggìo lento continuo) = Bluetooth connesso
-

R

osso e 

b

lu (lampeggìo veloce continuo) = In attesa di accoppiamento 

(modalità accoppiamento)

Indicatore LED

Si raccomanda caldamente di caricare il vostro Ricevitore al 100% prima 
dell'uso.


Ci vogliono circa 2-3 ore per caricare il ricevitore da 0% a 100% la 

prima volta.

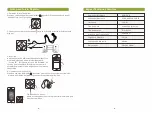
1.

 Usare il computer: collegate il cavo micro USB al connettore di 

alimentazione del ricevitore e la porta USB standard allì’ingresso Usb del 
computer.

2. 

Usare una presa elettrica: collegate il cavoe micro USB al ricevitore e la 

porta Usb standard ad un adattatore DC 5V.

3. 

Stato indicatore:

a. ROSSO = ricarica
b. BLU = ricarica completata

Caricare il vostro Ricevitore

1. Accensione: Premete e tenete premuto il pulsante centrale       per 5 secondi 
finchè l’indicatore non lampeggerà due volte in blu.
2.Spegnimento: Premete e tenete premuto il pulsante centrale        per 5 secondi 
finchè l’indicatore non diventerà 


rosso


per un secondo per poi spegnersi.

Accendere/Spegnere il vostro Ricevitore

1. Collegate il ricevitore ad una cuffia da 3.5mm o ad un altoparlante da 3.5mm
2. Accendete il ricevitore
3. Accoppiatelo con il vostro dispositivo compatibile Bluetooth
4. Adesso potete godervi la musica!

Usare il vostro Ricevitore

1. Si prega di caricare completamente il Ricevitore prima dell'uso, la batteria è 
quasi vuota all'arrivo.
2. Per il primo collegamento, premete il pulsante central per circa 5 secondi fin 
qunado l’indicatore non lampeggerà due volte in rosso e blu. Significa che il 
ricevitore è pronto per essere cercato ed accoppiato.
3. Attivate o accendete il Bluetooth del vostro dispositivo media, cercate per il 
Bluetooth dal nome “AAR1900X”. Inserite la chiave “0000” se richiesto. Il 
ricevitore si collegherà automaticamente all'ultimo dispositivo al quale lo 
avete connesso.
4. Dopo essersi connesso con successo, potrete iniziare a riprodurre la musica 
sul vostro dispositivo Bluetooth. Godetevi la meravigliosa musica!

Accoppiare il vostro Ricevitore


  italiano


Summary of Contents for MOLINK Clipper

Page 1: ...User s Guide MOLINK Clipper Wireless Bluetooth Receiver English italiano langue fran aise lengua espa ola Deutsch...

Page 2: ...nnector and the standard USB port to computer s USB port 2 Using an electrical outlet connect the micro USB cable to the receiver and the standard USB port to a DC 5V adapter 3 Indicator status a RED...

Page 3: ...ice search for the Bluetooth name AAR1900X Enter pair key 0000 if prompt The receiver will automatically connect to the last device you connected 4 Hands free calls Press the middle button twice quick...

Page 4: ...r 1 2 3 4 5 6 Micro USB 7 3 5mm 8 9 LED Micro USB LED Micro USB MOLINK Clipper MOLINK Clipper 100 MOLINK Clipper 0 100 2 3 1 micro USB Clipper USB USB 2 micro USB Clipper USB DC 5V 3 a b 1 5 2 5 1 1 M...

Page 5: ...Clipper 5 2 MOLINK Clipper 3 5mm 5 3 AAR1900X 0000 MOLINK Clipper 4 V3 0 EDR A2DP AVRCP HSP HFP 2 4 GHz 8 2 3 10 Micro USB 80mAh 7 8 settings Bluetooth Bluetooth DEVICES AAR1900X 5V 1A 30 x 30 x 10 m...

Page 6: ...ipper Bluetooth USB 100 2 3 0 100 1 USB USB 2 USB DC 5V USB 3 a b 9 10 6 USB 7 3 5mm 8 9 LED 1 2 3 4 5 USB Bluetooth LED 1 ON 5 2 OFF 5 ON OFF 1 3 5mm 3 5mm 2 3 Bluetooth 4 1 2 5 3 Bluetooth AAR1900X...

Page 7: ...Clipper 3 5mm 5 3 Bluetooth AAR1900X Bluetooth 0000 4 2 1 V3 0 EDR A2DP AVRCP HSP HFP 2 4 GHz 8 2 3 10m Bluetooth Bluetooth 80mAh 11 12 settings Bluetooth Bluetooth DEVICES AAR1900X 5V 1A 30 x 30 x 1...

Page 8: ...1 Accensione Premete e tenete premuto il pulsante centrale per 5 secondi finch l indicatore non lampegger due volte in blu 2 Spegnimento Premete e tenete premuto il pulsante centrale per 5 secondi fin...

Page 9: ...uetooth 3 Accoppiamento Attivate o accendete il Bluetooth del vostro dispositivo media cercate per il Bluetooth dal nome AAR1900X Inserite la chiave 0000 se richiesto Il ricevitore si collegher automa...

Page 10: ...U la recharge est termin e Chargez votre r cepteur 1 Mise sous tension Appuyez et maintenez le bouton du milieu pendant 5 secondes jusqu ce que le voyant clignote deux fois en bleu 2 Mise hors tension...

Page 11: ...tooth AAR1900X Entrez la cl 0000 si demand e Le r cepteur se connecte automatiquement au dernier appareil connect 4 Appels mains libres Appuyez sur le bouton du milieu deux fois rapidement pour faire...

Page 12: ...ompletamente 1 Encendido ON Presione y sostenga el bot n por cinco 5 segundos hasta que el indicador azul parpadee dos veces 2 Apagado OFF Presione y sostenga el bot n por cinco 5 segundos hasta que e...

Page 13: ...T Introduzca la clave AAR1900X en caso de que lo requiera El recibidor se conectar autom ticamente al ltimo dispositivo al cual estuvo conectado 4 Llamadas con manos libres Presione el bot n del medio...

Page 14: ...voll Aufgeladen Ihren Empfaenger Aufladen 1 Anschalten Dr cken und halten Sie die mittlere Schalttaste f r 5 Sekunden bis die Anzeige zweimal Blau aufleuchtet 2 Ausschalten Dr cken Sie die mittlere S...

Page 15: ...suchen Sie nach dem Bluetooth namens AAR1900X Geben Sie den Vernetzungs Schl ssel 0000 sobald Sie danach gefragt werden Der Empf nger wird automatisch sich mit dem zuletzt angeschlossenen Ger t verbin...

Reviews: