VITAL SAFETY INFO
Please read all instructions carefully before using this
model. If any information in this manual is unclear,
please contact your supplier for help.
Please note especially the potential dangers
associated with the rotating parts in this model:
DANGER—Wear protective eyewear when using
model helicopters!
DANGER—Do not wear loose clothing or ties!
DANGER—Keep well clear of rotating blades!
DANGER—Never fly near people or animals!
DANGER—A Li-Po battery is installed in the
helicopter. Please observe the safety information
regarding the safe use of Li-Po batteries before using
this product!
DANGER—Do not touch the battery or charger with
wet hands!
f
Always let the battery cool down before
recharging.
f
Always recharge the battery after use, especially if
it is going to be stored and not used for a while.
f
Not suitable for children under 14 years.
f
If you are completely new to R/C helicopters we
advise that you seek advice from an experienced
R/C helicopter pilot before attempting to fly this
model.
f
When you begin to fly always turn on the
transmitter first then connect the battery on the
helicopter.
f
When you have finished flying always disconnect
the battery on the helicopter first then turn off the
transmitter.
f
Only for use indoors
f
Do not fly near electrical or wireless equipment
and magnetic objects.
f
Be careful to insert the battery the correct way
round, do not force the plug.
f
If you hear the transmitter beeping this means the
transmitter batteries are low. Land immediately,
unplug the battery from the helicopter, turn off
the transmitter and replace the batteries in the
transmitter.
f
Only use the USB charge lead provided with this
model to charge the helicopter battery.
CONTENTS
Introduction .............................................3
New to R/C helicopters? .......................3
Specifications .........................................4
Welcome ..................................................4
A. Kit contents .....................................4
B. Transmitter part names .................5
C. LCD display ......................................5
Flight controls ........................................6
Beginner and Advanced mode .............6
Binding transmitter to receiver ...........7
Transmitter usage ...................................7
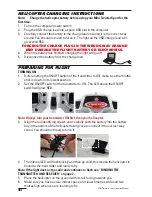
Helicopter charging instructions ........8
Preparing for flight .................................8
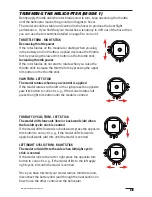
Trimming the helicopter (mode 1) ........9
Throttle trim - RIGHT stick .................9
Yaw trim - left stick .............................9
Fore/aft cyclic trim - LEFT stick ........9
Left/right cyclic trim - right stick ......9
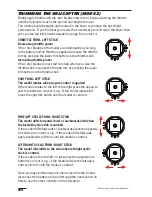
Trimming the helicopter (mode 2) ......10
Throttle trim - left stick .....................10
Yaw trim - left stick ...........................10
Fore/aft cyclic trim - right stick .......10
Left/right cyclic trim - right stick ....10
Flight controls .......................................11
Taking off ............................................11
Left-right rotation ..............................11
Fore/aft cyclic control ......................12
Left/right cyclic controls ..................12
Exploded diagram.................................13
Parts List.................................................15
Lithium polymer battery safety ..........16
GUARANTEE/WARRANTY
Model Engines (Aust.) Pty. Ltd. guarantee this product to be free of manufacturing and assembly defects for a period of
30 days from time of purchase. This does not affect your statutory rights. This warranty is not valid for any damage or
subsequent damage arising as a result of a crash, misuse, modification or for damage or consequential damage arising
as a result of failure to observe the procedures outlined in this manual. Operation of this model is carried out entirely at
the risk of the operator. Please note that, whilst every effort is made to ensure the accuracy of instructions and material
included with this product, mistakes can occur neither Model Engines (Aust.) Pty. Ltd. or its retailers will be held liable for
any loss or damage arising from the use of this model or for any loss or damage arising from omissions or inaccuracies in
the associated instructions or materials included with this product.
We reserve the right to modify the design of this product, contents and manuals without prior notification.
© 2011 Model Engines (Aust.) Pty. Ltd., Noble Park, Victoria 3174, Australia. www.modelengines.com.au
All rights reserved. E&OE


