Assembly
Instructions
Parts Included:
1 Nose Cone
1 Body Tube
3 Laser Cut Balsa Fins
1 Thrust Ring
1 Motor Spacer Tube (yellow)
1 Launch Lug
1 Kevlar Shock Cord (yellow)
1 Elastic Shock Cord (white)
1 Plastic Streamer (color varies)
2 Tape Discs
1 Decal Sheet
Materials Not Included:
Yellow Wood or White Glue
Sanding Sealer
Paint Brush
Sandpaper (#240 grit)
Gloss Spray Enamel
Primer Spray Enamel
Masking Tape
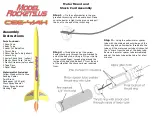
Motor Mount and
Shock Cord Assembly
Step 1 –
Tie the yellow kevlar to the pre-
grooved thrust ring with a double knot. Make
sure the kevlar is tight in the groove and pull
the knot to the end of the thrust ring.
Step 2 –
Thread the end of the yellow
kevlar shock cord through the pre-marked fin
end of the body tube. Using a Q-tip or the tip
of your small finger, spread glue around the
inside of the body tube about 2” from the end
of the side that the shock cord was inserted
from.
Step 3 –
Using the yellow motor spacer
tube with the marked end outside, push the
thrust ring and yellow kevlar thread into the
tube until the motor spacer tube sticks out at
the ¼” mark from the end of the body tube.
Remove the motor spacer tube immediately
and set the body tube aside to dry for a few
minutes.


