background image


• 

Do not allow children to operate the unit. 

• 

This  exhaust  hood  is  designed  for  home  use  only,  not  suitable  for  the 
environmental  condition,  bake  shop,  barbecue,  and  other  commercial 
purposes. 

• 

The  exhaust  hood  should  be  cleaned  periodically  so  that  its  power  is 
maintained. 

• 

Clean the exhaust hood according to the instructions contained in this book and 
keeps it away from the danger of being burnt. 

• 

No direct grilling on a gas stove. 

• 

Keep your kitchen remains good circulation. 

• 

Before connecting the unit to a power source, make sure the power cord is in 
good shape. If there is damage to the power cord, the replacement  must  be 
performed by qualified personnel or contact the MODENA Service Center for 
replacement process. 

• 

The room should have good ventilation during the use of exhaust hood on gas 
stoves or other fuels. 

• 

The exhaust hood waste pipe should be separated with an air-duct. 

• 

Regulations regarding the air exhaust must be met. 

• 

The  unit  is  not  intended  to  be  used  by  persons  (including  children)  with  a 
physical,  sensory,  or  mental  disability,  or  lack  of  experience  and  knowledge 
unless they have been given supervision or instructions concerning the use of 
the appliance by the person who is responsible for their safety. 

• 

Children should be supervised to ensure that they are not playing with the unit. 

• 

Do not strike a fire under the sucker of the exhaust hood. 

• 

The exhaust hood is not aimed to be installed on top of the stove that had more 
than four burners. 


Electrical Shock Hazards 


• 

Connect the unit only to a grounded power socket correctly. If you are in doubt, 
ask advice from an experienced technician who is suitably qualified. 

• 

The failure to follow these instructions may cause electric shock, fire, or other 
hazards that are fatal.   


PART 1: SAFETY WARNINGS 

Summary of Contents for Cessena Series

Page 1: ...0 CX 6150 CX 7110 L Ferrara Series CX 9301 CX 6301 Forli Series CX 9753 CX 9701 L CX 9777 CX 9754 CX 7754 Diva Series CX 9330 CX 6330 Modica Series CX 7712 L Imola CX 9313 L CX 7310 L CX 9313 S CX 7313 S Faenza Series CX 9356 Cessena CX 9177 CX 9157 CX 9156 ...

Page 2: ... Installation Height 15 Part 4 How to Use 17 Push Button Type 17 Electronic Button Display Type 18 Touch Button Type 18 Clock Setting 18 Touch Control 20 LCD Display 21 Operating Instructions 22 CX 9777 22 CX 9157 CX 9177 23 CX 9754 CX 7754 Part 5 Maintenance 24 Cleaning the Cabiner 24 Cleaning the Filter 24 Cleaning oil Container 25 Changing the Light Bulb 25 Part 6 Problem Solution 26 Part 7 Pre...

Page 3: ...t hood on gas stoves or other fuels The exhaust hood waste pipe should be separated with an air duct Regulations regarding the air exhaust must be met The unit is not intended to be used by persons including children with a physical sensory or mental disability or lack of experience and knowledge unless they have been given supervision or instructions concerning the use of the appliance by the per...

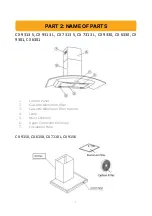
Page 4: ...7313 L CX 9330 CX 6330 CX 9301 CX 6301 1 Control Panel 2 Cassette Aluminum Filter 3 Cassette Aluminum Filter Handle 4 Lamp 5 Main Chimney 6 Upper Connector Chimney 7 Circulation Hole CX 9150 CX 6150 CX 7110 L CX 9156 PART 2 NAME OF PARTS ...

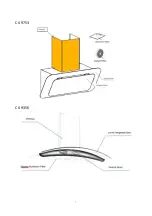
Page 5: ...5 CX 9753 CX 9356 ...

Page 6: ...6 CX 9701 L CX 7712 1 Circulation Hole 2 Upper Chimney 3 Main Chimney 4 Control Panel 5 Aluminum Filter 6 Carbon filter ...

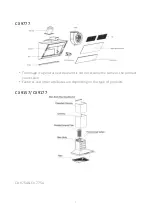
Page 7: ...7 CX 9777 The image is a general overview and is not necessarily the same as the product you receive Features and other attributes are depending on the type of products CX 9157 CX 9177 CX 9754 CX 7754 ...

Page 8: ...e and odor produced in cooking process With an exhaust hood your kitchen will be free from oil particles which produces bad odor If you have a waste pipe outside the exhaust hood can be connected using extraction duct enamel aluminum flexible pipe or a fire resistant material with an inner diameter of 150 mm see the following picture Before installation switch off the unit and unplug the power cor...

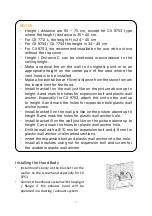
Page 9: ...the weight load of the hood The hood should be installed precisely over the stove at a vertical distance of 65 75 cm from the stove surface Installing the Hood on Wall The hood must be installed in an upright position to prevent the oil from flowing to one side and dripping out of the exhaust hood ...

Page 10: ...Creating Holes on the Wall and Methods for Installing Bracket Model A cm B cm C cm CX 9753 37 5 39 39 CX 9330 34 5 20 5 49 CX 6330 34 5 20 5 49 CX 9150 34 5 20 5 49 CX 6150 34 5 20 5 49 CX 7712 L 25 39 39 ...

Page 11: ... is to be installed Make a horizontal line at H cm distance from the stove to mark the lowest limit for the hood Install bracket I on the wall just like on the picture above up to height A and mark the holes for expansion bolt and plastic wall anchor Especially for CX 9753 attach the unit on the wall up to height A and mark the holes for expansion bolt plastic wall anchor screw Install bracket II ...

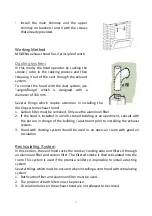
Page 12: ... hood is installed in a multi storied building or an apartment consult with the person in charge of the building apartment prior to installing the exhaust system 3 Hood with ducting system should be used in an open air room with good air circulation Recirculating System In this version the vent hood sucks the smoke cooking odor and filters it through an aluminum filter and carbon filter The filter...

Page 13: ...er than electricity are simultaneously in operation the negative pressure in the room must be not exceed 4 Pa 4 10 5 Bar Drill 3 x 8mm holes to accommodate the bracket Screw and tighten the bracket onto the wall with the screws screw plugs provided For inclined panel Model need to drill 4 x 8mm extra holes fixing screws screw plugs before installation Leave up the exhaust hood and hang onto the wa...

Page 14: ...aust pipe is not required and the installation is similar to the one show in section Installation Ducting Exhaust System Activated carbon filter can be used to trap odors In order to install the activated carbon filter the grease filter should be detached first by press the lock and pull it downward Plug the activated carbon filter into the unit and turn it in clockwise direction Repeat the same o...

Page 15: ... to adjust the chimney height When the height you required is reached then hang the fixing hole to the fixing screws as showed in below pictures NOTE Make sure the filter is securely locked Otherwise it would loosen and cause dangerous When activated carbon filter attached the suction power will be lower Carbon filters are installed at the rear of the grill and had to be replaced after three month...

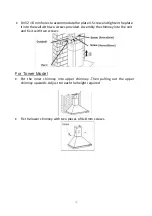
Page 16: ... the wall with two screws provided Assembly the chimney into the unit and fix it with two screws For Tower Model Put the inner chimney into upper chimney Then pulling out the upper chimney upwards Adjust to reach the height required Fix the lower chimney with two pieces of 4x8 mm screws ...

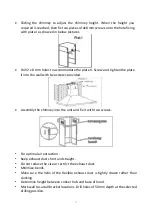
Page 17: ...into the wall with two screws provided Assembly the chimney into the unit and fix it with two screws For optimal air extraction Keep exhaust duct short and straight Do not reduce the size or restrict the exhaust duct Minimize bends Make sure the helix of the flexible exhaust duct is tightly drawn rather than slacking Determine height between cooker hob and base of hood Mark wall to suit all bracke...

Page 18: ...l to strengthen the position and to reduce vibration when the hood is switched on Chimney extension can be installed to the ceiling or wall Ensure the oil collection container is in place before the hood is being used To remove it for cleaning slide the oil collection container from front to rear vice versa for inserting it into position Ensure there is proper ventilation in the cooking area Instr...

Page 19: ... Light Electronic Button Display To Turn On Off the Hood To Adjust the Motor s Speed Low Medium High To Activate the Shut off Timer After 9 Minutes motor will switch off automatically To Turn On Off the Light PART 4 HOW TO USE NOTES Adjust the motor speed of the exhaust hood according to the thickness of smoke steam generated in the cooking process ...

Page 20: ...ton around 2 until 5 seconds the display will show the first two digits will blink indicates for setting of the hours Then adjust with touch the button to increase or the touch to decrease The largest value for hour is 23 and will not working if it is exceeded 23 and function will not working if it has reached the lower limit of 00 The addition value by every touch is 01 2 Touch the button once mo...

Page 21: ...nge an ongoing timer touch the for 5 seconds or until the correct time is displayed Touch control After plug in power it will automatically sets in standby mode Timer s Button Times setting keep pressing it while in standby mode to enter time setting hour display will flash press or to set the time Press to change into minute setting press or to set the time press again or wait 10s to finish the t...

Page 22: ...the hood sends out a drip sound indicating that the power is connected Please use the following methods for the first time If there is any discrepancy please contact the local distributor or service department as soon as possible CX 9777 To start the hood press the wake button first and then touch the ring with clockwise touch The wind is changed from small to large when the whole ring is red when...

Page 23: ... 3 minutes after 3 minutes it will automatically turn into strong gear operation state Lighting keys used to turn on or off lights Cleaning Lock Screen Function Press the Lighting keys for 3 seconds to enter the cleaning lock screen state and press 3 seconds to exit the cleaning lock screen The indicator light of strong key keeps flickering the hood enters the state of cleaning lock screen Press t...

Page 24: ...old On off icon for 3 seconds to keep the setting CX 9754 CX 7754 1 On off key When this key is touched in the off state entering the standby state and waiting for other key operations When you touch this key again it returns to the off state Time delay function when the motor is running touch this key to enter a 1 minute time delay shutdown state the indicator light flashes during the delay In the off...

Page 25: ... left and right sensing area The ideally gesture motion speed from left to right or right to left shall within two seconds The ideally distance of gesture motion from control panel is from 5 10CM Heat Cleaning Function 1 Press and hold the button for 2 seconds to activate the heat cleaning function 2 The cooker hood will operate the heat cleaning function for 15 minutes 3 The indicator light will ...

Page 26: ...its proper position Aluminum filter can be cleaned using a dishwasher Avoid bending the filter when you wash it 2 Carbon Filter Carbon filter must be replaced with a new one at least once every 4 months or when the carbon filter is no longer capable to absorb the cooking odor Remove the aluminum filter first Remove the carbon filter by pulling the hook for square shaped filter or rotating it for r...

Page 27: ...cted to the electrical socket Electrical socket does not have any electricity Connect the power cord to the electrical socket Connect the power cord to a properly functioning electrical socket Deteriorating of Suction Power Dirty aluminum filter Dirty carbon filter Clean the aluminum filter dry it and place it back on the exhaust hood Replace the carbon filter with a new one Motor fan is not funct...

Page 28: ...mediately identified and repaired Contact MODENA Service Center MODEL CX 9753 CX 9330 CX 6330 Cabinet s Material Stainless tempered glass Stainless tempered glass Stainless tempered glass Front panel s color Diamond black Stainless Stainless Number of Motor s 1 Turbo 1 Turbo 1 Turbo Lamp s 2 LED 2 LED 2 LED Exhaust speeds 3 3 3 Ionizer Germinator Y Yes Yes Filter s type Cassette Aluminum Carbon Fi...

Page 29: ... 1040 600 x 500 x 580 1060 700 x 450 x 540 1020 MODEL CX 7310 L CX 9301 CX 9301 Cabinet s Material Metal Tempered glass Stainless Tempered glass Stainless Tempered glass Cabinet s Color Black Stainless Stainless Front panel s color Black Black Black Number of Motor s 1 Turbo 1 Turbo 1 Turbo Lamps LED LED LED Control Push Button Push Button Push Button Exhaust speeds 3 3 3 Filter s type Cassette Al...

Page 30: ...ltage 220V 50Hz 220V 50Hz 220V 50Hz Dimension P x L x T mm 895 x 425 x 660 895 x 515 x 655 895 x 520 x 600 MODEL CX 7712 L CX 9156 CX 9356 Cabinet s Material Metal Painted Tempered Glass Stainless Steel Tempered Glass Stainless Steel Tempered Glass Cabinet s Color Stainless Stainless Stainless Front panel s color Black Stainless Black Number of Motor s 1 Turbo 1 Turbo 1 Turbo Lamps LED 2 LED LED S...

Page 31: ...0 240 V 50 60Hz Dimension P x L x T mm 900 x 340 x 800 1180 900 x 360 x 740 1080 700 x 360 x 740 1080 MODEL CX 7313 S CX 9313 S CX 9313 L Cabinet s Material Stainless Steel Tempered Glass Stainless Steel Tempered Glass Metal Painted Tempered Glass Cabinet s Color Stainless Stainless Black Front panel s color Stainless Stainless Black Number of Motor s 1 1 1 Lamps LED LED LED Control Push Button Pu...

Page 32: ...11 20 ...

Reviews: