

31
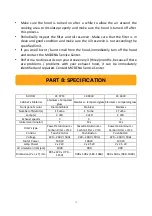
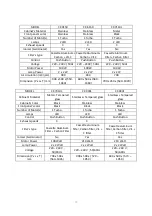
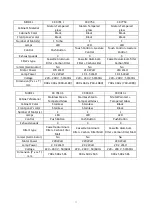
MODEL
CX 9701 L
CX 9754
CX 7754
Cabinet’s Material
Metal +Tempered
glass
Metal +Tempered
glass
Metal +Tempered
glass
Cabinet’s Color
Black
Black
Black
Front
panel’s color
Black
Black
Black
Number of Motor(s)
1 Turbo
1
1
Lamps
LED
LED
LED
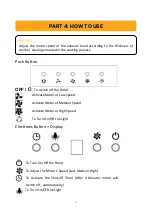
Control
Push Button
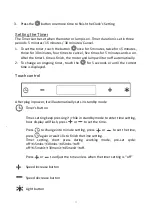
Touch C Gesture
Control
Touch C Gesture
Control
Exhaust speeds
3
3
3
Filter’s type
Cassette Aluminum
Carbon Filter
Cassette Aluminum
Carbon Filter
Cassette aluminum filter,
Carbon filter
Ionizer (Germinator)
No
No
No
Motor Power
170 Watt
210 Watt
210 Watt
Lamp Power
2 x 2 Watt
1 X 1.5 Watt
1 X 1.5 Watt
Voltage
220
–
240 V ; 50/60Hz
220
–
240 V ; 50/60Hz
220
–
240 V ; 50/60Hz
Dimension (P x L x T)
mm
900 x 340 x (800
–
1180)
900 x 360 x (740
–
1080)
700 x 360 x (740
–
1080)
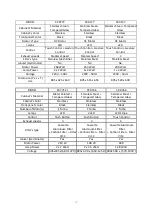
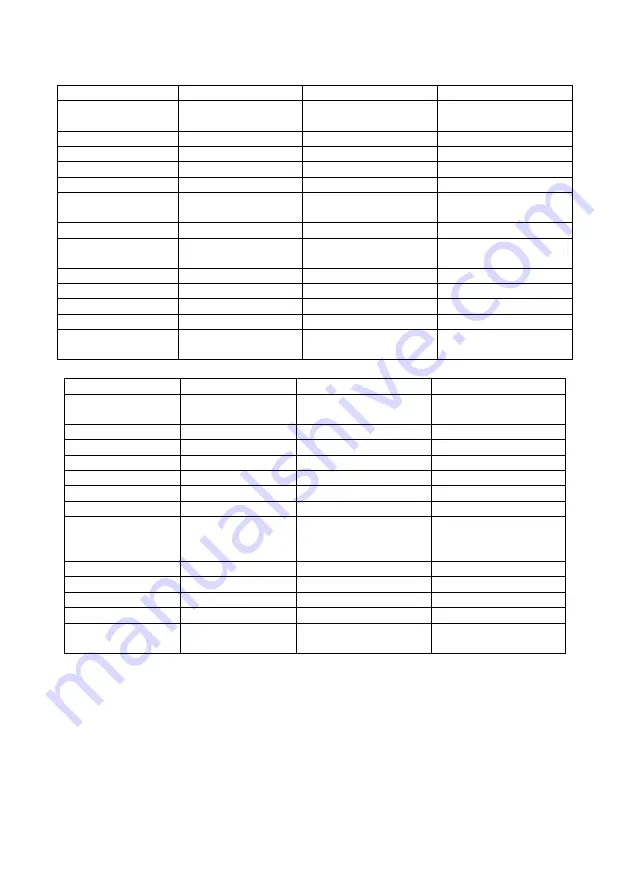
MODEL
CX 7313 S
CX 9313 S
CX 9313 L
Cabinet’s Material
Stainless Steel +
Tempered Glass
Stainless Steel +
Tempered Glass
Metal P
Tempered Glass
Cabinet’s Color
Stainless
Stainless
Black
Front panel’s color
Stainless
Stainless
Black
Number of Motor(s)
1
1
1
Lamps
LED
LED
LED
Control
Push Button
Push Button
Push Button
Exhaust speeds
3
3
3
Filter’s type
Cassette Aluminum
Carbon Filter
Matt
Cassette Aluminum
Carbon Filter Matt
Cassette Aluminum
Carbon Filter Matt
Ionizer (Germinator)
No
No
No
Motor Power
220 Watt
220 Watt
220 Watt
Lamp Power
2 X 2 Watt
2 X 2 Watt
2 X 2 Watt
Voltage
220
–
240 V ; 50/60Hz
220
–
240 V ; 50/60Hz
220
–
240 V ; 50/60Hz
Dimension (P x L x T)
mm
700 x 500 x 565
900 x 500 x 565
900 x 500 x 565
Summary of Contents for Cessena Series
Page 5: ...5 CX 9753 CX 9356 ...
Page 32: ...11 20 ...


