background image

Bahasa  Indonesia 9


Catatan: 


Pastikan  filter  telah  terpas ang  dengan  benar  dan  benar-benar 
terkunci. Jika tidak filter terle pas dan menimbulkan bahaya.   


Pada  saat  karbon  filter  terpasang,  daya  hisap  akan  menjadi  lebih 
rendah.  


Karbon  filter  dipasang  di  bagian  belakang  grill  dan  harus  diganti 
setelah tiga bulan.


Peringatan:


Karbon  filter  tidak  dapat  dicuci  atau  didaur  ulang.  Penggunaan  karbon  filter  maksimal  selama  120  jam  
penggunaan dan harus diganti setelahnya. Karbon filter tidak boleh terkena panas.


Hubungkan steker dengan stop kontak listrik. 
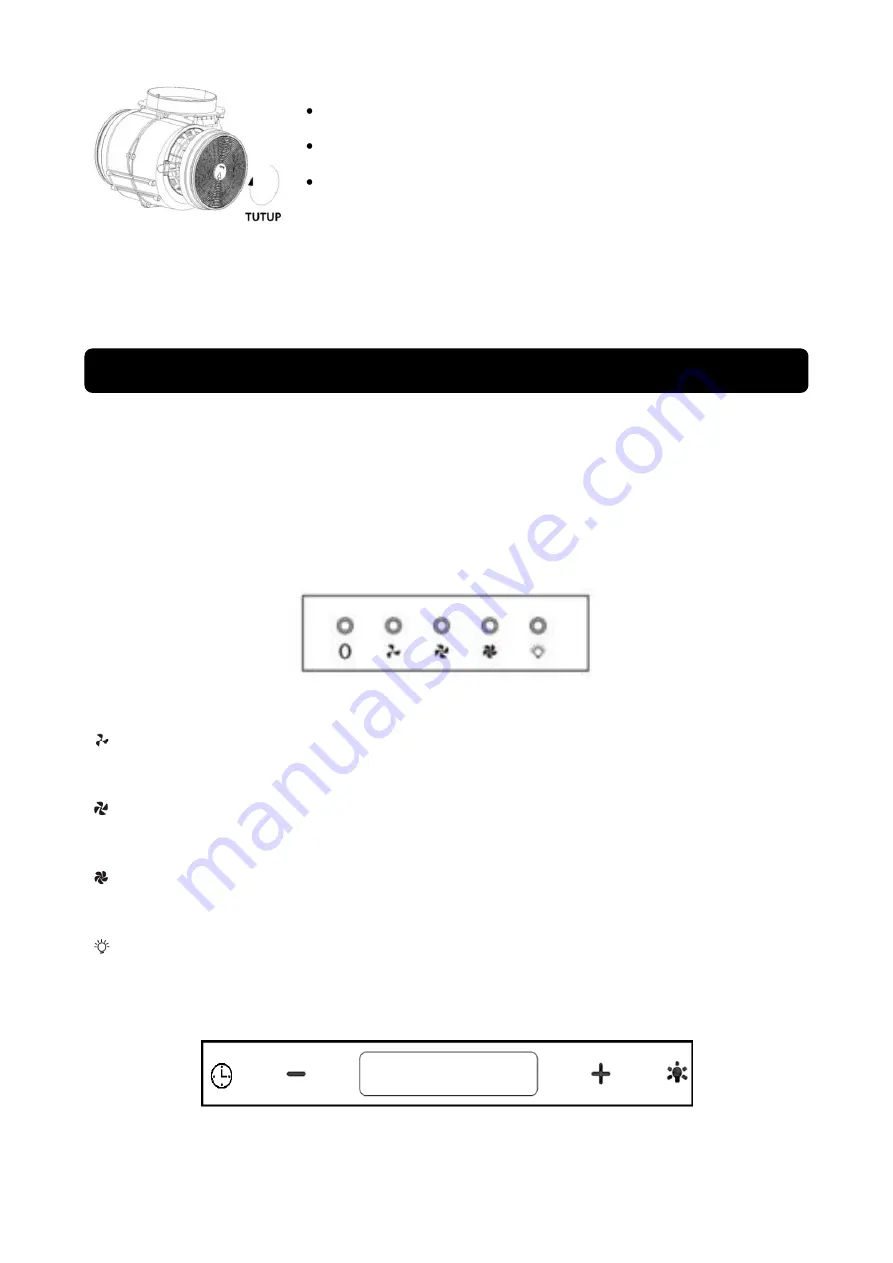
Untuk  menyalakan  atau  mematikan  tudung  hisap  serta  lampu  tudung  hisap  dapat  dengan  cara  menggeser 
atau  menekan  tombol  pengatur  kecepatan  motor  dan  tombol  penyalaan  lampu  seperti  pada  gambar  di 
bawah ini.


Catatan:


Untuk pengaturan kecepatan motor tudung hisap  disesuaikan dengan ketebalan asap/uap yang timbul ketika 
memasak.  
 

Tombol jenis TEKAN / Tombol elektronik


0   Tombol On / Off


Tombol untuk mematikan atau mengaktifkan tudung hisap.  
 

Tombol kecepatan motor 

– RENDAH 


Cocok  digunakan  untuk  sirkulasi  udara  dapur  atau  digunakan  pada  kondisi  memasak  yang  tidak  
menimbulkan banyak asap atau uap.  
 

Tombol kecepatan motor 

– SEDANG 


Kecepatan  perputaran  udara  yang  cocok  untuk    proses  memasak  yang  menimbulkan  volume  asap 
atau uap sedang.   
 

Tombol kecepatan motor 

– TINGGI


Ketika tingkat asap  atau  uap yang dihasilkan cukup tinggi, maka gunakanlah tingk at kecepatan tinggi 
untuk sirkulasi udara yang efektif.   
 

Tombol untuk menyalakan/mematikan lampu


Tombol jenis SENTUH / Touch control  


Setelah kabel listrik dihubungkan ke sumber listrik, unit akan otomatis berada pada mode “stand by”. 


Bagian 3: 

Cara Penggunaan 

Summary of Contents for CX 6301

Page 1: ...Bahasa Indonesia 1 2016 ...

Page 2: ...inci sehingga memudahkan Anda dalam menggunakan dan memanfaatkannya Agar produk ini dapat berfungsi normal dalam jangka waktu yang panjang kami sangat merekomendasikan agar buku ini tidak saja menjadi pegangan Anda sebagai pembeli namun juga sebagai panduan bagi siapa saja yang menggunakan dan mengoperasikannya sehingga keawetan dan kualitas fungsionalnya lebih tahan lama Buku ini sangat disaranka...

Page 3: ... ISI HLM Kata Pengantar 1 Bagian 1 Nama nama Bagian 3 Bagian 2 Instalasi 3 Bagian 3 Cara Penggunaan 8 Bagian 4 Pemeliharaan 13 Bagian 5 Masalah Solusinya 14 Bagian 6 Spesifikasi 15 NOMOR 20 DJ ILMEA MG V 2000 728 ILMEA IX 2003 ...

Page 4: ...akukan oleh tenaga berkompeten atau hubungi Sentra Servis MODENA untuk proses penggantian Ruangan harus memiliki ventilasi yang baik pada saat tudung hisap digunakan pada kompor berbahan gas atau bahan bakar lainnya Saluran pembuangan tudung hisap harus terpisah dengan saluran udara ruangan Peraturan mengenai pembuangan udara harus dipenuhi Unit ini tidak diperuntukan untuk orang termasuk anak ana...

Page 5: ... tepat di atas kompor dengan jarak ketinggian minimal 65 cm dan maksimal 75 cm dari permukaan kompor Instalasi Sistim DUCTING Perhatian Patuhi peringatan dalam lembar instruksi mengenai pengoperasian alat saat udara dikeluarkan dari ruangan Ketika unit dan piranti rumah tangga dioperasikan secara bersamaan menggunakan suplai energi selain listrik pastikan tekanan negative di dalam ruangan tidak me...

Page 6: ...akan jika tudung hisap akan difungsikan untuk versi buang ducting Pemasangan cerobong asap Chimney Untuk Model kaca dan Model T shape Dengan meletakan cerobong atas di dalam cerobong bawah Kemudian untuk mengatur ketinggian cerobong tarik keluar cerobong atas sesuai ketinggian yang diinginkan Geser cerobong untuk menyesuaikan ketinggian cerobong Setelah ketinggian cerobong telah sesuai gantunglah ...

Page 7: ...krup Untuk model Tower Dengan menempatkan cerobong bagian dalam ke dalam cerobong atas Kemudian untuk menyesuaikan ketinggian cerobong tarik keatas cerobong bagian atas sesuai ketinggian yang diinginkan Kencangkan cerobong bawah dengan dua buah sekrup 4 x 8 mm Tarik cerobong sampai ketinggian yang diinginkan kemudian pasang dua buah sekrup 4 x 8 mm kedalam lubang yang ada pada plat I lihat gambar ...

Page 8: ...pipa pembuangan tidak diperlukan pada saat instalasi pemasangan pada sistem resirkulasi mirip dengan pertunjukan pemasangan sistem ducting Filter karbon aktif dapat digunakan untuk menetralisir bau yang dihasilkan pada saat proses memasak Untuk memasang filter karbon aktif lepaslah filter grease terlebih dahulu dengan cara menekan kunci pengait dan menariknya ke bawah Pasang filter karbon aktif ke...

Page 9: ...u seperti pada gambar di bawah ini Catatan Untuk pengaturan kecepatan motor tudung hisap disesuaikan dengan ketebalan asap uap yang timbul ketika memasak Tombol jenis TEKAN Tombol elektronik 0 Tombol On Off Tombol untuk mematikan atau mengaktifkan tudung hisap Tombol kecepatan motor RENDAH Cocok digunakan untuk sirkulasi udara dapur atau digunakan pada kondisi memasak yang tidak menimbulkan banyak...

Page 10: ...eanning muncul ketika waktu kerja total unit sudah mencapai 14 jam PERHATIAN Hindari pertemuan langsung antara kompor yang sedang dalam keadaan menyala dengan cooker hood Untuk mendapatkan hasil penyaringan yang optimal sebaiknya cooker hood dimatikan 20 30 menit setelah selesai memasak Tudung hisap MODENA dirancang secara khusus untuk pemakaian jangka waktu panjang sehingga tidak memerlukan peraw...

Page 11: ... Center kami bila terjadi gangguan pada tudung hisap Anda PROBLEM PENYEBAB SOLUSINYA Daya hisap berkurang Filter Aluminium Acrylic kotor Karbon filter kotor Bersihkan filter Aluminium Acrylic dan pasang kembali setelah kering Ganti Karbon filter dengan yang baru Motor berhenti bekerja setelah beberapa saat Alat pengaman untuk suhu yang tinggi dalam keadaan aktif Jarak tudung hisap dengan kompor te...

Page 12: ... Ya Ya Perputaran udara 1000 m3 H 1000 m3 H Daya motor 210 Watt 210 Watt Daya lampu 2 x 2 Watt 2 x 2 Watt Dimensi PxLxT mm 895x500x 570 1050 895x500x 570 1050 MODEL CX 9106 CX 9106 W Jenis Wall Wall Bahan kabinet Stainless steel Kaca temper Stainless steel Kaca temper Warna kabinet Stainless Stainless Warna Panel Depan Hitam Putih Motor 1 Turbo 1 Turbo Lampu LED LED Kontrol Touch Control Touch Con...

Page 13: ...Carbon filter Vit C filter Germinator Ionizer Tidak Ya Ya Perputaran udara 700 m3 h 1000 m3 h 1000 m3 h Daya motor 170 Watt 210 Watt 210 Watt Daya lampu 2 x 2 Watt 2 x 2 Watt 2 x 2 Watt Dimensi PxLxT mm 900x340x 800 1180 900x500x 570 1050 600x500x 570 1050 Untuk meningkatan kualitas produk desain dan spesifikasi diatas dapat berubah setiap saat tanpa pemberitahuan Gambar pada buku ini bersifat ske...

Page 14: ......

Page 15: ...n this manual to facilitate the users In order for this product to perform normally for an extended period of time we highly recommend Not only the buyer to hold onto this manual but also those who wish to operate the product optimally to maintain its service period and quality This manual is recommended for use by anyone who operates the this product We also provide a customer care service for MO...

Page 16: ...English 15 CONTENTS PAGE Introduction 14 Part 1 Name of Parts 16 Part 2 Installation 16 Part 3 How to Use 21 Part 4 Maintenance 22 Part 5 Problem Solving 23 Part 6 Specification 24 ...

Page 17: ...ord the replacement must be performed by qualified personnel or contact the MODENA Service Center for replacement process The room should have good ventilation during the use of cooker hood on gas stoves or other fuels The cooker hood waste pipe should be separated with an air duct Regulations regarding the air exhaust must be met The unit is not intended to be used by persons including children w...

Page 18: ...e top of the stove with a minimum distance of 65 cm and a height of maximum 75 cm from the surface of the stove Installation DUCTING EXHAUST System Attention Observe the warning in the instruction sheet concerning the operation of the appliance when air is discharged from the room When the range hood and appliance supplied with energy other than electricity are simultaneously in operation the nega...

Page 19: ... and hang onto the wall bracket hook Fix the one way valve to the air outlet of the cooker hood Then attached the exhaust pipe onto the one way valve as shown below Chimney installation For Glass model and T shape model By put the upper chimney into lower chimney Then pulling out the upper chimney upwards Adjust to reach the height required ...

Page 20: ...es Drill 2 8mm holes to accommodate the plate II Screw and tighten the plate II onto the wall with two screws provided Assembly the chimney onto the unit and fix it with two screws For Tower model By Put the inner chimney into upper chimney Then pulling out the upper chimney upwards Adjust to reach the height required Fix the lower chimney with two pieces of 4x8mm screws ...

Page 21: ...onto the unit and fix it with two screws Installation Re circulating System If you do not have an outlet to the outside exhaust pipe is not required and the installation is similar to the one show in section Installation DUCTING EXHAUST System Activated carbon filter can be used to trap odors In order to install the activated carbon filter the grease filter should be detached first by press the lo...

Page 22: ...he lighting button as shown below Note The setting of the cooker hood motor speed is adjusted to the thickness of the smoke steam that arises when cooking PUSH type button Electronic button 0 On Off Buttons The Buttons which are for turning off or turning on the cooker hood Motor speed button LOW Suitable for air circulation used in the kitchen or cooking conditions that do not cause a lot of smok...

Page 23: ...ng a cooker hood should be turned off 20 30 minutes after cooking is finished MODENA cooker hood specifically designed for long term use so that it does not require complicated maintenance However there are some things that are recommended to take care of your cooker hood so that the quality is maintained Turn the unit off and unplug the power cord from the power source before cleaning I Regular c...

Page 24: ...e aluminum filter dry it and place it back on the vent hood Replace the carbon filter foam with a new one Motor stop working after a while Safety thermal regulator is active The vent hood is installed too close to the stove Air circulation is not optimal Contact MODENA Service Center Light on but fan does not work The fan blade is jammed Switch of the unit and Contact MODENA Service Center The mot...

Page 25: ...0 W 210 W Lamp power 2 x 2 W 2 x 2 W Dimension L x W x H mm 895x500x 570 1050 900x500x 570 1050 MODEL CX 9106 CX 9106 W Hood type Wall Wall Cabinet Material Stainless tempered glass Stainless tempered glass Color of Cabinet Stainless Stainless Color of Front Panel Black White Motor 1 turbo 1 turbo Lamp LED LED Control Touch Control Touch Control Speed 3 3 Filter type Cassette Aluminum Filter Carbo...

Page 26: ...filter Cassette Aluminum Filter Carbon Filter Vit C filter Ionizer No Yes Yes Maximum airflow 700 m3 h 1000 m3 h 1000 m3 h Motor power 174 W 210 W 210 W Lamp power 2 x 2 W 2 x 2 W 2 x 2 W Dimension L x W x H mm 900x340x 800 1180 900x500x 570 1050 600x500x 570 1050 Specifications of this appliance may change without notice to improve the quality of the product Figures in this manual are schematic a...

Page 27: ......

Reviews: