background image

English

   15 


Grounding Instruction   

-


Improper use of the grounding outlet may result in electrocution and serious injury, even fatality  

-


This appliance must be “Grounded” to reduce the risks of electrocution during shortage.  

-


This  appliance  comes  with  a  power  cord  and  plug  grounding  which  must  be  properly  connected 
with  a  polarized  ground  outlet.  Consult  with  an  electrician  if  you  are  not  well-versed  with  the 
grounding instruction.  

-


Do not cut or remove the third prong (ground) from the power plug. 

-


Do not use an adapter plug on this appliance. 

-


Do not use an extension cord / extension of this unit. 


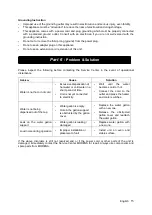
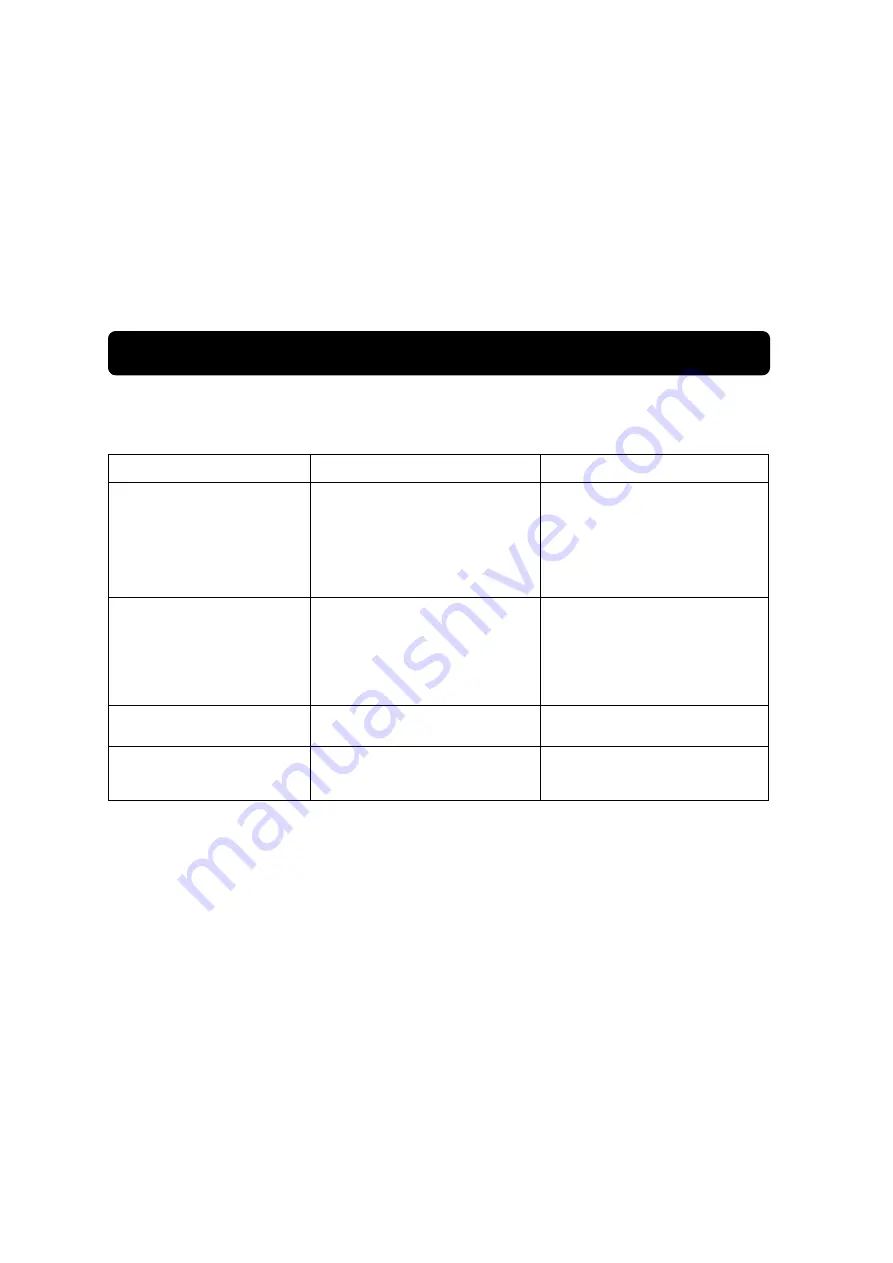
Please  inspect  the  following  before  contacting  the  Service  Center  in  the  event  of  operational 
disturbance:  
 

Problem 

Cause 

Solution 


Water is not hot or not cold


-


Excessive dispensation of 
hot water or cold water in a 
short period of time. 

-


Unit is not yet connected 
to electricity.  


-


Wait 

until 

the 

water 

becomes cold or hot. 

-


Connect  the  cord  to  the 
outlet and press the heater 
and cooler switches.  


Water is not being 
dispensed out of the tap 

-


Water gallon is empty. 

-


Hole in the gallon support 
is obstructed by the gallon 
cover. 

-


Replace  the  water  gallon 
with a new one. 

-


Release  the  obstructed 
gallon  cover  and  reattach 
the water gallon.   

Leak  on  the  water  gallon 
support 

-


Water gallon is leaking / 
damaged 

-


Replace  water  gallon  with 
a new one. 

Loud noise during operation 

-


Improper installation or 
placement of unit 

-


Install  unit  on  even  and 
stable surface. 

 
If  the  above  disorders  is  still  not  resolved  and  or  if  the  power  cord  or  other  parts  of  the  unit  is 
damaged, immediately contact the  Service Center MODENA for repair. Always  use components and 
spare parts from MODENA. 


Part  6 

Problem & Solution


Summary of Contents for DD 23

Page 1: ...04 17 www modena co id DD Series BUKU PETUNJUK PENGGUNAAN DISPENSER DAN KARTU GARANSI WATER DISPENSER MANUAL AND WARRANTY CARD ...

Page 2: ...n rinci sehingga memudahkan Anda dalam menggunakan dan memanfaatkannya Agar produk dispenser ini dapat berfungsi normal dalam jangka waktu yang panjang kami sangat merekomendasikan agar buku ini tidak saja menjadi pegangan Anda sebagai pembeli namun juga sebagai panduan bagi siapa saja yang menggunakan dan mengoperasikannya sehingga keawetan dan kualitas fungsionalnya lebih tahan lama Buku ini san...

Page 3: ... HLM Kata Pengantar 1 Bagian 1 Nama nama Bagian 3 Bagian 2 Instalasi 4 Bagian 3 Cara Penggunaan 4 Bagian 4 Pemeliharaan 5 Bagian 5 Tindakan Pencegahan 6 Bagian 6 Masalah Solusinya 7 Bagian 7 Spesifikasi 8 NOMOR P 6 INDO2 00301 0212 ...

Page 4: ...mati hati hati pada saat mengeluarkan air bisa jadi air masih dalam kondisi panas B Lampu indikator biru Menyala Suhu air dingin telah optimal air siap digunakan Mati Proses pendinginan air sedang bekerja pada saat ini air bisa digunakan dengan kemungkinan suhu air dingin optimal belum tercapai 3 Child lock 4 Tombol keran air panas 5 Tombol keran air dingin 6 Baki tetesan air 7 Thermostat pengatur...

Page 5: ...i apakah botol gallon air atau dispenser yang menjadi sumber dari masalah 1 Lepaskan kabel listrik kemudian lepaskan botol 2 Lepaskan penyangga dudukan botol gallon dan periksa level air didalam penampung air reservoir 3 Air didalam penampung seharusnya dalam kondisi penuh Isi atau kurangi beberapa gelas air untuk mencapai kondisi tersebut 4 Terus pantau level air dalam penampung reservoir jika da...

Page 6: ...a botol tabung air dan heating elemen oleh ahlinya Hal ini akan membuat mesin tetap dalam kondisi yang baik dan memperpanjang umur pemakaian Jangan membongkar sendiri mesin ini untuk menghindari kerusakan yang akan timbul pada mesin 4 Gunakan kain lembut dan dibasahi secukupnya untuk membersihkan permukaan dispenser lalu gunakan kain lembut yang kering untuk mengeringkannya Jangan biarkan air masu...

Page 7: ...ui lubang pembuangan e Jangan menggunakan bahan kimia dan menyiramkan air secara langsung untuk membersihkan dispenser Gunakan kain yang lembut untuk membersihkannya Perawatan regular dibutuhkan untuk menjaga kinerja produk ikuti petunjuk perawatan yang ada dan bersihkan dispenser setidaknya setiap 4 bulan sekali f Jangan menarik kabel untuk melepaskan steker dari stop kontak Tarik steker dengan t...

Page 8: ... terjadi gangguan pengoperasian MASALAH PENYEBAB PENYELESAIAN Air tidak panas atau tidak dingin Penggunaan air panas atau air dingin yang terlalu banyak dalam waktu yang singkat Unit belum terhubung ke sumber arus listrik Tunggulah beberapa saat sampai dengan air menjadi panas atau dingin Hubungkan steker ke stop kontak kemudian tekan sakelar pemanas dan sakelar pendingin Tidak ada air yang keluar...

Page 9: ...dari tabung air Stainless Stainless Daya listrik pemanas watt 350 350 Daya listrik kompresor watt 80 80 Dimensi Produk Ø Atas x Ø Bawah x T mm 290 x 330 x 970 290 x 330 x 970 Berat Produk Kg 11 9 11 9 Untuk meningkatan kualitas produk desain dan spesifikasi diatas dapat berubah setiap saat tanpa pemberitahuan Gambar pada buku ini bersifat skematis dan bisa saja tidak tepat sama dengan produk aktua...

Page 10: ......

Page 11: ...ual to facilitate the users In order for this water dispenser to perform normally for an extended period of time we highly recommend not only the buyer to hold onto this manual but also those who wish to operate the product optimally to maintain its service period and quality This manual is recommended for use by anyone who operates the water dispenser We also provide a customer care service for M...

Page 12: ...lish 10 CONTENTS PAGE Introduction 9 Part 1 Name of Parts 11 Part 2 Installation 12 Part 3 How to Use 12 Part 4 Maintenance 13 Part 5 Precaution Action 14 Part 6 Problem Solution 15 Part 7 Specification 16 ...

Page 13: ...ent is off exercise caution when dispensing water it may still be hot B Blue Indicator Lamp On Cold water temperature is optimum water is ready for use Off Water is cooling At this moment water can still be used but it may not be at optimum temperature 3 Child lock 4 Hot water tap button 5 Cold water tap button 6 Water drip pan 7 Cold water temperature regulator thermostat 8 Drainage hole 9 Conden...

Page 14: ...k conduct the following simple test to identify whether the water bottle gallon is the source of the problem 1 Disconnect the cord and remove the bottle 2 Remove the gallon bottle support pad and check the water level in the water reservoir 3 The water level in the reservoir should be full Adjust the water level as needed 4 Monitor the water level in the reservoir If it decreases within 1 2 hours ...

Page 15: ...cian once a year to ensure that the machine maintains good condition and to extend usage Do not attempt to disassemble the machine in order to avoid damage to the machine 10 Use soft and slightly wet cloth to clean the surface of water dispenser and use soft and dry cloth to wipe the surface 11 For water dispenser with built in refrigerator remove the defrosting water residue from the refrigerator...

Page 16: ...ge n Do not use chemical substances or direct water rinsing to clean the unit Use soft cloth instead Regular maintenance is required to retain product performance Follow the official maintenance instruction and clean the unit at least once every 4 months o Do not pull the cord to disconnect the cord from the outlet Pull the cord head with dry hand Always disconnect the power cord plug before doing...

Page 17: ...hot or not cold Excessive dispensation of hot water or cold water in a short period of time Unit is not yet connected to electricity Wait until the water becomes cold or hot Connect the cord to the outlet and press the heater and cooler switches Water is not being dispensed out of the tap Water gallon is empty Hole in the gallon support is obstructed by the gallon cover Replace the water gallon wi...

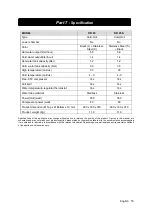
Page 18: ...at Yes Yes Water tube material Stainless Stainless Power Hot watt 350 350 Compressor power watt 80 80 Product dimension Ø Top x Ø Bottom x H mm 290 x 330 x 970 290 x 330 x 970 Product weight Kg 11 9 11 9 Specifications of this appliance may change without notice to improve the quality of the product Figures in this manual are schematic and may not match your product exactly Values stated on the ma...

Page 19: ......

Reviews: