background image


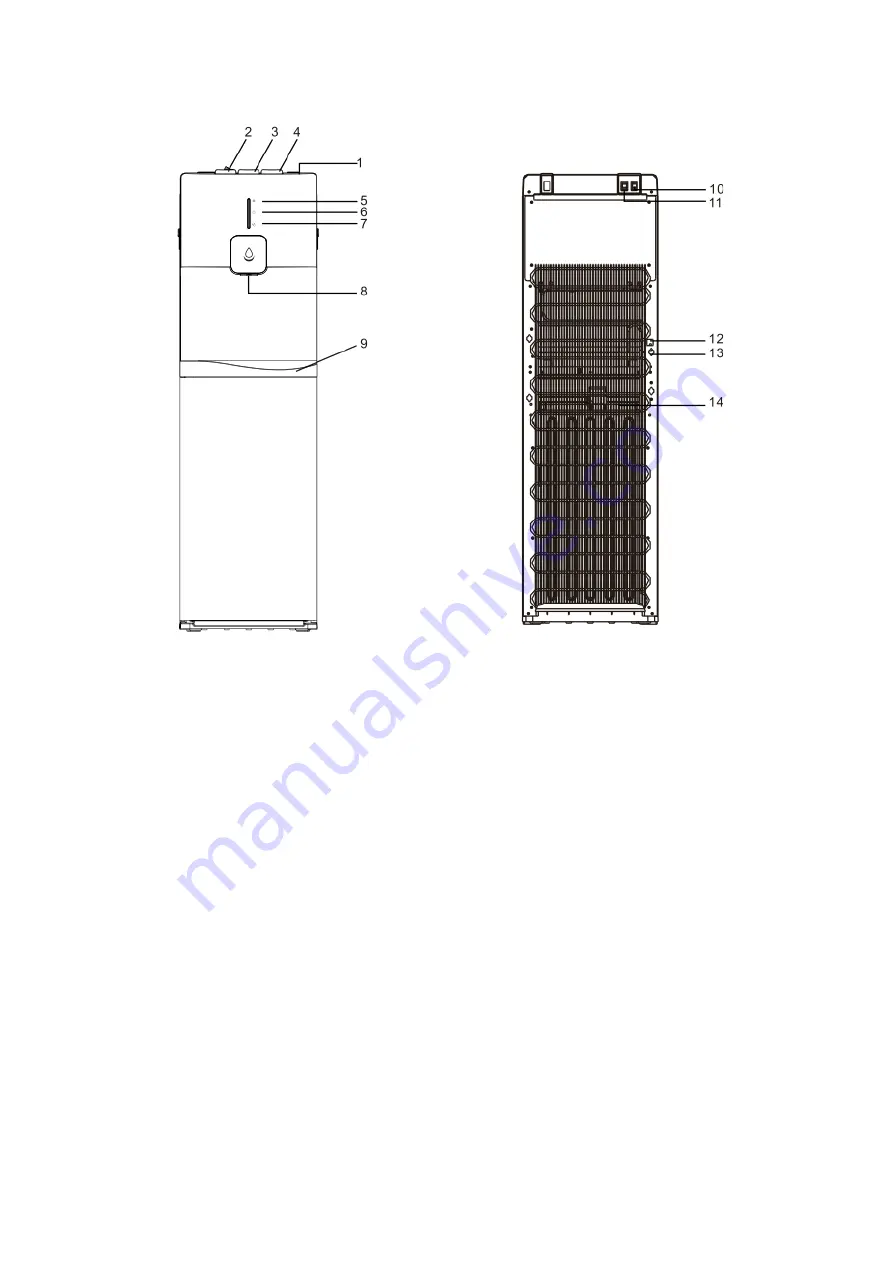
DD 7301 L 


Note : 

1. Top Cover 


7.  Water Level Indicator Light   


13. Drain Valve 

2. Hot Water Button 


8.  Water Tap   


14. Condenser 

3. Normal Water Button  

9.  Drip tray 

4. Cold Water Button 


10.Heating switch 

5. Cooling Indicator Light 

11.Cooling switch 

6. Heating Indicator Light 

12.Power supply cord


(Front) 

(Rear) 

Summary of Contents for DD 7301 L

Page 1: ...User Manual Book Water Dispenser Grafici Series DD 7301 L Lucido Series DD 7315 W ...

Page 2: ...m to deliver stylishly designed products equipped with state of the art technology to assist you in your daily activities This is your guidebook containing everything you need to know about our product Please reach out to us if you need further assistance or other information via our Customer Care or our official website www modena com ...

Page 3: ...3 CONTENTS PAGE Introduction 2 Part 1 Name of Parts 4 Part 2 Installation 6 Part 3 How to Use 7 Part 4 Maintenance 8 Part 5 Precaution Action 8 Part 6 Troubleshooting 10 Part 7 Specification 10 ...

Page 4: ...l Indicator Light 6 Water Tap 12 Condenser 1 Cooling Indicator Light 7 Drip Tray 13 O3 Switch 2 Heating Indicator Light 8 Heating switch 3 O3 Indicator Light 9 Cooling switch 4 Dispenser controls panel 10 Power cord 5 Water button 11 Drain Valve Front Rear ...

Page 5: ...dicator Light 13 Drain Valve 2 Hot Water Button 8 Water Tap 14 Condenser 3 Normal Water Button 9 Drip tray 4 Cold Water Button 10 Heating switch 5 Cooling Indicator Light 11 Cooling switch 6 Heating Indicator Light 12 Power supply cord Front Rear ...

Page 6: ...by opening the drain valve Make sure the power cord is unplugged from the power source when draining the remaining water To prevent the dispenser from falling wobbling adjust the placement using the bracket 1 Loosen the screws at the rear bottom left as seen on the picture 2 Loosen the screw at the rear bottom right corner as well as seen on the picture 3 If the bracket has been taken out install ...

Page 7: ... the cold water button the cold water indicator will be on and the button will blink Touch the button to dispense the cold water 3 Touch the button again and the indicator will be off The appliance will stop dispensing the water b Dispensing Normal Water 1 Place a glass or another container under the tap 2 Touch the warm water button the warm water indicator will be on and the button will blink To...

Page 8: ...unplugged from the power source when draining the remaining water or when in a maintenance or when not in use for a long time Meanwhile when the water from the hot tap is cold open the drain valve until there is no water in the appliance 1 Install the dispenser on even surface Avoid placing it in a humid place A minimum distance of 20 cm from the wall must be provided Do not store flammable substa...

Page 9: ...o is responsible for their safety If there is damage to the power cord contact MODENA Call Center immediately to do a replacement The replacement of power cord must be done by experienced expert and understands about electricity Never replace the power cord on your own due to the dangers that could lead to harm yourself and others Attention This appliance must not be disposed of with other househo...

Page 10: ...liance on even and stable surface Specifications of this appliance may change without prior notice to improve the quality of the product Pictures in this manual are schematic and may be different from the actual product Values stated on the machine labels or in the documentation accompanying it are obtained in laboratory in accordance with the relevant standards Depending on operational and enviro...

Page 11: ...11 20 ...

Reviews: