background image


5


responsible  for  their  safety.  Children  should  be  supervised  to 
ensure that they are not playing with this water heater. 


During the heating process, there may be drops of water dripping 

from the pressure relief hole, and this is a normal case. If there is 
an  over-leaking,  please  contact 

MODENA

  Customer  Care  for 

repair.  This  pressure  relief  hole  should  not,  under  any 
circumstances,  be  blocked;  otherwise,  the  water  heater  may  be 
damaged, even resulting on accidents. 


The  drainage  pipe  that  is  connected  to  the  pressure  relief  hole 
must be kept sloping downwards. 


Since the water temperature inside the heating tank can reach up 
to 75

o

C, the hot water must not be directly flowed to human skin at 

the  initial  use.  Adjust  the  water  temperature  in  accordance  to 
human skin endurance to avoid scalding. 


If  the  flexible  power  supply  cord  is  damaged,  the  special  power 

cord  provided  by 

MODENA

  must  be  selected,  and  replaced  by 

MODENA

 maintenance personnel (technician). 


If any parts and components of this electrical storage water heater 
are damaged please contact 

MODENA

 Customer Care for repair. 


In  order  to  avoid  a  hazard  due  to  inadvertent  resetting  of  the 
thermal  cut-out,  this  appliance  must  be  not  supplied  through  an 

external switching device, such as a timer, or connected to a circuit 
that is regularly switched on and off by the utility. 


For  the  correct  operation  of  the  appliance,  it  is  necessary  to  pay 

attention  that  the  maximum  inlet  water  pressure  is  0.8  MPa,  and 
the minimum inlet water pressure is 0.015 MPa. 


When the water pressure is over 0.8 MPa, this will be automatically 
activated  the  safety  valve,  and  the  water  may  drip  from  the 

discharge  pipe  of  the  pressure-relief  device  (see  Picture  2). 
Therefore,  this  pipe  must  be  left  open  towards  the  air 
(atmosphere).  The  pressure-relief  device  should  be  operated  / 

activated  regularly  to  remove  limestone  deposits  and  to  avoid 
blockage in the pipes. 


Draining away the water inside the inner tank can be done from the 

pressure  relief  valve.  Twist  off  the  thread  screw  of  the  pressure 
relief valve and lift the handle of the drainage pipe valve upwards 

(Picture  3).  Every  drainage  pipe  that  connected  to  the  pressure-
relief  device  has  to  be  installed  in  a  continuously  downward 
direction and in a frost-free environment. 

Summary of Contents for Disteso Series

Page 1: ...User Manual Book Electric Storage Water Heater Tondo Series ES 30VD ES 50VD ES 80VD ES 100VD Disteso Series ES 30HD ES 50HD ES 80HD ES 100HD ...

Page 2: ... Use 11 Operating Procedure 11 Operating the Water Heater 12 Function Introduction 13 Product Features 13 Part 5 Maintenance 13 General Instruction 13 Tank Cleaning 15 Savety Valve Cleaning 15 Magnesium Anode 15 Heating Element 16 Part 6 Troubleshooting 15 Part 7 Disposal of Used Product 17 Part 8 Specification 18 Appendix Wiring Diagram 20 This manual book explains everything you need to know abo...

Page 3: ...a problem with the power socket Incorrect installation and use of this water heater may result in serious injuries and loss of property Special Caution If the supply cord is damaged it must be replaced by MODENA technicians MODENA service agent or similarly qualified persons in order to avoid a hazard The power socket must be earthed grounded reliably The rated current of the socket should not be ...

Page 4: ...il it has been filled fully with water When filling the water at least one of the outlet valves of the water heater must be opened to exhaust the air This valve can be closed after the water heater has been filled fully with water This appliance water heater is not intended to be used by persons with special needs for their physical sensory or mental capabilities or lack of experience and knowledg...

Page 5: ...damaged please contact MODENA Customer Care for repair In order to avoid a hazard due to inadvertent resetting of the thermal cut out this appliance must be not supplied through an external switching device such as a timer or connected to a circuit that is regularly switched on and off by the utility For the correct operation of the appliance it is necessary to pay attention that the maximum inlet...

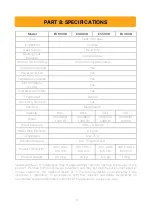
Page 6: ...Rated Volume 30 L 50 L 80 L 100 L Rated Voltage 220 240 Rated Power 1200 W 1200 W 1200 W 1500 W Rated Pressure 0 8 MPa Rated Frequency 50Hz Rated Water Temperature 75 o C Heating Efficiency 90 Water proof Degree IPX4 Structure Mode Hermetically Closed Type Water Storage Style Picture 2 Picture 3 PART 2 PRODUCT INTRODUCTION Picture 4 Water Outlet Safety Valve Opened Water Drainage Valve Position Ha...

Page 7: ...ld Water Inlet Temperature Display Temperature Controller Knob Power Controller Knob Power Cord Machine Body Cold Water Inlet Temperature Display Hot Water Outlet Hot Water Outlet Cold Water Inlet Power Controller Knob The features and product specifications depend on the product type Temperature Controller Knob ...

Page 8: ...th is approximately 45 mm Use the anchor fastener bolt that provided along with this appliance for securing the bracket firmly in the wall see Picture 6 Align the slots on the back of the water heater with the projections of the bracket and then mount the water heater on the bracket Thereafter slide the water heater gently towards the bottom side of the bracket to be locked The power supply must h...

Page 9: ...n of each used pipe is G1 2 BSP The maximum and minimum pressures of the water inlet should use Pa Bar as the unit Connect the pressure relief valve to this water heater on its water inlet In order to avoid leakage when connecting the plumbing the rubber seal gaskets that provided with this water heater must be added at the end of the threads to ensure the connection is leak proof see Picture 8 Pi...

Page 10: ...Gasket Pressure Relief Safety Valve Cold Water Inlet Pipe Copper Nut for Water Inlet Shower Hot Water Outlet Pipe Nut for Hot Water Outlet Handle for Mixing Water Valve Rubber Gasket Pressure Relief Hole Machine Body Hot Water Outlet Pipe Triple Connection Pipe Basin Water pool Pressure Relief Pipe Pressure Relief Safety Valve Shower Water Inlet Pipe Water Inlet Valve ...

Page 11: ... Press the testing button the indicator light on the power plug should be off and the reset button should bounce up then push down the reset button the indicator light will turns on to verify that the leakage protection works well see Picture 10 If the reset button cannot be pressed during the use the leakage protection device ELCB might be error or fails to work If the reset button is pressed dow...

Page 12: ...ition I II or III and the water heating process starts The water heater needs to be turned on for a certain period of time to reach the desired set temperature During the heating process it is normal to see the slight drip at the safety valve Please do not cover the hole of the safety valve outlet Connect the outlet hole to a drainage pipe The water may drip from the drainage pipe of the safety va...

Page 13: ...tched off General Instruction Check the power plug and the power socket as often as possible Electrical contact must be secured and also must be provided proper grounding The power plug and the power socket must not heat excessively If the water heater is not used for a long time especially in regions with low air temperature below 0 o C it is necessary to drain the water from the heating tank to ...

Page 14: ...e of water in the tank If the water heater is connected to the power supply electricity but the water is not heated and the indicator does not light up then the thermal switch was off or not switched on To reset the water heater to the normal operating condition it is necessary to 1 De energize the water heater Remove the plate of the front cover upside 2 Press the button that is located at the ce...

Page 15: ...ve the safety valve then clean and wash it 2 Check if the parts of the valve are still able to move well 3 After cleaning the valve install the safety valve back to its position by first giving the seal tape around the end of valve 4 Fill the water heater with water after the pipes are refitted Magnesium Anode Magnesium Anodes functions to neutralize the corrosive substances in the water and will ...

Page 16: ...is off 1 Power source is not connected or badly connected 2 Indicator light is damaged 3 Overheating sensor is activated Contact MODENA Customer Care for repair No water flows out from hot water outlet 1 Water supply is cut off 2 Water pressure is too low 3 Water Inlet valve is not opened 1 Wait for the restoration of water supply 2 Use the water heater again when the water pressure is increased 3...

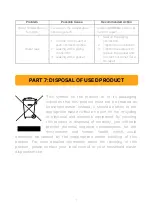
Page 17: ... on the product or in its packaging indicates that this product must not be treated as household waste Instead it should be taken to the appropriate waste collection point for the recycling of electrical and electronic equipment By ensuring this product is disposed of correctly you will help prevent potential negative consequences for the environment and human health which could otherwise be cause...

Page 18: ...Pressure 0 015 0 8 MPa Water Pipe Diameter 0 5 Inch Temperature Max 75o C Insulation Material PUF Polyurethane Product Dimension 410 x 410 x 1110 mm 410 x 410 x 920 mm 410 x 410 x 675 mm 340 x 340 x 620 mm Product Weight 29 2 kg 25 kg 17 5 kg 14 kg Specifications of this appliance may change without notice to improve the quality of the product Pictures in this manual are schematic and may not matc...

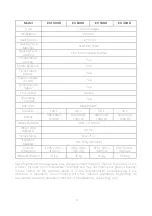
Page 19: ...1500 W Water Pressure 0 015 0 8 MPa Water Pipe Diameter 0 5 Inci Temperature Max 75o C Insulation Material PUF Polyurethane Product Dimension 1095 x 410 x 410 mm 918 x 410 x 410 mm 910 x 340 x 340 mm 650 x 340 x 340 mm Product Weight 31 kg 25 kg 19 kg 13 6 kg Specifications of this appliance may change without notice to improve the quality of the product Pictures in this manual are schematic and m...

Page 20: ...20 ES XXHD ES XXVD APPENDIX WIRING DIAGRAM Picture 13 Thermostat Power Input Switch Thermostat Power Input Switch Thermal Cut out Thermal Cut out Transformer Transformer Display Display ...

Page 21: ...12 20 ...
Reviews: