background image


Summary of Contents for IX 9150

Page 1: ...IX series BUKU PETUNJUK PENGGUNAAN TUDUNG HISAP DAN KARTU GARANSI EXHAUST HOOD MANUAL AND WARRANTY CARD 2017 www modena co id ...

Page 2: ...ehingga memudahkan Anda dalam menggunakan dan memanfaatkannya Agar produk ini dapat berfungsi normal dalam jangka waktu yang panjang kami sangat merekomendasikan agar buku ini tidak saja menjadi pegangan Anda sebagai pembeli namun juga sebagai panduan bagi siapa saja yang menggunakan dan mengoperasikannya sehingga keawetan dan kualitas fungsionalnya lebih tahan lama Buku ini sangat disarankan untu...

Page 3: ...Kata Pengantar 1 Bagian 1 Nama nama Bagian 3 Bagian 2 Instalasi 3 Bagian 3 Cara Penggunaan 8 Bagian 4 Pemeliharaan 10 Bagian 5 Masalah Solusinya 11 Bagian 6 Spesifikasi 12 NOMOR 20 DJ ILMEA MG V 2000 728 ILMEA IX 2003 ...

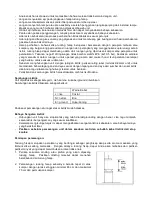
Page 4: ...ga Bersihkan tudung hisap sesuai petunjuk yang ada dalam buku ini dan hindarkan unit dari bahaya terbakar Dilarang memanggang langsung pada kompor gas Jagalah sirkulasi ruang dapur tetap baik Sebelum menghubungkan unit dengan sumber listrik pastikan kabel listrik dalam kondisi yang baik Jika terjadi kerusakan pada kabel listrik penggantian harus dilakukan oleh tenaga berkompeten atau hubungi Sentr...

Page 5: ...ingan listrik periksa rating label terletak didalam unit untuk memastikan bahwa tegangan dan daya sesuai dengan tegangan dan daya dari sumber dan soket listrik Jika Anda ragu silakan menghubungi teknisi untuk bantuan Perakitan dan sambungan listrik harus dilakukan oleh teknisi Modena Sambungan Listrik Unit diproduksi sebagai kategori I oleh karena itu kabel ground dibutuhkan Sambungan kelistrik di...

Page 6: ...ngalir ke satu sisi dan menetes keluar dari tudung hisap 4 Tempelkan template untuk memberi tanda pada plafon yang akan dipasang tudung hisap Buatkan lubang 17 cm untuk pipa extensible jika tudung hisap akan menggunakan sistim ducting exhaust Lubangi semua tanda yang ada pada template dengan menggunakan bor berdiameter 8 mm Kemudian pasang plat holder dengan dynabolt dan fischer Pasang 4 buah besi...

Page 7: ...erapat ke atas dan pasang pengait untuk menahan sementara 7 Pasang spigot dengan 4 buah sekrup 8 Pasang glass panel untuk tipe tertentu dengan 4 buah baut dan rubber ring serta atur posisinya secara tepat 9 Pasang bodi tudung hisap pada besi siku yang telah terpasang dengan 16 buah baut ...

Page 8: ...ui saluran pembuangan Diperlukan sistim ducting tahan panas api sebesar diameter 150 mm untuk membuang asap aroma melalui saluran keluar Beberapa hal yang perlu diperhatikan untuk pemasangan tudung hisap sistim ducting antara lain 1 Karbon filter harus dilepas hanya filter aluminium yang digunakan 2 Jika tudung hisap akan dipasang pada gedung bertingkat atau apartemen sebaiknya sebelum pemasangan ...

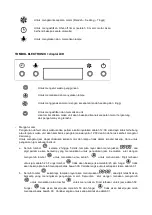
Page 9: ...p tidak boleh tertutup Hubungkan kabel power dengan stop kontak listrik Untuk menyalakan atau mematikan tudung hisap serta lampu tudung hisap dapat dengan cara menekan tombol pengatur kecepatan motor dan tombol penyalaan lampu seperti pada gambar di bawah ini Catatan Untuk pengaturan kecepatan motor tudung hisap disesuaikan dengan ketebalan asap uap yang timbul ketika memasak TOMBOL TEKAN PUSH BUT...

Page 10: ...m dapat dilakukan ketika motor dan lampu tidak dalam kondisi bekerja Cara untuk pengaturan jam sebagai berikut a Sentuh tombol selama 2 hingga 5 detik tampilan layar akan menunjukkan dua digit pertama akan berkedip yang menunjukkan untuk pengaturan jam Kemudian atur dengan menyentuh tombol untuk menaikkan atau sentuh untuk menurunkan Digit terbesar untuk jam adalah 23 Fungsi tombol tidak akan beke...

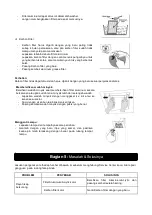
Page 11: ...ap MODENA dirancang secara khusus untuk pemakaian jangka waktu panjang sehingga tidak memerlukan perawatan yang rumit Namun ada beberapa hal yang dianjurkan untuk merawat tudung hisap Anda agar kualitasnya tetap terjaga Matikan unit dan lepas kabel power dari sumber listrik Membersihkan Kabinet Untuk membersihkan permukaan kabinet tudung hisap dari partikel partikel minyak yang menempel gunakan ka...

Page 12: ...wadah minyak saat membersihkan filter aluminum secara bersamaan atau jika sudah terisi minyak lebih dari setengah wadah Lepaskan wadah minyak dengan menggeser ke kiri atau ke kanan sesuai slot Cuci dengan air sabun lalu bilas dan keringkan Pasang kembali wadah minyak dengan posisi yang benar Mengganti Lampu Lepaskan lampu dari tempatnya secara perlahan Gantilah dengan yang baru tipe yang sama dan ...

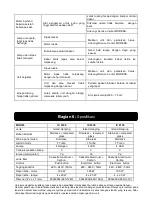
Page 13: ...9150 Jenis Island Hanging Island Hanging Island Hanging Bahan kabinet Stainless tempered glass Stainless tempered glass Stainless tempered glass Warna panel muka Stainless Stainless Stainless Jumlah motor 1 Turbo 1 Turbo 1 Turbo Lampu 4 Halogen 4 LED 4 LED Variasi kecepatan hisap 3 3 3 Ionizer Germinator Ya Ya Ya Jenis filter Cassette Aluminum Carbon Cassette Aluminum Carbon Cassette Aluminum Carb...

Page 14: ......

Page 15: ... this manual to facilitate the users In order for this product to perform normally for an extended period of time we highly recommend not only the buyer to hold onto this manual but also those who wish to operate the product optimally to maintain its service period and quality This manual is recommended for use by anyone who operates this product We also provide a customer care service for MODENA ...

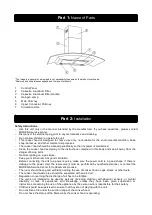
Page 16: ...CONTENTS PAGE Introduction 13 Part 1 Name of Parts 15 Part 2 Installation 15 Part 3 How to Use 20 Part 4 Maintenance 22 Part 5 Problem Solving 23 Part 6 Specification 24 ...

Page 17: ...urnt No direct grilling on a gas stove Keep your kitchen remains good circulation Before connecting the unit to a power source make sure the power cord is in good shape If there is damage to the power cord the replacement must be performed by qualified personnel or contact the MODENA Service Center for replacement process The room should have good ventilation during the use of cooker hood on gas s...

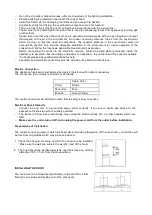
Page 18: ...able If in doubt please ask qualified electrician for help Assembly and electrical connections must be carried out by Modena technicians Electric Connection The appliance has been manufactured as class I therefore earth cable is necessary The connection to the mains is carried out as follows Cable Color L live Brown N neutral Blue E earth Green Yellow The cooker hood must be installed in order tha...

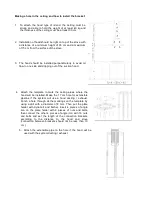
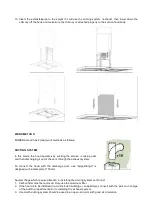
Page 19: ...he template to mark the ceiling areas where the hood will be installed Make the 17 cm hole for extensible pipeline if the system will use a hood ducting exhaust Punch a hole through all the markings on the template by using a drill with a diameter of 8 mm Then put the plate holder with dynabolt and fischer Insert 4 pieces of angle iron on the plate holder with 8 pieces of nuts and bolts then conne...

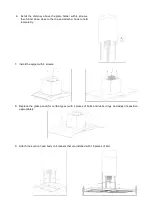
Page 20: ...the top and attach a hook to hold temporarily 7 Install the spigot with 4 screws 8 Replace the glass panel for certain types with 4 pieces of bolts and rubber rings and adjust its position appropriately 9 Attach the suction hood body on brackets that are installed with 16 pieces of bolt ...

Page 21: ...ng it out of the vent through the exhaust system To connect the hood with the discharge duct use spigot flange is designed with a diameter of 150 mm Several things which require attention in installing the ducting system vent hood 1 Carbon filter must be removed Only use the aluminum filter 2 If the hood is to be installed in a multi storied building or an apartment consult with the person in char...

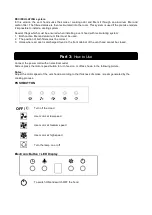
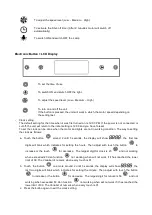
Page 22: ...2 The position of both filters must be correct 3 Holes where air duct is discharged found in the front cabinet of the vent hood cannot be closed Connect the power cord with an electrical outlet Slide or press the motor speed button to turn hood on or off as shown in the following picture Notes Adjust the motor speed of the vent hood according to the thickness of smoke steam generated by the cookin...

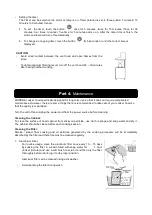
Page 23: ...he way to setting the clock as follows a Touch the button around 2 until 5 seconds the display will show the first two digits will blink which indicates for setting the hours Then adjust with touch the button to increase or the touch for decrease The largest digit for clock is 23 and not working when exceeded 23 dan function not working when will not work if it has reached the lower limit of 00 Th...

Page 24: ...maintenance However there are some things that are recommended to take care of your cooker hood so that the quality is maintained Turn the unit off and unplug the power cord from the power source before cleaning Cleaning the Cabinet To clean the surface of hood cabinet from sticky oil particles use cloth sponge and soap water and dry it The cabinet should be cleaned after each cooking session Clea...

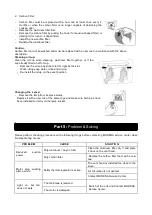
Page 25: ...d drying Re install the oil up on the exact position Changing the Lamp Remove the lamp from its place slowly Replace it with a new one of the same type and make sure both pins have been installed correctly on the lamp socket Please perform checking procedure on the following things before contacting MODENA service center when troubleshooting occurs PROBLEM CAUSE SOLUTION Reduced suction power Dirt...

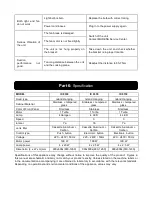
Page 26: ... Front Panel Stainless Stainless Stainless Motor 1 Turbo 1 Turbo 1 Turbo Lamp 4 Halogen 4 LED 4 LED Speed 3 3 3 Ionizer Ya Ya Ya Jenis filter Cassette Aluminum Carbon Cassette Aluminum Carbon Cassette Aluminum Carbon Control type Push button Electronic button Electronic button Voltage 220 240V 50Hz 220 240V 50Hz 220 240V 50Hz Motor power 190 W 190 W 190 W Lamp power 4 x 20 W 4 x 2 5 W 4 x 2 5 W Di...

Page 27: ......

Reviews: