background image


5.


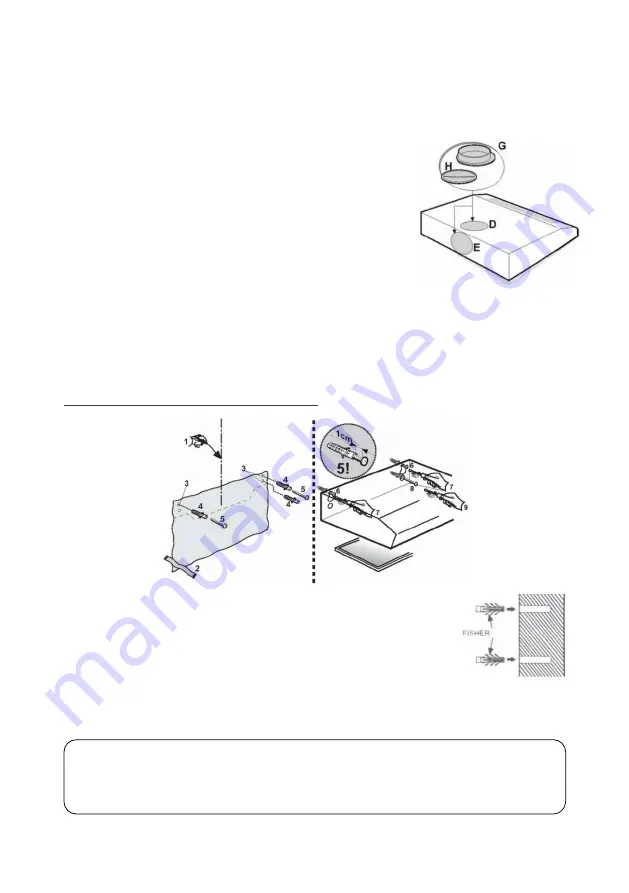
The exhaust hood has two holes on it: Hole D and Hole E (look at 
the picture). To install the spigot/flange and hole cover, follow 
these instructions: follow these instructions: 


For  ducting  /  exhaust  system: 

Install 

the spigot / flange G on one of the air 

holes,  either  D  or  E.  Holes  which  do 
not  have  spigot  /  flange  shall  be 
covered with Hole Cover H.


For  re-circulating  system: 

Both  air 

holes D  and E shall be  covered with 

the available plastic Hole Cover.


Installation of exhaust hood 

Exhaust hood can be installed on the concrete (brick) wall or the bottom 
part of the kitchen set.


Installing on concrete (brick) wall 


1.


Draw a centerline on the wall where the exhaust 
hood is to be installed (1).  

2.


Post a template for drilling on the wall (2). If no 
template  is  available,  attach  the  exhaust  hood 
on the wall and mark the spot on the wall where 
a hole is to be made.  

3.


Create holes on the four marks with a 6 mm diameter drill bit or 

fisher size (3), and then insert the fisher to the four holes (4). 


ATTENTION! 

Before drilling, make sure that there's no cable installation, water 
pipe and installation inside the wall. 

Summary of Contents for RX 7632

Page 1: ...1 User Manual Book Slim Hood Series RX ...

Page 2: ... 5 Installation on the bottom part of the kitchen set 6 Operating procedure 7 HOW TO USE 9 Touch button 9 MAINTENANCE 10 Cleaning the cabinet 10 Cleaning the filter 10 TROUBLESHOOTING 12 SPECIFICATION 13 This guide book explains everything you need to know about your new product Please contact our Customer Care should you need further assistance through www modena com ...

Page 3: ...3 1 Carbon Filter 2 Direction airflow 3 Control panel 4 Lamp 5 Aluminum filter 6 Filter holder FEATURES ...

Page 4: ...rface Installing the exhaust hood on the wall Exhaust hood must be installed perpendicularly to prevent the oil from flowing to one side and dripping out of the vent hood Preparations before installing the exhaust hood 1 Remove the exhaust hood from its packaging and put it on an even place e g Tables 2 Open the aluminum filter and then pull it Remove the spigot flange pipe connector and the hole ...

Page 5: ...r Installation of exhaust hood Exhaust hood can be installed on the concrete brick wall or the bottom part of the kitchen set Installing on concrete brick wall 1 Draw a centerline on the wall where the exhaust hood is to be installed 1 2 Post a template for drilling on the wall 2 If no template is available attach the exhaust hood on the wall and mark the spot on the wall where a hole is to be mad...

Page 6: ...the spigot falnge if the exhaust hood is to be operated as a ducting exhaust system Installation on the bottom part of the kitchen set 1 Put the exhaust hood on the bottom part of the kitchen set in accordance with the planned position 2 Mark the bottom part of the kitchen set for flexible pipe hole and then create a hole if the exhaust hood is to be operated with ducting exhaust system 3 Install ...

Page 7: ...diately discharged out of the room 2 The suction force will be diminished if the exhaust system is too long and there are too many elbows 3 Do not connect the exhaust system with a chimney or an air duct or hot steam duct 4 If the exhaust hood is to be installed in a multi storied building or an apartment consult with the person in charge of the building apartment prior to installing the exhaust s...

Page 8: ...f both filters must be correct 3 Holes where air duct is discharged found in the front cabinet of the exhaust hood cannot be closed Electricity Connection MODENA Exhaust Hood is designed for 220 Volt electricity input single phase with 50 Hz of frequency This appliance uses a double insulated power cord 2 parallel cords and should not be connected to a grounding wire ...

Page 9: ...n and hold for 3 second The digital display will be flashing and into 5 minutes countdown After 5 minutes the motor and the lamp will be turn off automatically the buzzer sound for 1 second HOW TO USE NOTES Adjust the motor speed of the vent hood according to the thickness of smoke steam generated by the cooking process ATTENTION Avoid direct contact between the vent hood and open flames from the ...

Page 10: ...erefore must be cleaned regularly Aluminum filter and metal filter For routine usage clean the aluminum filter once every 10 15 days by soaking the filter in a basin filled with soap water for 1 hour look at picture and use a soft brush to scrub it and then dry the filter throughly before returning it to its proper position Aluminum filter can be cleaned using a dishwasher Avoid bending the filter...

Page 11: ...11 Install the new carbon filter by putting it in position and rotating it clockwise ATTENTION Carbon filter cannot be washed and must be replaced with a new one upon its expiry ...

Page 12: ...utlet Connect the power cord to a properly functioning electrical outlet Reduced suction power Dirty aluminum filter Dirty carbon filter Clean the aluminum filter dry it and place it back on the vent hood Replace the carbon filter with a new one Motor fan malfunctioning Broken motor coil Contact MODENA Service Center Motor stops working after a while Safety thermal regulator is active The vent hoo...

Page 13: ...r Motor power 2 x 80 W 2 x 80 W Lamp power 2 x 1 5 W 2 x 1 5 W Product dimension L x D x H mm 895 x 480 x135 895 x 480 x135 Specifications of this appliance may change without notice to improve the quality of the product Figures in this manual are schematic and may not match your product exactly Values stated on the machine labels or in the documentation accompanying it are obtained in laboratory ...

Page 14: ...06 21 ...

Reviews: