background image

8  


INSTALLATION 

OPERATION 

Recessed Installation: 

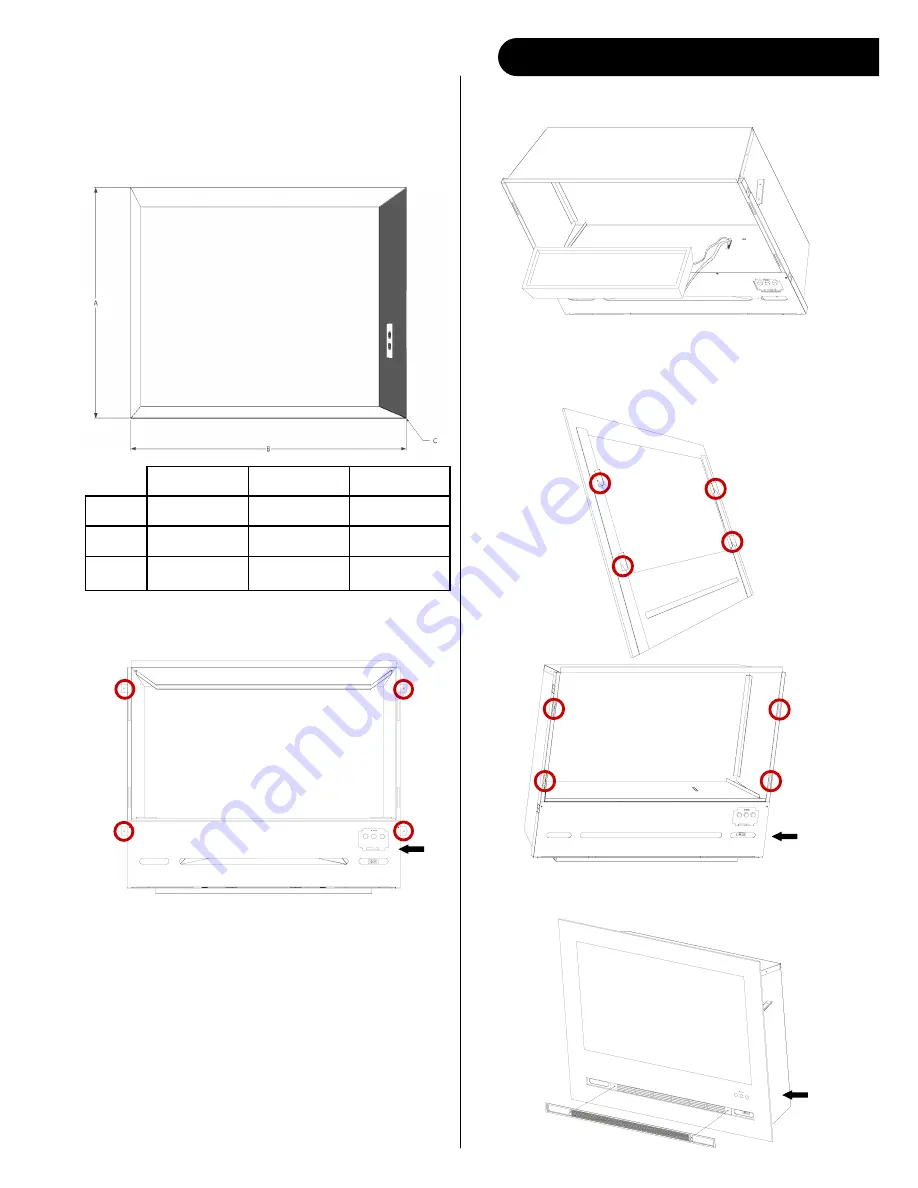
1. Prepare frame opening according to chart. 
Frame opening is slightly larger than the fire 
unit. 

2. Fold out the small tabs on the side of the 
fire unit. 

3. Secure fire unit to the finished framed 
opening with the provided large washer head 
screws. Make certain that at least 4 of the 
screws are driven in to a solid backing. 
Fireplace will stand proud of the finished wall 
opening by 3/8 of an inch. This is a semi-
permanent installation. Remove screws to 
relocate. 


4. Connect the fire feature to the inside of the 
fire unit. 

5. Hang the glass face on the fire unit. Make 
certain that the hooks from the on the 
backside of the glass face are secured in all 4 
slots on the fire unit. 


HF36 

27 1/4” H 

33” W 

12” D 

HF42 

27 1/4” H 

39” W  

12” D 

HF60 

27 1/4” H 

57” W 

12” D 

6. Install the grid in to the glass face. 

Power 
cord 

Power 
cord 

Power 
cord 

Summary of Contents for HF36CBI

Page 1: ...Home Fire CBI Electric Series HF36CBI HF42CBI HF60CBI INSTALLATION SERVICE INSTRUCTIONS FOR USE IN UNITED STATES AND CANDA ...

Page 2: ...ctric heaters have hot and arcing or sparking parts inside Do not use it in areas where gasoline paint or flammable liquids are or are stored This fireplace meets the construction and safety standards of H U D for application in manufactured homes when installed according to these instructions INSTALLER Leave this manual with the appliance CONSUMER Retain this manual for future reference ...

Page 3: ... or liquids are used or stored 10 Use this heater only as described in this manual Any other use not recommended by the manufacturer may cause fire electric shock or injury to persons 11 This heater includes a visual alarm to warn that parts of the heater are getting excessively hot If the alarm illuminates immediately turn TABLE OF CONTENTS Important Instructions 3 Power Data 4 Product Dimensions...

Page 4: ...or plug or after the heater malfunctions has been dropped or damaged in any manner Return heater to authorized service facility for examination electrical or mechanical adjustment or repair 13 This heater is not intended for use in bathrooms laundry areas and similar indoor locations Never locate heater where it may fall into a bathtub or other water container 14 Do not run cord under carpeting Do...

Page 5: ...5 BOX CONTENTS Home Fire 42 42 W x 28 1 2 H x 11 1 2 D Home Fire 60 60 W x 28 1 2 H x 11 1 2 D USER INSTRUCTIONS 1 Fire Unit 1 Glass Face 4 Large Washer Head Screws 1 Remote ...

Page 6: ...ed and protected 120 volt outlet Always use ground fault protection where required by the electrical code Never use an extension cord with this product WARNING Do not operate the unit if it is damaged or has malfunctioned If you suspect the unit is damaged return the unit to an authorized service facility for examination electrical or mechanical ad justment or repair LOCATING FIREPLACE CAUTION Do ...

Page 7: ...n that is not suscep tible to moisture and is a safe distance from drapes furniture and high traffic areas A qualified electrician should add an electrical outlet per local building codes See shaded area on recessed installation diagram for proper outlet placement Fireplace must be installed to a plumb vertical wall for cor rect operation of touch controls Note Follow all national and local electr...

Page 8: ...driven in to a solid backing Fireplace will stand proud of the finished wall opening by 3 8 of an inch This is a semi permanent installation Remove screws to relocate 4 Connect the fire feature to the inside of the fire unit 5 Hang the glass face on the fire unit Make certain that the hooks from the on the backside of the glass face are secured in all 4 slots on the fire unit A B C HF36 27 1 4 H 3...

Page 9: ...turns on this orange pilot lamp is always on It shows the fire is ener gized The status light above shows that the power is on and the heater is on low The status light above shows that the power is on and the heater is on high The included re mote functions in the same manner as the buttons on the main unit The HF CBI has a thermal safety cut out incorporated in the heater to prevent damage due t...

Page 10: ...ERVICE PARTS ITEM PHOTO COMMENTS MFPCB1 PRINTED CIRCUIT BOARD CONTROLS LOW VOLTAGE AND HIGH VOLTAGE FUNCTIONS MFTC1 LCD TOUCH CONTROL MFRR1 REMOTE CONTROL IR RECEIVER MF12VT1 TRANSFORMER MFHF12015 HEATER FAN 120 V 1500 WATTS ...

Page 11: ...MFSM120 SPINDLE MOTOR 120 V 50 60 HZ MFPHF36 LED LED LIGHT STRING HF36 MFPHF42 LED LED LIGHT STRING HF42 MFPHF60 LED LED LIGHT STRING HF60 MF PS1 POWER SWITCH MFR1 REMOTE CONTROL HFGLS36 GLASS FACE HF36 HFGLS42 GLASS FACE HF42 HFGLS60 GLASS FACE HF60 ...

Page 12: ...an will be able to adjust the touch screen sensi tivity Q Can the fireplace be installed outside A No Please review the entire safety chapter before installing this fireplace Q Does the fireplace need to be on a dedicated 15 amp circuit A Yes Q What thickness of sheetrock should be used for the recessed installation A 1 2 or 5 8 Q How often do the batteries in the remote need to be replaced A Annu...

Page 13: ...rrectly on pins B Fireplace was installed with the power in on position B Turn main power switch to the off position for 30 seconds Switch the fireplace back into the on position for 20 seconds for complete reboot of touch control C Not operating touch control properly with finger C Press flat part of finger firmly on the touch screen and apply moderate pressure D Loose connection on motherboard D...

Page 14: ... motor CLEANING AND MAINTENANCE INSTRUCTIONS There is very little maintenance involved with your electric fireplace Please follow the few points be low On a semi annual basis unplug the machine from it s power source and wait for the heating ele ment to cool dust the fire unit and glass face with a dry cloth Be careful not to brush any wires that may be exposed as you do this To clean the glass fa...

Page 15: ...15 MAINTENANCE NOTES ...

Page 16: ...16 2012 www modernflames com Please dispose of properly ...

Reviews: