background image

8  


OPERATION 

MAINTENANCE 

OPERATION 

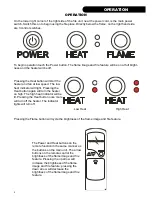
On the lower right corner of the right side of the fire unit, near the power cord, is the main power 
switch. Switch this on to begin using the fireplace. Directly below the flame, on the right hand side 
are 3 control switches. 

To begin operation touch the Power button. The flame image and fire feature will be on at full bright-
ness and the heater will be off. 

The Power and Heat buttons on the 
remote function in the same manner as 
the buttons on the main unit. The arrow 
buttons on the remote control the 
brightness of the flame image and fire 
feature. Pressing the up arrow will 
increase the brightness of the flame 
image and fire feature; pressing the 
down arrow will decrease the 
brightness of the flame image and fire 
feature. 

Pressing the Heat button will start the 
heater and fan at low speed. The low 
heat indicator will light. Pressing the 
Heat button again will turn the heater 
on high. The high heat indicator will be 
lit. Pressing the Heat button once more 
will turn off the heater. The indicator 
lights will turn off. 
 

Low Heat 

High Heat 

Pressing the Flame button will cycle the brightness of the flame image and fire feature.  

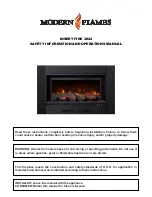
Summary of Contents for INSERT FIRE 3824

Page 1: ...perty damage WARNING All electric heaters have hot and arcing or sparking parts inside Do not use it in areas where gasoline paint or flammable liquids are or are stored This fireplace meets the construction and safety standards of H U D for application in manufactured homes when installed according to these instructions INSTALLER Leave this manual with the appliance CONSUMER Retain this manual fo...

Page 2: ...ock and injury to persons including the following 1 Read all instructions before installing or using this heater 2 This heater is hot when in use To avoid burns do not let bare skin touch hot surfaces Keep combustible materials such as furniture pillows bedding papers clothes and curtains at least 3 feet 0 9m from the front of the heater and keep them away from the sides and rear 3 Extreme caution...

Page 3: ...d in any manner Return heater to authorized service facility for examination electrical or mechanical adjustment or repair 13 This heater is not intended for use in bathrooms laundry areas and similar indoor locations Never locate heater where it may fall into a bathtub or other water container 14 Do not run cord under carpeting Do not cover cord with throw rugs runners or the like Arrange cord aw...

Page 4: ...4 BOX CONTENTS USER INSTRUCTIONS 1 Fire Unit 1 Remote PRODUCT DIMENSIONS Insert Fire 3824 Front View 29 W x 19 H x 10 1 2 D 29 10 1 2 19 Optional trim ...

Page 5: ...lt outlet Always use ground fault protection where required by the electrical code Never use an extension cord with this product WARNING Do not operate the unit if it is damaged or has malfunctioned If you suspect the unit is damaged return the unit to an authorized service facility for examination electrical or mechanical ad justment or repair LOCATING FIREPLACE CAUTION Do not locate in a moist r...

Page 6: ... high traffic areas A qualified electrician should add an electrical outlet per local building codes The included power cord is 73 1 2 inches long the outlet should be installed within 70 inches of the rear right corner of the fireplace Note Follow all national and local electrical codes WARNING If the fireplace has a gas line present a plumber or fireplace technician should cap the gas supply acc...

Page 7: ...t 2 Simply slide the fire unit in to your existing fireplace 3 Use the adjustable feet to adjust for the ash bed in some fireplaces INSTALLATION 4 If desired use the optional trim to trim your new fire place 5 To install the optional trim remove the 4 screws on the right and left side that hold on the glass face Index the elongated screw holes on the metal trim over the screw holes for the glass f...

Page 8: ... unit The arrow buttons on the remote control the brightness of the flame image and fire feature Pressing the up arrow will increase the brightness of the flame image and fire feature pressing the down arrow will decrease the brightness of the flame image and fire feature Pressing the Heat button will start the heater and fan at low speed The low heat indicator will light Pressing the Heat button ...

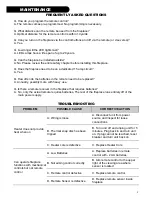
Page 9: ...eiver in the fireplace that requires batteries A No only the actual remote requires batteries The rest of the fireplace runs entirely off of the main power supply TROUBLESHOOTING PROBLEM POSSIBLE CAUSE CORRECTIVE ACTION A Wiring is loose A Disconnect unit from power source and inspect for loose connections Heater does not provide heat when on B Thermal snap disc has been tripped B Turn unit off an...

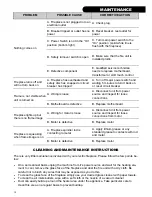
Page 10: ...eplace motherboard Fireplace lights up but there is no flame image A Wiring for motor is loose A Disconnect unit from power source and inspect for loose connections from motor B Motor is defective B Replace motor A Fireplace spindle rod is contacting to metal A Apply lithium grease or any standard grease to contacts with rod and metal Fireplace is squeaking when flame image is on B Motor is defect...

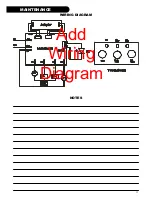
Page 11: ...11 MAINTENANCE WIRING DIAGRAM Add Wiring Diagram NOTES ...

Page 12: ...12 2013 www modernflames com Please dispose of properly ...

Reviews: