background image

15

MAINTENANCE

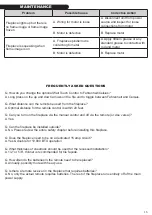
FREQUENTLY ASKED QUESTIONS

Q. How do you change the optional Wall Touch Control to Fahrenheit/Celsius?

A. Long press on the up and down arrows on the fire unit to toggle between Fahrenheit and Celsius.

Q. What distance can the remote be used from the fireplace?

A. Optimal distance for the remote control is within 20 feet.

Q. Can you turn on the fireplace via the manual control and off via the remote (or vise versa)?

A. Yes.

Q. Can the fireplace be installed outside?

A. No. Please review the entire safety chapter before installing this fireplace.

Q. Does the fireplace need to be on a dedicated 15 amp circuit?

A. Yes & double for 10,000 BTU operation

Q. What thickness of sheetrock should be used for the recessed installation?

A. 1/2” or 5/8”, thinner is recommended for tile façade.

Q. How often do the batteries in the remote need to be replaced?

A. Annually, possibly more with heavy use.

Q. Is there a remote receiver in the fireplace that requires batteries?

A. No, only the actual remote requires batteries. The rest of the fireplace runs entirely off of the main 

power supply.

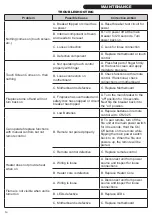
Problem

Possible Cause

Corrective Action

Fireplace lights up but there is 

no flame image or flame image 

frozen

A. Wiring for motor is loose

A. Disconnect unit from power 

source and inspect for loose 

connections from motor

B. Motor is defective

B. Replace motor

Fireplace is squeaking when 

flame image is on

A. Fireplace spindle/rod is 

contacting to metal

A. Apply lithium grease or any 

standard grease to contacts with 

rod and metal

B. Motor is defective

B. Replace motor

Summary of Contents for Landscape Pro Multiview LPM-4216

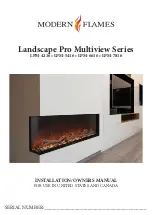
Page 1: ...SERIAL NUMBER ________________________________________ Landscape Pro Multiview Series LPM 4216 LPM 5416 LPM 6616 LPM 7816 INSTALLATION OWNERS MANUAL FOR USE IN UNITED STATES AND CANADA ...

Page 2: ...ulting in serious injury and or property damage WARNING All electric heaters have hot and arcing or sparking parts inside Do not use it in areas where gasoline paint or flammable liquids are or are stored This fireplace meets the construction and safety standards of H U D for application in manufactured homes when installed according to these instructions INSTALLER Leave this manual with the appli...

Page 3: ...8 To prevent a possible fire do not block air intakes or exhaust in any manner 9 A heater has hot and arcing or sparking parts inside Do not use it in areas where gasoline paint or flammable vapors or liquids are used or stored 10 Use this heater only as described in this manual Any other use not recommended by the manufacturer may cause fire electric shock or injury to persons 11 SAVE THESE INSTR...

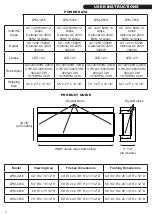
Page 4: ...0mA 3 0W 18 15RPM CCW AC120V 60Hz 40mA 3 7W AC100V 50Hz 40mA 3 0W 18 15RPM CCW AC120V 60Hz 40mA 3 7W AC100V 50Hz 40mA 3 0W 18 15RPM CCW AC120V 60Hz 40mA 3 7W AC100V 50Hz 40mA 3 0W 18 15RPM CCW Shipping Size 46 x 27 x 13 1 2 58 x 27 x 13 1 2 70 x 27 x 13 1 2 82 x 27 x 13 1 2 Model Viewing Area Firebox Dimensions Framing Dimensions LPM 4216 42 W x 15 1 2 H 44 W x 24 7 8 H x 11 1 2 D 44 1 4 W x 25 1 ...

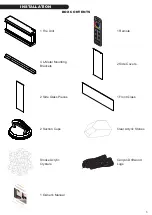
Page 5: ...TION BOX CONTENTS 1 Fire Unit 1 Remote 4 L Metal Mounting Brackets 2 Side Glass Pieces 2 Side Covers 1 Front Glass Clear Acrylic Stones Canyon Driftwood Logs 2 Suction Cups Smoke Acrylic Crystals 1 Owner s Manual ...

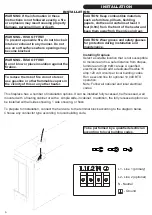
Page 6: ...protection during installation and maintenance Installing fireplace Select a suitable location that is not susceptible to moisture and is a safe distance from drapes furniture and high traffic areas A qualified electrician should add a dedicated flexible 15 amp 120 volt circuit per local building codes Run a second line for optional 10 000 BTU operation Note Follow all national and local electrica...

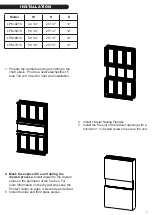
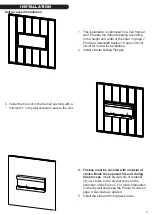
Page 7: ...olt circuit for hard wire installation 2 Install L Metal Nailing Flanges 3 Install the fire unit in the framed opening with a minimum 1 drywall screws to secure the unit 4 Mask the exposed fire unit during the drywall process Install drywall to the drywall stops on the perimeter of the fire box For more information on the drywall stops see the Product Guide on page 4 Decorate as desired 5 Install ...

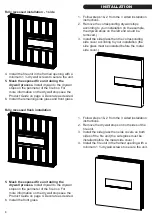
Page 8: ...wall to the drywall stops on the perimeter of the fire box For more information on the drywall stops see the Product Guide on page 4 Decorate as desired 6 Install the remaining side glass and front glass 1 Follow steps 1 2 from the 3 sided installation instructions 2 Remove the drywall stops on both sides of the fire unit 3 Install the side glass then side covers on both sides of the fire unit the...

Page 9: ... Install L Metal Nailing Flanges 3 Install the fire unit in the framed opening with a minimum 1 drywall screws to secure the unit 4 Firebox must be covered with material of choice Mask the exposed fire unit during this process Install drywall tile or material of your choice to the drywall stops on the perimeter of the fire box For more information on the drywall stops see the Product Guide on page...

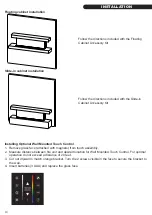
Page 10: ...nstalling Optional Wall Mounted Touch Control 1 Remove glass face attached with magnets from touch assembly 2 Measure distance between fire unit and desired location for Wall Mounted Touch Control For optimal operation do not exceed a distance of 20 feet 3 Cut out drywall to match orange bracket Turn the 2 screws visible in the face to secure the bracket to the wall 4 Insert batteries 3 AAA and re...

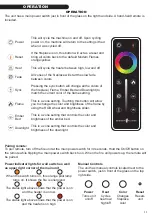
Page 11: ...controls the color and brightness of the downlight The unit has a main power switch just in front of the glass on the right hand side A hand held remote is included Power indicator lights for wall switch as well as upper right corner of the main unit When the switch turns on this orange pilot lamp turns on It shows the fire is energized The status light above shows that the power is on and the hea...

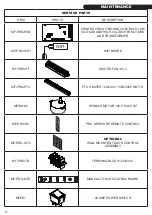
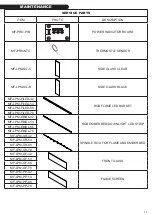
Page 12: ...NSFORMER MF PRO WIFI WIFI WIFI BOARD MF PRO HF HEATER FAN 120 V MF PRO PTC PTC HEATER 120 240 V 1500 3000 WATTS MFSM120 SPINDLE MOTOR 120 V 50 60 HZ MF PRO RC PRO SERIES RF REMOTE CONTROL MF PRO WTC OPTIONAL WALL MOUNTED TOUCH CONTROL ASSEMBLY MF PRO TB TERMINAL BLOCK 120 240 V MF PRO MTC MANUAL TOUCH CONTROL BOARD MFPS1 20 AMP POWER SWITCH ...

Page 13: ...42 RGB FLAME LED BAR SET MF LPM F LED 54 MF LPM F LED 66 MF LPM F LED 78 MF LPM EB DL 42 RGB EMBER BED DOWNLIGHT LED STRIP MF LPM EB DL 54 MF LPM EB DL 66 MF LPM EB DL 78 MF LPM SR 42 SPINDLE ROD FOR FLAME AND EMBER BED MF LPM SR 54 MF LPM SR 66 MF LPM SR 78 MF LPM GF 42 FRONT GLASS MF LPM GF 54 MF LPM GF 66 MF LPM GF 78 MF LPM PP 42 FLAME SCREEN MF LPM PP 54 MF LPM PP 66 MF LPM PP 78 ...

Page 14: ...ce has overheated and safety disc has snapped or circuit breaker has tripped A Turn the main breaker to the off position for 30 seconds Next flip the breaker back into the on position Can operate fireplace functions with manual controls but not remote control A Low Batteries A Replace batteries in remote control with CR2025 B Remote not paired properly B To pair remote turn off the fire unit at th...

Page 15: ...s of sheetrock should be used for the recessed installation A 1 2 or 5 8 thinner is recommended for tile façade Q How often do the batteries in the remote need to be replaced A Annually possibly more with heavy use Q Is there a remote receiver in the fireplace that requires batteries A No only the actual remote requires batteries The rest of the fireplace runs entirely off of the main power supply...

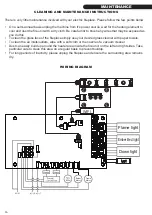
Page 16: ...be exposed as you do this To clean the glass face of the fireplace simply use your desired glass cleaner with paper towels To clean the air inlets outlets wipe with a soft cloth or the nozzle of a vacuum cleaner Dust can easily build up around the heater area inside the fire unit on the left and right sides Take particular care to clean this area on a regular basis to prevent buildup For long peri...

Page 17: ...17 MAINTENANCE NOTES ...

Page 18: ...18 MAINTENANCE NOTES ...

Page 19: ...19 MAINTENANCE NOTES ...

Page 20: ...20 2019 www modernflames com Please dispose of properly V1 ...

Reviews: