background image


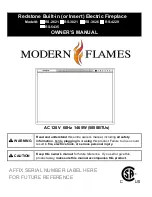
Redstone Built-in (or Insert) Electric Fireplace 

                 Model#:       RS-2621      RS-3021       RS-3626       RS-4229  
                                      RS-5435 

OWNER’S MANUAL 


AC 120V  60Hz  1465W (5000BTUs) 


WARNING


Read and understand

 this entire owner’s manual, including 

all safety 

information

, before

 plugging in

 or

 using

 this product. Failure to do so could 

result in 

fire, electric shock, or serious personal injury.


CAUTION


Keep this owner’s manual

 for future reference.  If you sell or give this 

product away, 

make sure this manual accompanies this product


AFFIX SERIAL NUMBER LABEL HERE 
FOR FUTURE REFERENCE 


Summary of Contents for RS-2621

Page 1: ...s entire owner s manual including all safety information before plugging in or using this product Failure to do so could result in fire electric shock or serious personal injury CAUTION Keep this owner s manual for future reference If you sell or give this product away make sure this manual accompanies this product AFFIX SERIAL NUMBER LABEL HERE FOR FUTURE REFERENCE ...

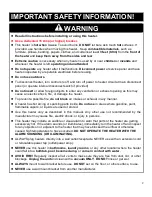
Page 2: ...kes or exhaust in any manner l A heater has hot arcing or sparking parts inside Do not use in areas where gasoline paint flammable vapors or liquids are used or stored l Use this heater only as described in this manual Any other use not recommended by the manufacturer may cause fire electric shock or injury to persons l This heater may include an audible or visual alarm to warn that parts of the h...

Page 3: ...it has not occurred with the use of other appliances iii During use check frequently to see if the plug outlet or face plate is HOT iv If the outlet or face plate is HOT discontinue use immediately and have a qualified electrician inspect and or replace the faulty outlets l SAVE THESE INSTRUCTIONS Preparation This product includes a GLASS panel Always use extreme caution when handling glass Failur...

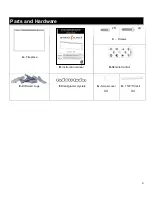
Page 4: ...4 Parts and Hardware A Fireplace x8 x4 C Screws B Instruction manual D Remote Control E Driftwood Logs F Small glacier crystals G Screw cover X4 H 1 5 8 Trim kit X4 ...

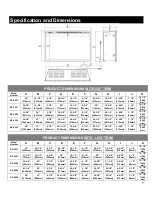
Page 5: ... 8 250mm 50 11 16 1288mm 32 5 8 829mm 9 1 4 234mm 50 3 4 1290mm 29 1 2 749mm 4 5 16 110mm 1 1 2 38mm 70 7 8 1800 mm PRODUCT DIMENSIONS WITH 1 5 8 TRIM Model Number A B C D E F G H I J K RS 2621 26 660mm 20 7 8 529mm 9 7 8 250mm 22 3 4 578mm 18 1 2 470mm 9 1 4 234mm 22 3 4 578mm 15 3 8 390mm 4 5 16 110mm 1 1 2 38mm 70 7 8 1800 mm RS 3021 31 1 4 793mm 20 7 8 529mm 9 7 8 250mm 28 710mm 18 1 2 470mm 9...

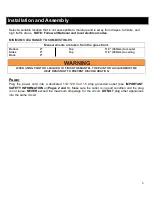
Page 6: ...des 0 Top 11 8 300mm to ceiling Back 0 WARNING WHEN USING PAINT OR LACQUER TO FINISH THE MANTEL THE PAINT OR LACQUER MUST BE HEAT RESISTANT TO PREVENT DISCOLOURATION Power Plug the power cord into a dedicated 110 120 Volt 15 Amp grounded outlet see IMPORTANT SAFETY INFORMATION on Pages 2 and 3 Make sure the outlet is in good condition and the plug is not loose NEVER exceed the maximum amperage for...

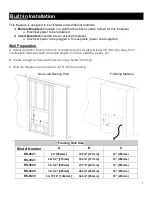
Page 7: ...ation that is not prone to moisture and is located at least 36 94 1cm away from combustible materials such as curtain drapes furniture bedding paper etc B Create a rough in frame with electrical see below framing C Hold the fireplace up to ensure it will fit into the framing Non Load Bearing Wall Finishing Material Framing Hole Size Model Number A B C RS 2621 23 584mm 18 3 4 477mm 10 254mm RS 3021...

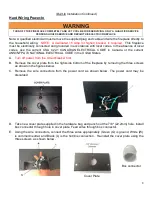
Page 8: ... from the right side bottom of the fireplace by removing the three screws as shown in the figures below C Remove the wire connectors from the power cord as shown below The power cord may be discarded D Take new cover plate supplied in the hardware bag and punch out the 7 8 22 2mm hole Install box connector through hole in cover plate Feed wires through box connector E Using the wire connectors con...

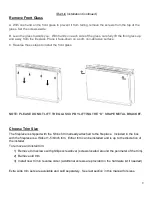
Page 9: ...LIFT THE GLASS UP BY LIFTING THE U SHAPE METAL BRACKET Choose Trim Size The fireplace is shipped with the 5 8inch trim already attached to the fireplace Included in the box with the fireplace is a thicker 1 5 8inch trim Either trim can be installed and is up to the discretion of the installer To remove and install trim 1 Remove trim screws with phillips screwdriver screws located around the perime...

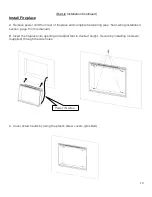
Page 10: ...e and complete hard wiring see hard wiring installation section page 8 in this manual B Insert the fireplace into opening and adjust feet to desired height Secure by installing 4 screws supplied through the side holes C Cover screw heads by using the plastic screw covers provided Power IN wires ...

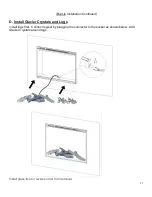
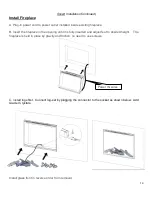
Page 11: ...ion Continued D Install Glacier Crystals and Logs Install logs first Connect log set by plugging the connector to the socket as shown below Add Glacier Crystals around logs Install glass front in reverse order from removal ...

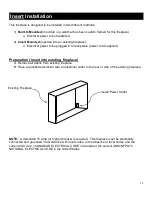
Page 12: ...eparation Insert into existing fireplace A Remove all debris from existing fireplace B Have a qualified electrician wire an electrical outlet to the rear or side of the existing fireplace NOTE A dedicated 15 Amp or higher breaker is required This fireplace must be electrically connected and grounded in accordance with local codes In the absence of local codes use the current CSA C22 1 CANADIAN ELE...

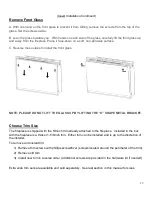
Page 13: ...LIFT THE GLASS UP BY LIFTING THE U SHAPE METAL BRACKET Choose Trim Size The fireplace is shipped with the 5 8inch trim already attached to the fireplace Included in the box with the fireplace is a thicker 1 5 8inch trim Either trim can be installed and is up to the discretion of the installer To remove and install trim 1 Remove trim screws with phillips screwdriver screws located around the perime...

Page 14: ...ireplace in the opening until it is fully inserted and adjust feet to desired height The fireplace is held in place by gravity and friction no need to use screws C Install logs first Connect log set by plugging the connector to the socket as shown below Add Glacier Crystals Install glass front in reverse order from removal Power IN wires ...

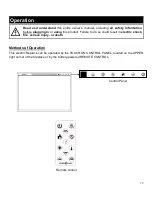
Page 15: ...n or using this product Failure to do so could result in electric shock fire serious injury or death Methods of Operation This electric fireplace can be operated by the TOUCH ON CONTROL PANEL located on the UPPER right corner of the fireplace or by the battery powered REMOTE CONTROL Control Panel Remote control ...

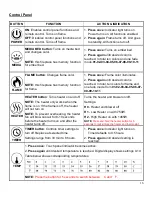
Page 16: ... mode from 01 02 03 04 05 06 07 08 09 10 11 HEATER HEATER button Turns heater on and off NOTE The heater only works when the flame is on If the flame is off the heater will not turn on NOTE To prevent overheating the heater fan will blow cool air for 8 10 seconds before the heater turns on and after the heater turns off Turns the heater and blower on off Settings H0 Heater and blower off H1 Low He...

Page 17: ...dium 03 fast 04 fastest 1 Press once Indicates current flame speed 2 Press again until desired setting is reached Display shows the setting The Default setting is 02 medium speed FLAME FLAME button Changes flame color NOTE this fireplace has memory function for flame 1 Press once Flame color illuminates 2 Press again until desired color is reached In total ten colors for flame and one fade mode fr...

Page 18: ...l display shows settings 0 10 Table below shows corresponding temperatures NOTE Press the button for 5 seconds to switch between C and F MEDIA MEDIA BED button Turns on media bed and changes color NOTE this fireplace has memory function for ember bed 1 Press once Turns on ember bed 2 Press again until desired color is reached In total ten colors and one fade mode 01 02 03 04 05 06 07 08 09 10 11 M...

Page 19: ... heater reach an unsafe temperature the heater will automatically turn OFF To reset 1 Remove the power from the fireplace Wait 5 minutes 2 Inspect the fireplace to make sure no vents are blocked or clogged with dust or lint If they are use a vacuum to clean the vent areas 3 Apply power to the fireplace 4 If the problem continues have your outlet and wiring inspected by a professional Remote Contro...

Page 20: ...ays or any cleaner that could scratch the surface Vents Use a vacuum or duster to remove dust and dirt from the heater and vent areas Plastic Wipe gently with a slightly damp cloth and a mild solution of dish soap and warm water NEVER use abrasive cleansers liquid sprays or any cleaner that could scratch the surface Maintenance Risk of electric shock DO NOT OPEN any panels No user serviceable part...

Page 21: ...in x 31 5 8in wide bottom trim TK RS 3726 RS 3021 5 inch 38in x 23 1 4in thin bottom trim 38in x 27 5 8in wide bottom trim TK RS 3824 8 inch 44in x 26 1 4in thin bottom trim 44in x 33 5 8in wide bottom trim TK RS 4427 RS 3626 4 inch 40 1 2in x 27 3 8in thin bottom trim 40 1 2in x 30 3 4in wide bottom trim TK RS 4128 6 inch 44 1 2in x 29 3 8in thin bottom trim 44 1 2in x 34 3 4in wide bottom trim T...

Page 22: ...22 ...

Page 23: ...p with installation product information or if your product arrives damaged please call our toll free number at 1 877 246 9353 Monday Friday 8 00AM 5 00PM AZ Mountain Time Or email us at customerservice modernflames com OUR STAFF IS READY TO PROVIDE ASSISTANCE ...

Reviews: