background image

SERIAL NUMBER:________________________________________

Sedona Pro Multi

SPM-2426/INT • SPM-3026/INT • SPM-3626/INT • SPM-4226/INT

WORLD INSTALLATION/OWNERS MANUAL

CE RATED FOR 220-240VAC 50/60HZ INSTALLATIONS

REV 20210127

Summary of Contents for Sedona Pro Multi

Page 1: ...NUMBER ________________________________________ Sedona Pro Multi SPM 2426 INT SPM 3026 INT SPM 3626 INT SPM 4226 INT WORLD INSTALLATION OWNERS MANUAL CE RATED FOR 220 240VAC 50 60HZ INSTALLATIONS REV 20210127 ...

Page 2: ...ious injury and or property damage WARNING All electric heaters have hot and arcing or sparking parts inside Do not use it in areas where gasoline paint or flammable liquids are or are stored This fireplace meets the construction and safety standards of H U D for application in manufactured homes when installed according to these instructions INSTALLER Leave this manual with the appliance CONSUMER...

Page 3: ...er 8 To prevent a possible fire do not block air intakes or exhaust in any manner 9 A heater has hot arcing or sparking parts inside Do not use in areas where gasoline paint or flammable vapors or liquids are used or stored 10 Use this heater only as described in this manual Any other use not recommended by the manufacturer may cause fire electric shock or injury to persons 11 SAVE THESE INSTRUCTI...

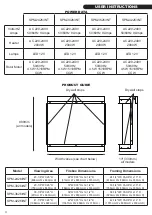
Page 4: ...nsions Framing Dimensions SPM 2426 INT 23 7 8 W X 26 H 606mm W x 660mm H 24 W X 35 H x 12 1 2 D 610mm W x 889mm H x 318mm D 24 1 4 W X 35 3 8 H x 13 D 616mm W x 899mm H x 330mm D SPM 3026 INT 29 7 8 W X 26 H 759mm W x 660mm H 30 W X 35 H x 12 1 2 D 762mm W x 889mm H x 318mm D 30 1 4 W X 35 3 8 H x 13 D 768mm W x 899mm H x 330mm D SPM 3626 INT 35 7 8 W X 26 H 911mm W x 660mm H 36 W X 35 H x 12 1 2 ...

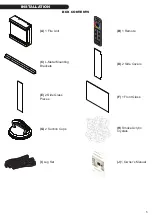
Page 5: ...INSTALLATION BOX CONTENTS A 1 Fire Unit B 1 Remote C L Metal Mounting Brackets E 2 Side Glass Pieces D 2 Side Covers F 1 Front Glass H Smoke Acrylic Crystals J 1 Owner s Manual G 2 Suction Cups I Log Set ...

Page 6: ...aust in any manner Do not use on soft surfaces where openings may become blocked WARNING RISK OF FIRE Do not blow or place insulation against the firebox To reduce the risk of fire do not store or use gasoline or other flammable vapors in the vicinity of this or any other heater CAUTION Keep combustible materials such as furniture pillows bedding papers clothes and curtains at least 3 feet 0 9m fr...

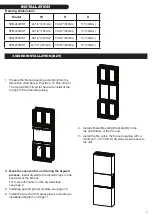
Page 7: ...nstall at the top right of the framed opening 2 Install L Metal Mounting Brackets C to the top and bottom of the fire unit 3 Install the fire unit in the framed opening with a minimum 1 1 4 32mm drywall screws to secure the unit 4 Mask the exposed fire unit during the drywall process Install drywall to the drywall stops on the perimeter of the fire box For more information on the drywall stops see...

Page 8: ...tallation diagram on Page 11 4 Install the fireplace in the framed opening with a minimum 1 1 4 32mm drywall screws to secure the unit 5 Mask the exposed fireplace during the drywall process Install drywall to the drywall stops on the perimeter of the fireplace For more information on the drywall stops see page 4 6 Install log set and glacier crystals see page 10 7 Install the front glass accordin...

Page 9: ...ounting holes located approximately 8 3 4 223mm from front surface 3 Install the fire unit in the framed opening with a minimum 1 1 4 32mm drywall screws to secure the fireplace 4 Mask the exposed fireplace during this process Install drywall tile or material of your choice to the drywall stops on the perimeter of the fireplace For more information on the drywall stops see page 4 5 Install log set...

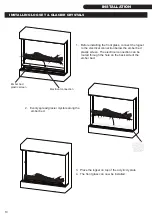
Page 10: ...tic screen The electrical connection can be routed through the hole on the back side of the ember bed 2 Evenly spread glacier crystals along the ember bed 3 Place the logset on top of the acrylic crystals 4 The front glass can now be installed INSTALLING LOG SET GLACIER CRYSTALS Electrical connection Ember bed plastic screen ...

Page 11: ...e glass back as far as it will go to make installation of the front glass easier See Figure 1 2 1 The unit has 2 channels on the top and bottom to hold the front glass 2 Using the included suction cups insert the glass at an angle into the top channel 3 Swing the bottom edge of the front glass into the unit See Figure 2 1 4 Slide the glass down in to the bottom channel See Figure 2 2 Figure 1 1 Fi...

Page 12: ...per left corner of the main unit When the switch turns on this orange pilot lamp turns on It shows the fire is energized The status light above shows that the power is on and the heater is on low The status light above shows that the power is on and the heater is on high Pairing remote wall mounted touch control 1 With the fireplace ON press and hold the Power button for about 3 seconds until you ...

Page 13: ... MF PRO HF INT HEATER FAN 220 240V MF PRO PTC INT PTC HEATER 220 240V 1000 2000 WATTS MFSM230 SPINDLE MOTOR 220 240V 50 60 HZ MF PRO RC PRO SERIES RF REMOTE CONTROL MF PRO WTC OPTIONAL WALL MOUNTED TOUCH CONTROL ASSEMBLY MF PRO TB TERMINAL BLOCK 120 240 V MF PRO MTC KEY K1 K2 K3 ON OFF HEAT DIM RESET SDSY BL RGB KEY 002 K4 MANUAL TOUCH CONTROL BOARD MFPS2 20 AMP POWER SWITCH ...

Page 14: ...S CLEAR MF SPM F LED 30 RGB FLAME LED BAR SET MF SPM F LED 36 MF SPM F LED 42 MF SPM EB DL 30 RGB EMBER BED DOWNLIGHT LED STRIP MF SPM EB DL 36 MF SPM EB DL 42 MF SPM SR 30 SPINDLE ROD FOR FLAME AND EMBER BED MF SPM SR 36 MF SPM SR 42 MF SPM GF 30 FRONT GLASS MF SPM GF 36 MF SPM GF 42 MF SPM PP 30 FLAME SCREEN MF SPM PP 36 MF SPM PP 42 ...

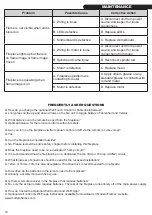
Page 15: ...eated and safety disc has snapped or circuit breaker has tripped A Turn the main breaker to the off position for 60 seconds Next flip the breaker back into the on position Can operate fireplace functions with manual controls but not remote control A Low Batteries A Replace batteries in remote control with CR2025 B Remote not paired properly B With the fireplace ON press and hold the Power button f...

Page 16: ...A Annually possibly more with heavy use Q Is there a remote receiver in the fireplace that requires batteries A No only the actual remote requires batteries The rest of the fireplace runs entirely off of the main power supply Q How do I install the Optional Wall Control and Wi Fi App A Optional wall control Wi Fi app instructions available for download on Modern Flames website www modernflames com...

Page 17: ...d dust the fire unit with a dry cloth Be careful not to brush any wires that may be exposed To clean the glass face of the fireplace simply use your desired glass cleaner with paper towels To clean the air inlets outlets wipe with a soft cloth or the nozzle of a vacuum cleaner Dust can easily build up around the heater area inside the fire unit on the left and right sides Particular care to clean ...

Page 18: ...18 MAINTENANCE NOTES ...

Page 19: ...toll free number at AUSTRALIA NEW ZEALAND 07 5630 6837 Monday Friday 9 00AM 4 00PM AEST Or email us at info modernflames com EUROPE 46 762 09 58 09 Monday Friday 9 00AM 4 00PM CEST Or email us at europe modernflames com NORTH AMERICA 1 877 246 9353 Monday Friday 8 00AM 5 00PM AZ MST Or email us at customerservice modernflames com OUR STAFF IS READY TO PROVIDE ASSISTANCE ...

Page 20: ... 2021 www modernflames com Please dispose of properly 20210127 ...

Reviews: