9
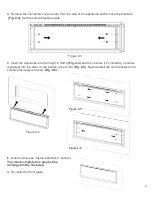
D. Remove the four screws (2 per side) from the side of the appliance and remove the brackets
(Fig. 2-3)
. Set the screw/brackets aside.
Figure 2-3
E. Insert the appliance into the rough-in frame
(Fig. 2-4)
and then secure it by installing 4 screws
(supplied) into the slots on the insides (2 per side)
(Fig. 2-5)
. Next reinstall the two brackets and 4
screws previously removed.
(Fig. 2-6)
.
Figure 2-4
F.
Install media (see “media installation” section).
You must complete this step before
moving onto the next step.
G. Re-install the front glass
Figure 2-5
Figure 2-6
Summary of Contents for SPS-100B-AU
Page 19: ...19 Spare Parts List ...

