FH-W1811-5
Aviator Flush Instructions 15
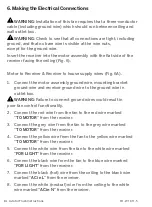
Follow the steps above to connect the fan to your household wiring. Use the plastic wire nuts with your fan.
Secure the plastic wire nuts with electrical tape. Make sure there are no loose strands or connections.
6
6A
1
2
1. Motor Assembly
2. Receiver
Black(Hot)
can be RED from Switch leg
Black(Line in H)
RED(to Motor)
GREEN(Ground)
BLUE (to Light)
BLACK (for Light)
GREEN(GND Must Use)
GREEN(Mounting Bracket Ground)
GREEN(Mounting Bracket Ground)
RED(to Motor)
GREY(to Motor)
WHITE(Neutral)
WHITE(to Light)
WHITE(Neutral)
GREY(to Motor)
YELLOW(to Motor)
WHITE(Line in N)
YELLOW(to Motor)
Outlet
Box
Receiver
Mounting
Bracket
Summary of Contents for Aviator 5 Flush
Page 1: ...Aviator 5 Flush Installation Instructions works with the Google Assistant ...
Page 13: ...FH W1811 5 Aviator Flush Instructions 13 3 4 3A 5 ...
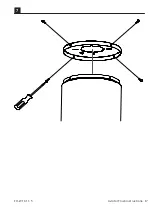
Page 17: ...FH W1811 5 Aviator Flush Instructions 17 7 ...
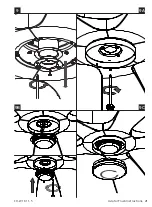
Page 21: ...FH W1811 5 Aviator Flush Instructions 21 9 9B 9C 9A ...
Page 27: ...FH W1811 5 Aviator Flush Instructions 27 ...
Page 34: ...FH W1811 5 Aviator Flush Instructions 34 ...
Page 35: ...FH W1811 5 Aviator Flush Instructions 35 ...
Page 36: ...modernforms com FH W1811 5 ...


