INSTALLATION
– Carel pAD Digital Wall Stat/Humidity Sensor
MCP15-542.0
3
Button Features
The pAD has several buttons to control certain functions.
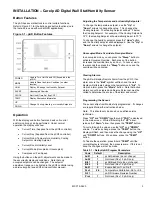
Refer to Figure 3.1 for the buttons and button functions (note
that not all are used with model MPR applications):
Figure 3.1
– pAD Button Features
POWER
Used to Turn Unit On and Off (if enabled in the
pCO3)
MODE
Used to Reset an Alarm Condition (no other
function)
HUM
Display & Change the Humidity Setpoint
SLEEP
Unoccupied Override
CLOCK
Not Used (Time Set By pCO3)
TEMP
Display Alternative Information
UP
Change Cooling, Heating, or Humidity Setpoints
DOWN
Operation
With the display and button features, basic unit control
and/or monitoring can be performed. Under normal
operation the display will show:
Current Time (Supplied from the pCO3 controller)
Current Day (Supplied from the pCO3 controller)
Current Room Temperature, Humidity, Cooling
Setpoint or Heating Setpoint.
Current Room Humidity Level
Current Mode (Occupied or Unoccupied)
Compressor / Fan Speed
Using the buttons on the pAD, adjustments can be made to
these currently displayed conditions. Note that only
occupied setpoints can be changed. The setpoint
adjustment range can be limited in the pCO3 controller using
a service keypad (see pCO3 microcontroller manual).
Adjusting the Temperature and/or Humidity Setpoints:
To change the temperature setpoint, use the
“Up”
or
“Down”
arrows to change the value. This changes the
Cooling Setpoint. The Heating Setpoint will be 4°F below
the Cooling Setpoint. For example, if the Cooling Setpoint is
74°F, the Heating Setpoint will automatically be set to 70°F.
To change the humidity setpoint, press the
“Hum”
button
and the Humidity setpoint will be displayed. Use the
“Up”
or
“Down”
arrows to change the setpoint.
Unoccupied Mode Override to Occupied Mode:
In unoccupied mode you can press the
“Sleep”
button to
activate Occupied Override. Each press of the button
increases the override time by an hour. To cancel, wait a
few seconds then press the
“Sleep”
button once and the
override will be canceled.
Clearing Alarms:
The pAD will display Remote Alarm from the pCO3, if an
alarm occurs the
“Bell”
symbol will flash and the main
display will alternate between the temperature &
“Alr”
. To
clear an alarm, press the
“Mode”
button. Note that active
alarms cannot be cleared and Service Personnel must be
called to determine the source of the alarm and correct.
Programming the Sensor:
The sensor ships from Modine fully programmed. If changes
are required follow the instructions below.
Note: This should only be done by a qualified service
technician.
Press
“UP”
and
“DOWN”
together until
“PAR”
is displayed
in the main screen. While still holding the
“UP”
arrow,
release the
“Down”
arrow,
then press the
“TEMP”
button.
To cycle through the values, use the
“UP”
and
“DOWN”
arrows. To make a change, press the
“TEMP”
button, the
display will flash, and then make the change using the
“UP”
and
“DOWN”
buttons. When done, press the
“TEMP”
button.
To finalize the operation, press & hold
“TEMP”
until the
normal display is returned, then press resume. If this is not
done the changes will not be made.
Table 3.1
– Default pAD Program Parameters
Code
Default
Description
Ad01
4
pLAN Address (do not change)
Ad02
1
Not Used (Rev 1.3 pAD only)
Br01
0
pLAN Baud Rate (do not change)
Br02
0
Not Used (Rev 1.3 pAD only)
En01
0
Enable Buzzer 1=on 0=off
Pco1
0.0
Temperature Calibration -9.9 to +9.9
Fr01
pAD Firmware Revision Number
Prot
1
Not Used (Rev 1.3 pAD only)


